Nextcloud
Installing Nextcloud manually. No turnkey Linux, no community script. We install Nextcloud manually. Step by step. Just like they used to do it in the old days. So you can understand why certain things work the way they do. You'll also learn something about Linux, which is a good thing.
- Part 1: Creating the VM and Installing Debian 13
- Part 2: Configuring IP, User Privileges, and the Second Data Disk
- Teil 3: Downloading, installing and configuring Nextcloud
- Part 4: Recommended Security Settings and System Hardening
Part 1: Creating the VM and Installing Debian 13
Objective of This Section
In this first part, we create a virtual machine in Proxmox and install a minimal Debian 13 system on it.
At the end of this section:
- Debian is running successfully inside the VM
- the system is accessible via console
- we are ready for network, storage, and Nextcloud setup
Prerequisites
Hardware Recommendations
- RAM: at least 4 GB (recommended: 8 GB)
- System Disk: at least 32 GB (SSD/NVMe recommended)
- Data Disk: separate HDD or SSD for Nextcloud data
- CPU: 2–4 cores
VM Parameters (Example)
- VM ID: 120
- vCPUs: 4
- RAM: 4 GB
- Root Disk: 32 GB
- Data Disk: 200 GB (later 250 GB)
- Mount Target (later):
/srv/cloud.zn80.net/data
Note:
The data disk is not used during the Debian installation,
but will be mounted separately at a later stage.
Required Credentials (Example)
⚠️ Note:
In a production environment, use secure, unique passwords
and store them in a password manager.
- root (VM)
- ncadmin (VM)
- Database User:
nextcloud - Nextcloud Admin:
nextcloud_admin
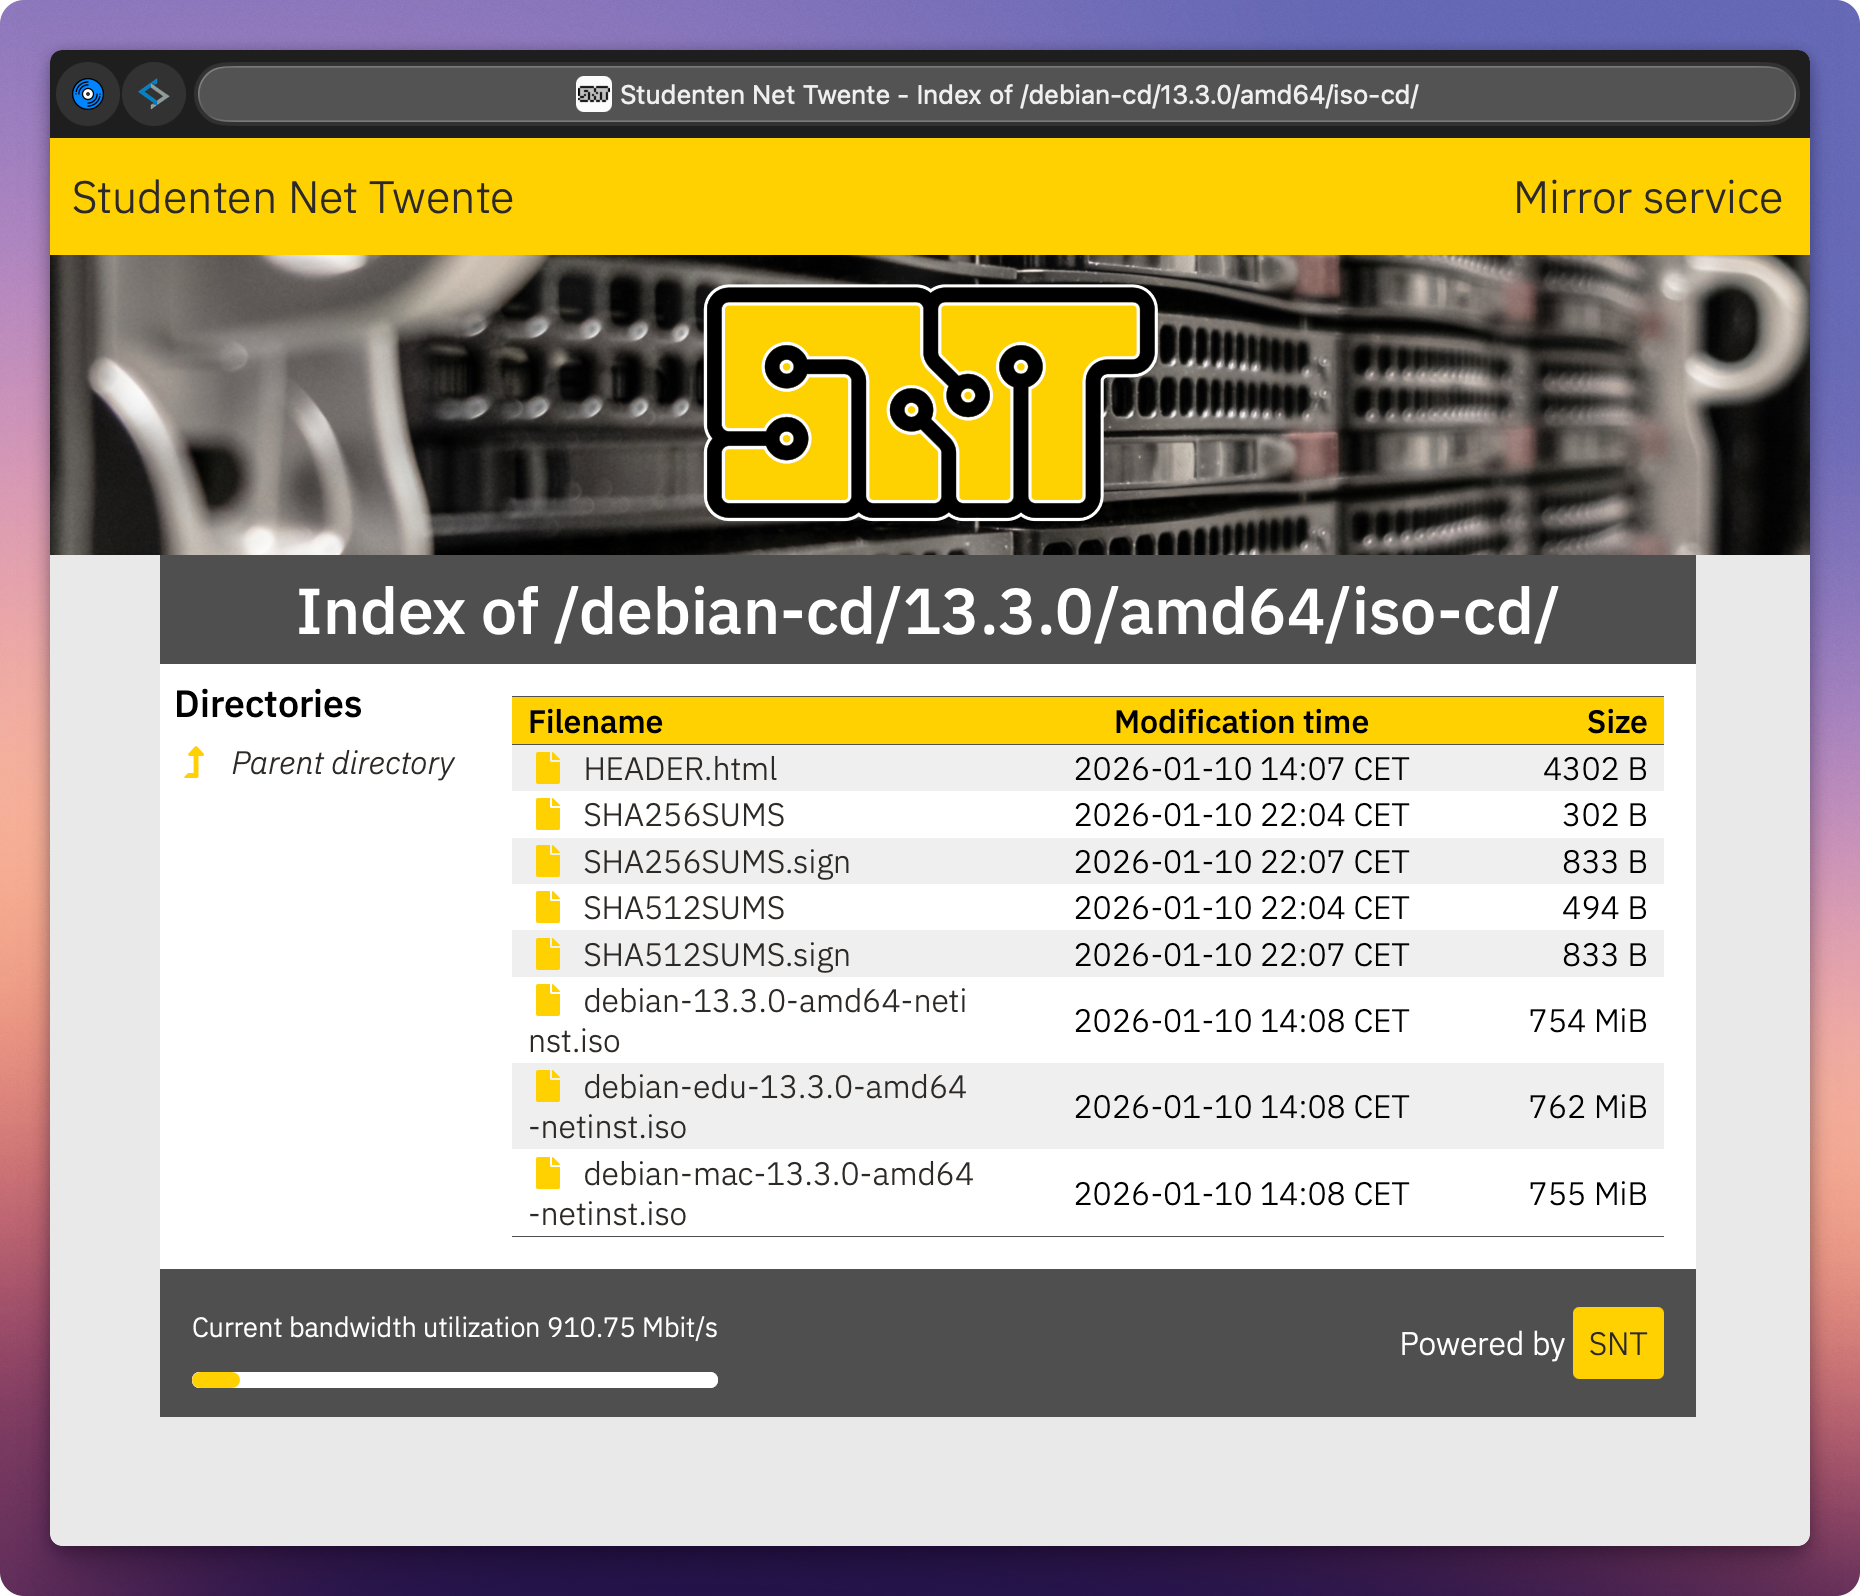
Debian Installation Medium
We use Debian 13 (amd64).
Download source (ISO): https://debian.snt.utwente.nl/debian-cd/13.3.0/amd64/iso-cd/
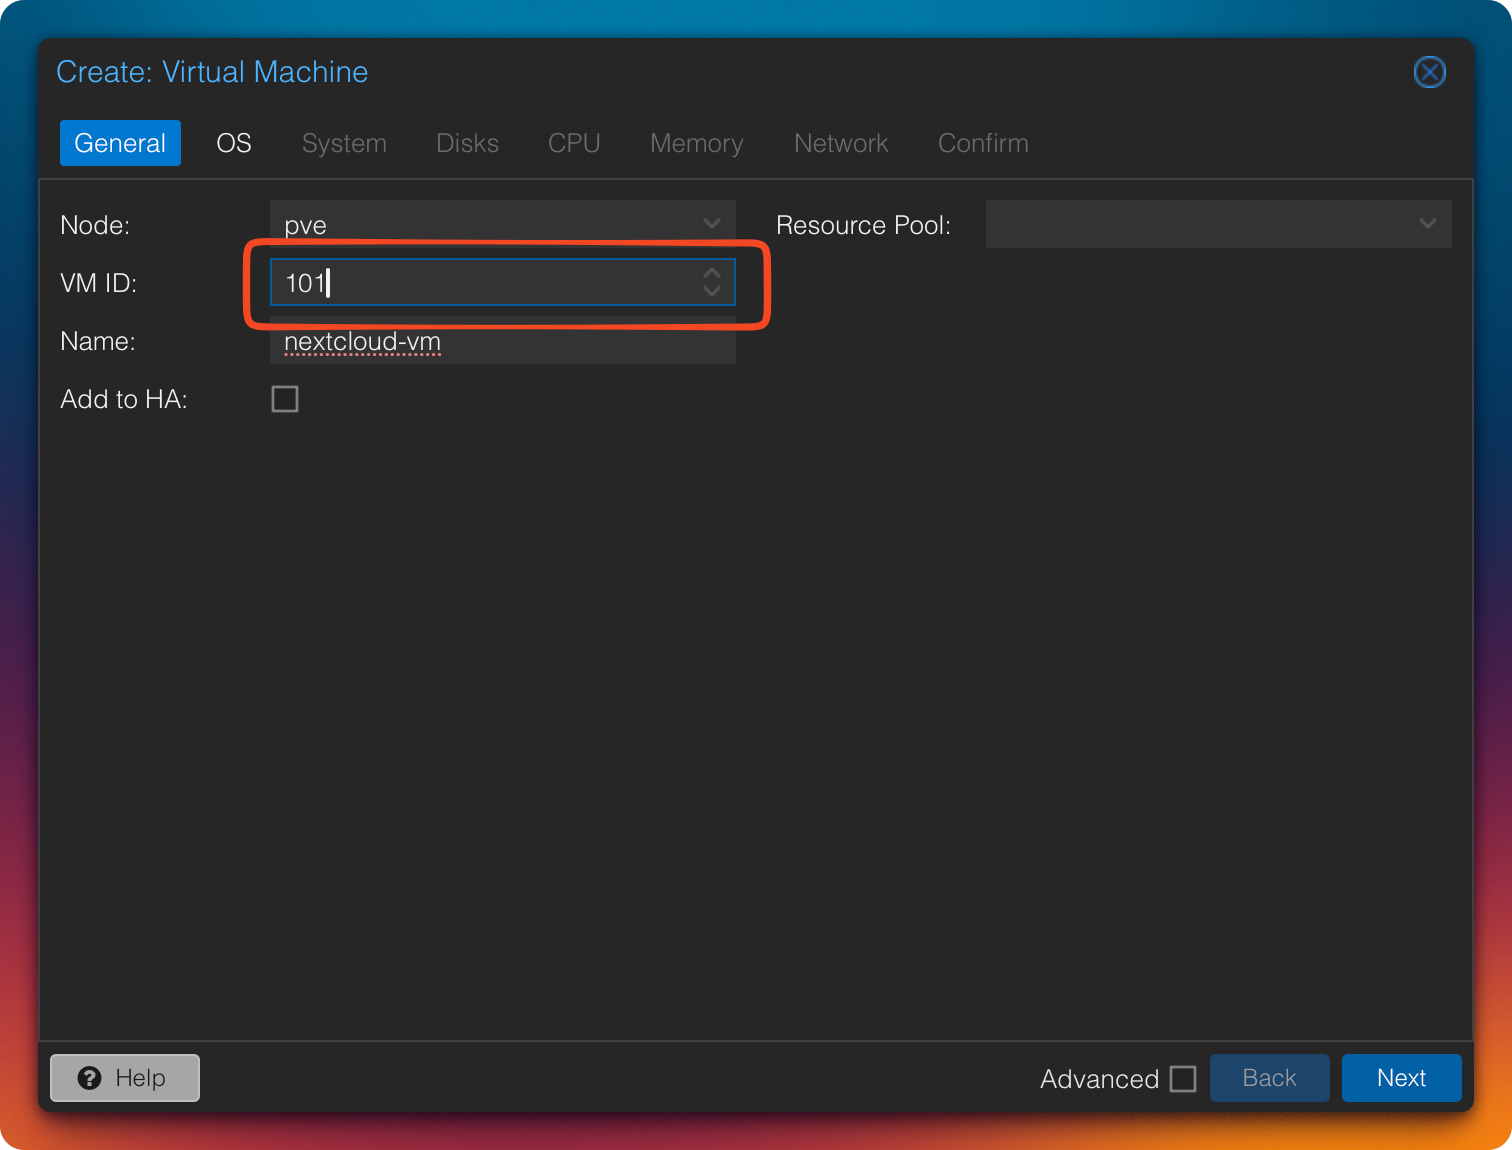
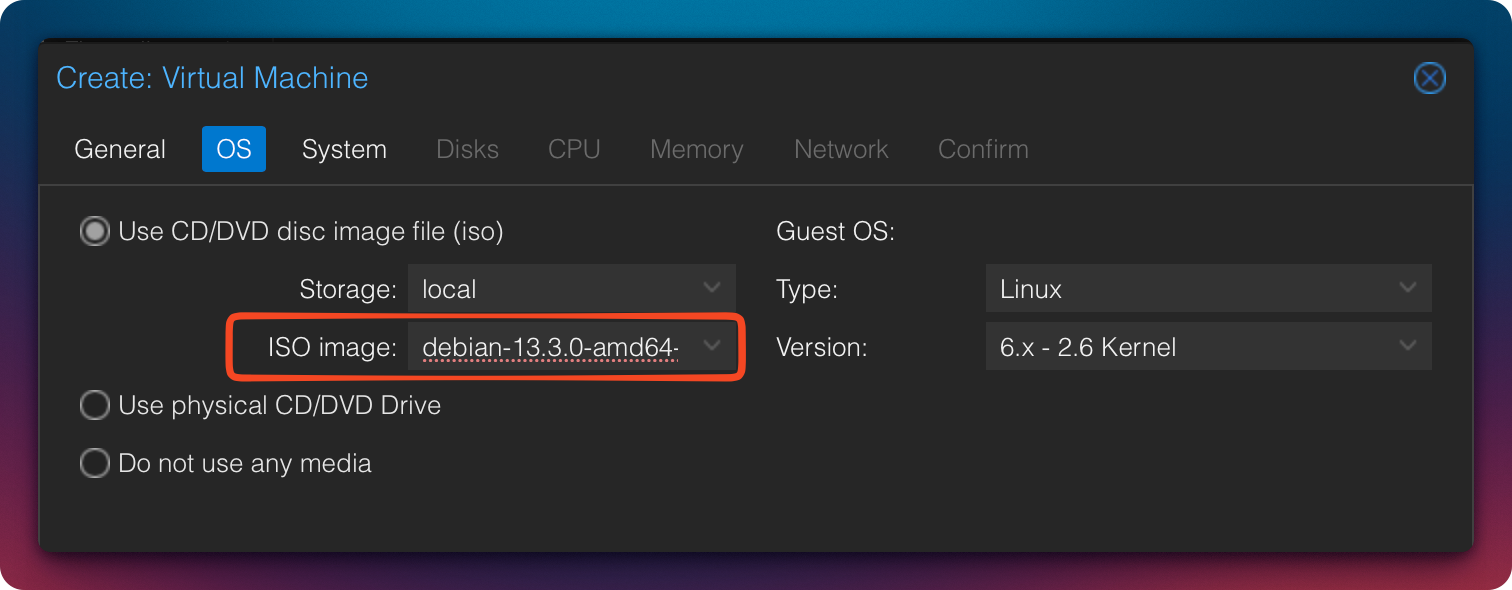
Step 1: Create the VM in Proxmox
- Create a new VM
- Assign the desired VM ID
- Select the previously downloaded Debian ISO
Step 2: VM System Configuration
Machine Type and Agent
-
Machine:
q35
→ modern CPU features such as improved PCIe, NVMe, and hardware emulation support -
QEMU Guest Agent: enable
→ improved status reporting and clean shutdown functionality
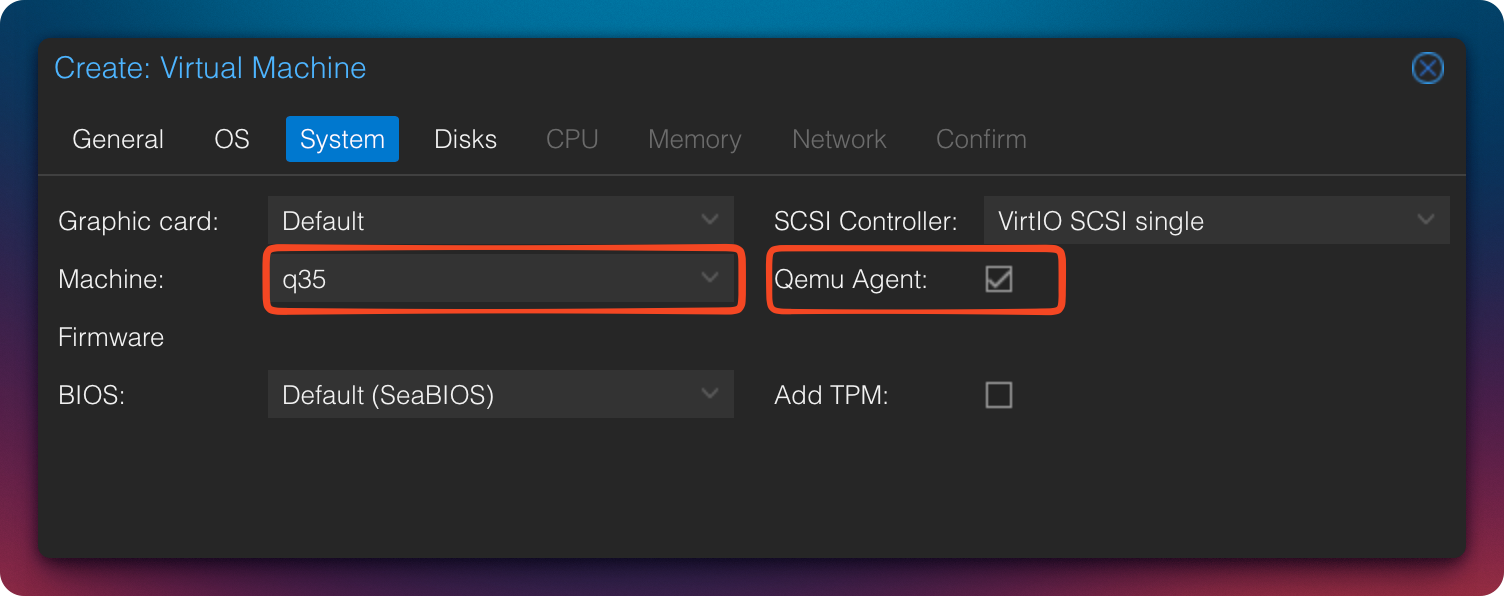
Why q35 instead of i440fx:
The q35 machine type emulates a modern Intel chipset with native PCIe support. This enables proper PCIe passthrough (e.g., for GPUs or NVMe devices), AHCI controllers, and vIOMMU emulation. Compared to the legacy i440fx, it is significantly better suited for modern guest systems and extensions.
QEMU Guest Agent:
The QEMU Guest Agent is a small daemon running inside the guest system that enables direct communication with Proxmox. It allows clean shutdowns (instead of ACPI force-off), freezes file systems before snapshots/backups (ensuring consistency), and provides accurate status information such as IP addresses and memory usage.
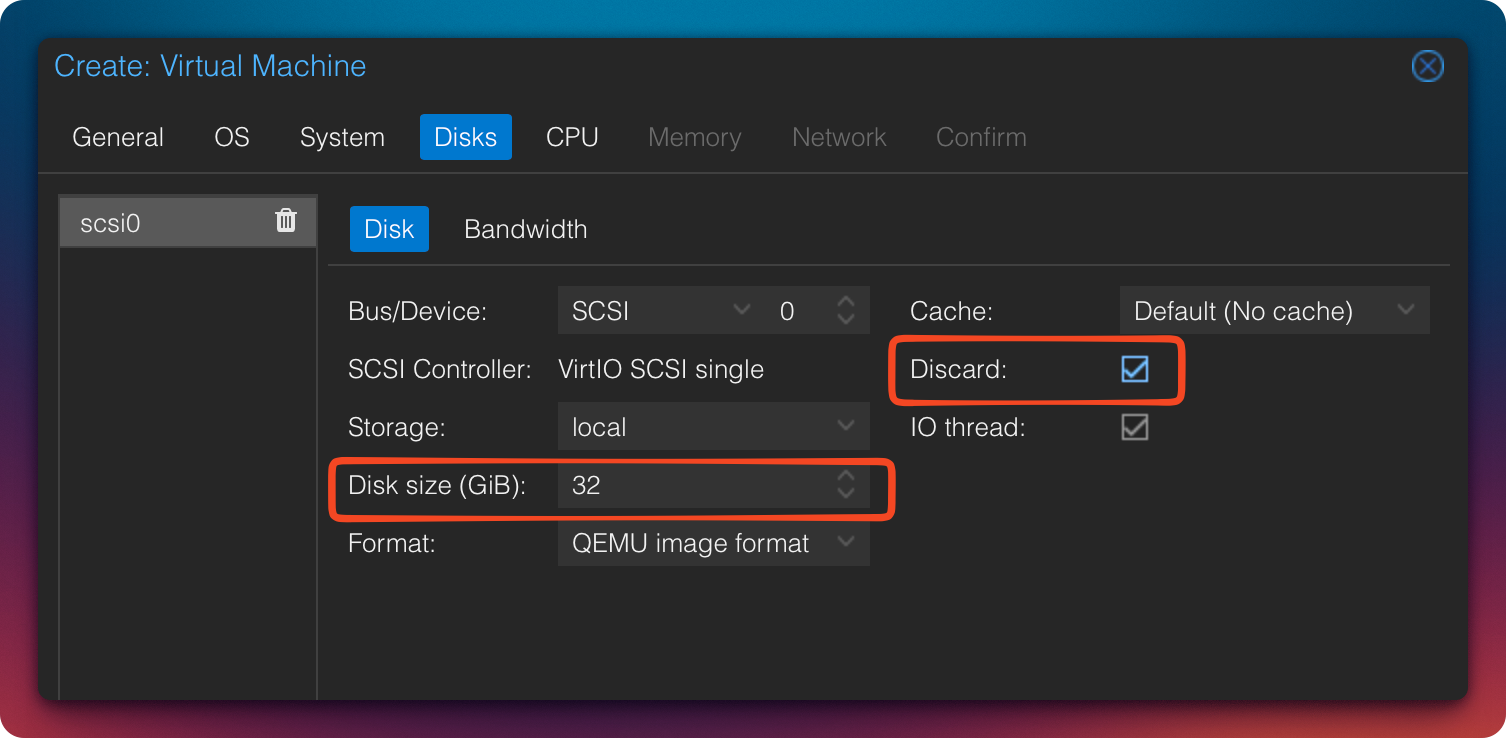
Configure the System Disk
- Disk Size: 32 GB
- Cache: Default
- Discard: Enable
(only relevant for SSD/NVMe)
Add Second Disk (Data)
We now add a second disk, which will later be used exclusively for Nextcloud data.
- Size: e.g., 200 GB
- Storage: according to your infrastructure
- Discard: enable (for SSD/NVMe)
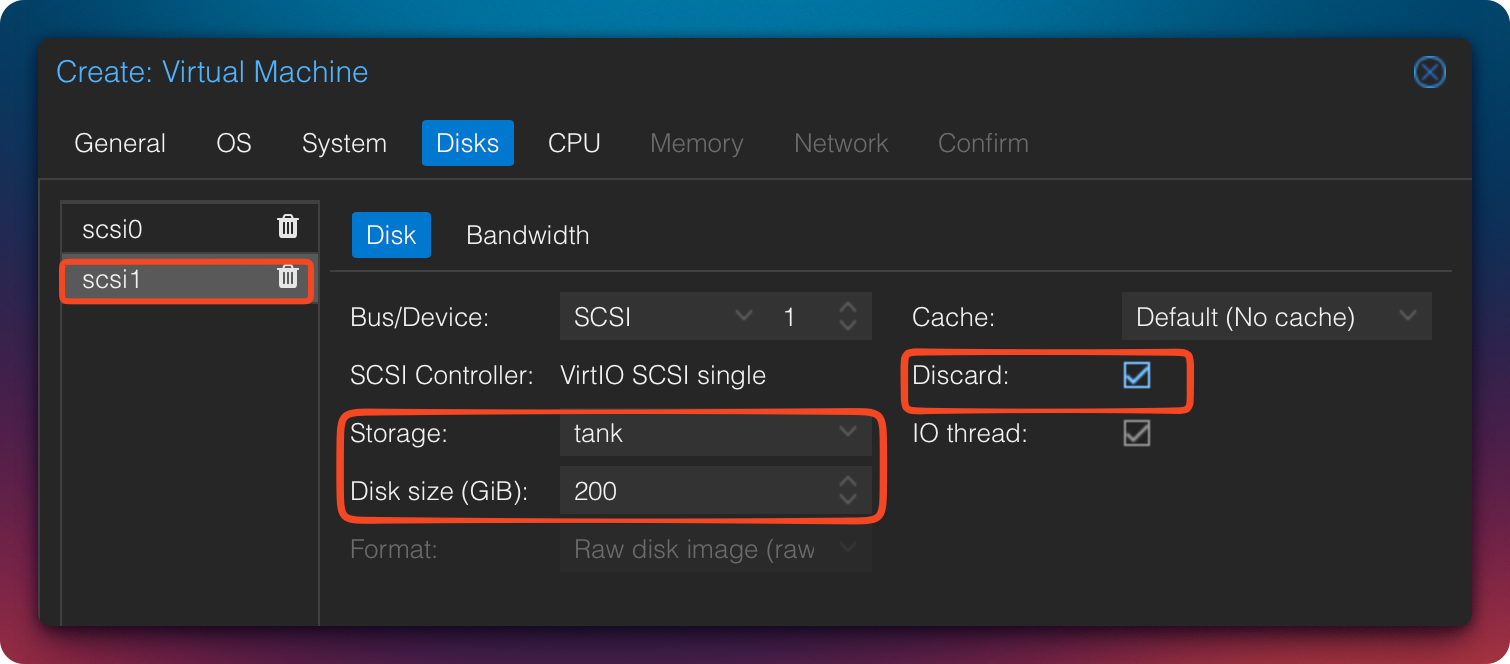
We deliberately start the data disk at 200 GB. It can later be expanded easily in Proxmox and within the guest system to demonstrate dynamic storage growth in a homelab environment.
CPU Configuration
-
Cores: 4
(2 are sufficient for small setups) -
Type:
host
→ exposes all CPU features to the VM
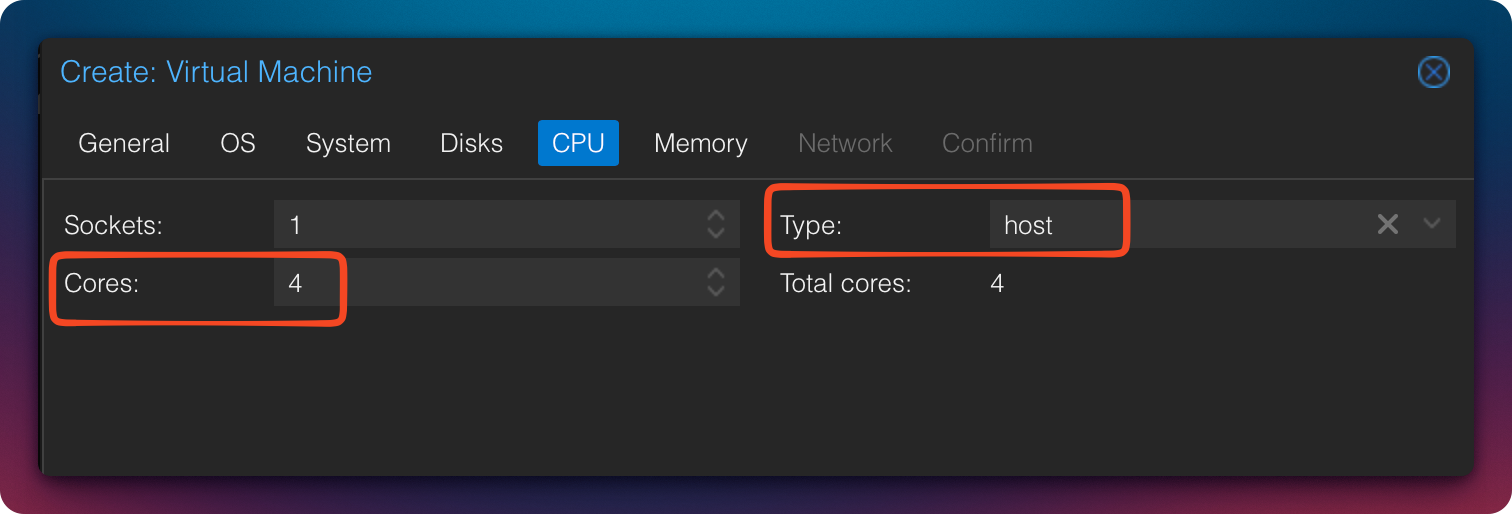
Why host:
The CPU type host passes all features and extensions of the physical host CPU (e.g., AVX, AES-NI) directly to the VM. This provides maximum performance. However, it is only recommended if you do not plan live migration between hosts with different CPU types, as this can cause migration failures.
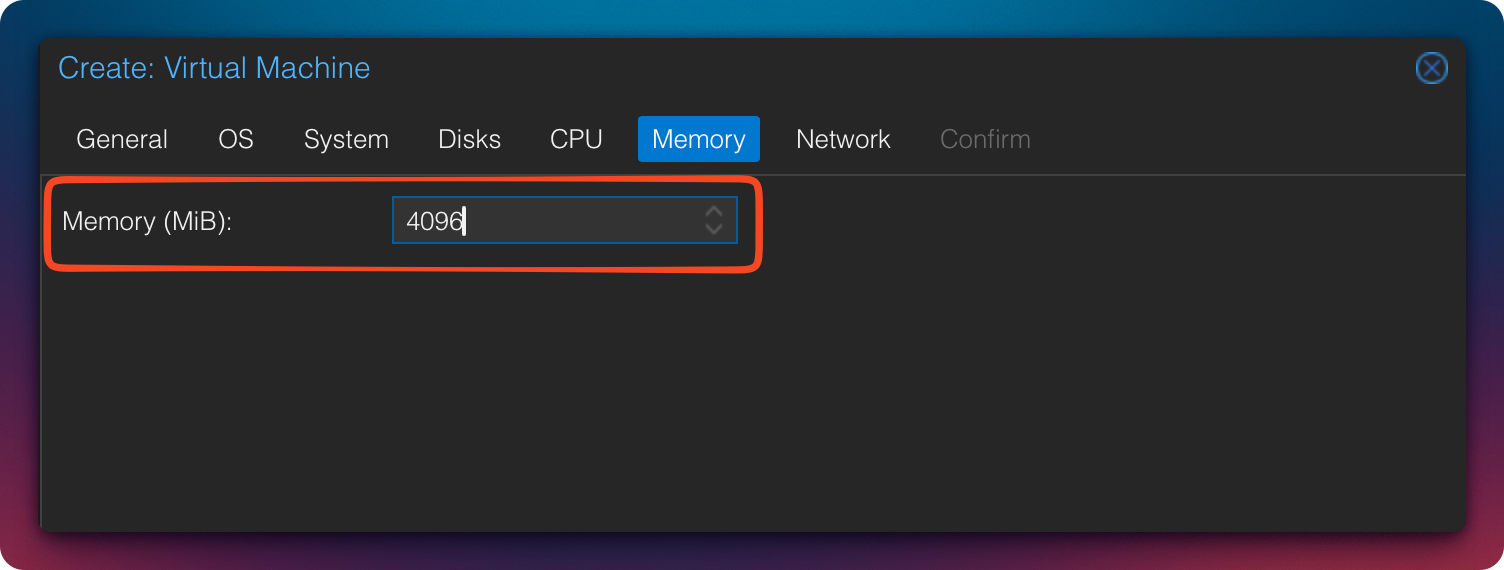
Memory
- Minimum: 2 GB (functional)
- Recommended: 4 GB
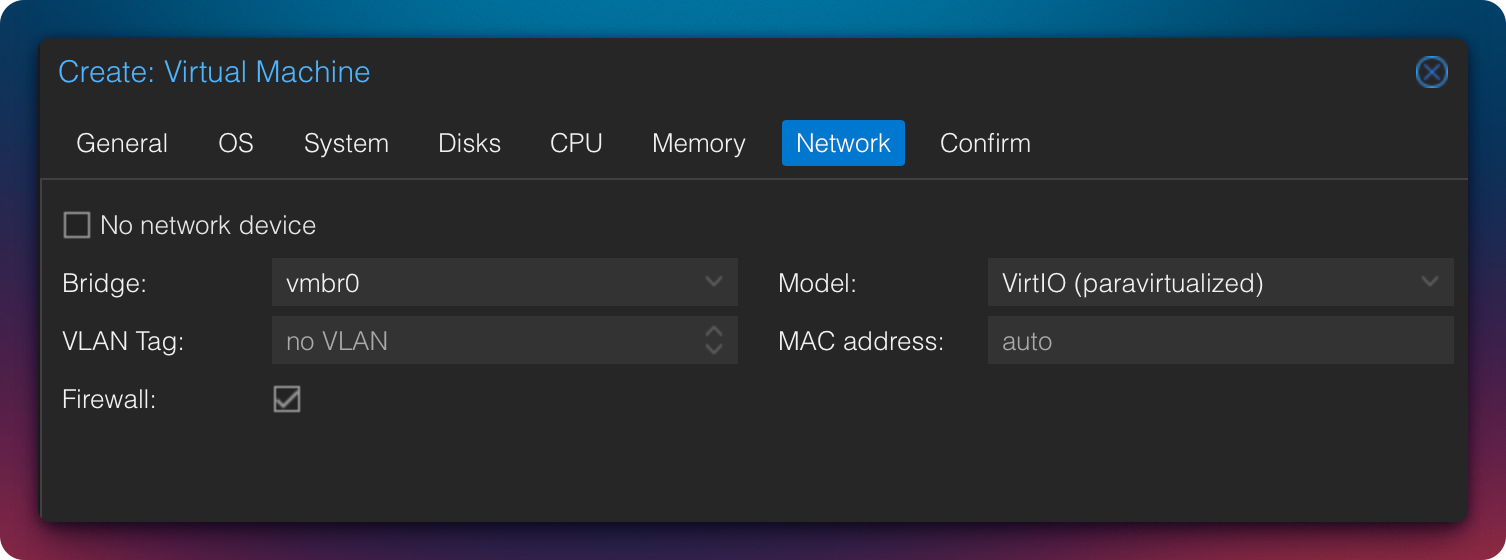
Network
The default network configuration can remain unchanged.
Review Configuration
If everything is configured correctly, the VM summary should look similar to this.
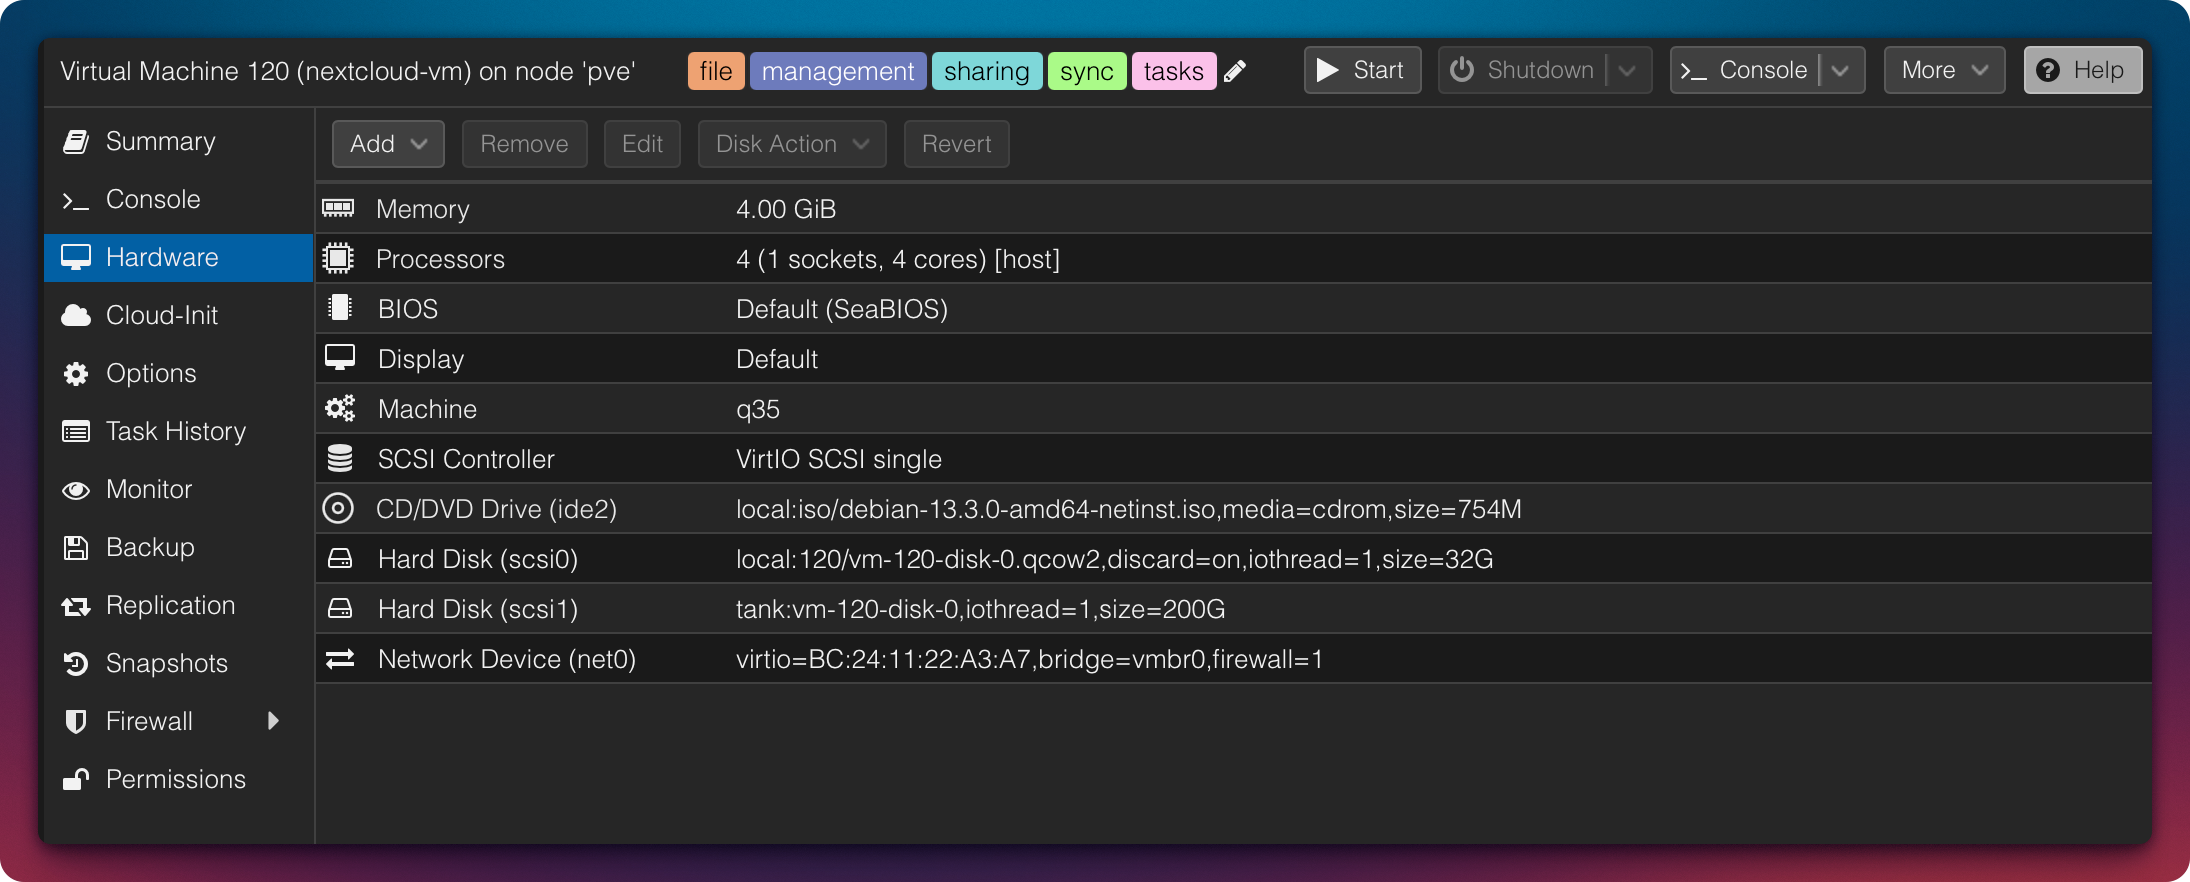
Now start the VM and begin the Debian installation.
Step 3: Install Debian
Language & Region
To select Germany:
OtherEuropeGermany
The keyboard layout can then be accepted as proposed.
Hostname & Domain
- Hostname: e.g.,
ncorcloud - Domain: either public or internal
(e.g.,intranet.zuhause.deorexample.org)
In this example, I chose:
cloudzn80.net
Set Root Password
Assign a strong root password.
Since direct SSH login as root poses a security risk, we will disable this capability after installation.
Create a Regular User
In addition to the root user, we require a regular user account.
In this example, the username is ncadmin. Assign a strong password here as well.
Partitioning
- Guided – use entire disk
- Important: select the small 32 GB disk
(usually/dev/sda) - All files in one partition
Then write the changes to disk.
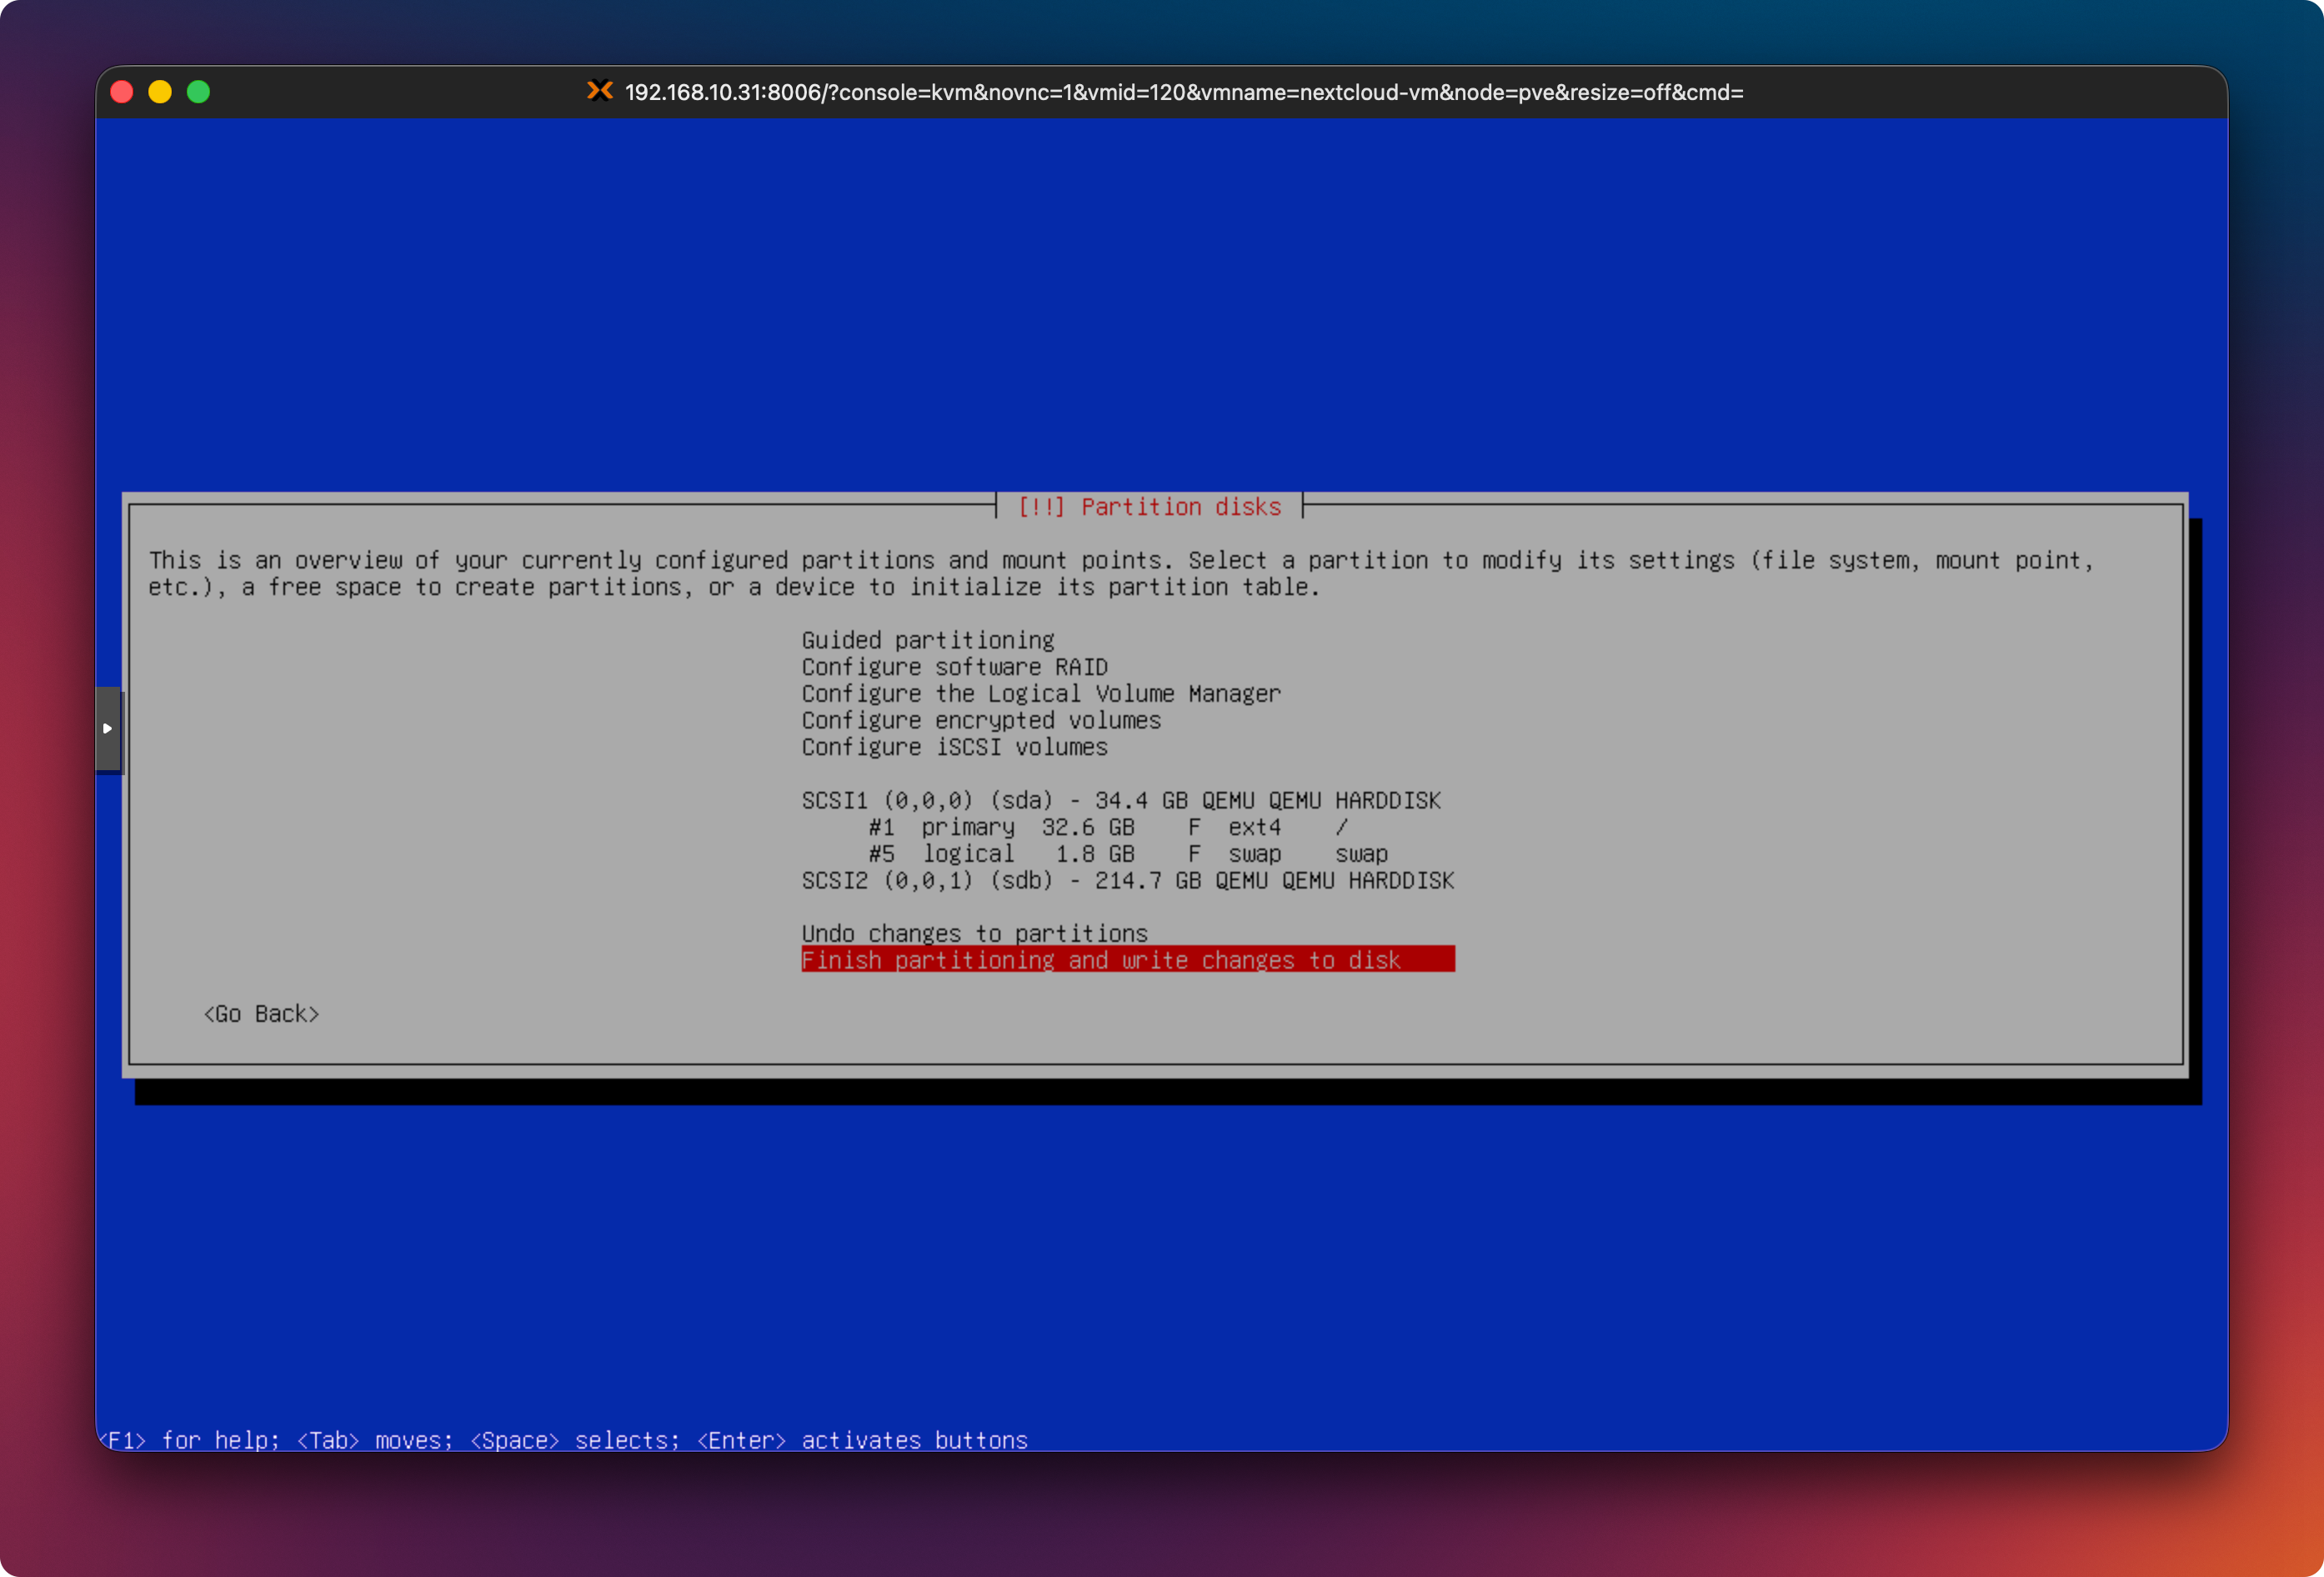
Partitioning Notes
During Debian installation, the commonly selected option is
“Guided – use entire disk.”
An alternative is:
“Guided – use entire disk and set up LVM.”
This creates Logical Volume Manager (LVM) volumes, allowing more flexible resizing of partitions (especially the root filesystem) later without repartitioning the disk.
Swap Area
Regardless of the partitioning method, a swap partition or swap file should be configured. In the screenshot above, a 1.8 GB swap partition is shown.
Typical guidelines:
- At least 2–4 GB swap for low-RAM systems
- For systems with ≤ 8 GB RAM, swap equal to RAM (1:1) is often recommended
- With large amounts of RAM (> 16–32 GB), significantly less swap (2–8 GB) or a swap file is usually sufficient
Package Sources & Updates
- Additional media: No
- Debian mirror:
- Country: Germany
- Mirror:
deb.debian.org
- Proxy: No
- Participate in package usage survey: No
Software Selection
We install no desktop environment.
- ❌ Debian Desktop Environment
- ❌ GNOME
- ✅ SSH Server
The web server will be installed manually later.

Bootloader
- Install GRUB to:
/dev/sda
(SCSI-0)
The Debian installation is now complete.
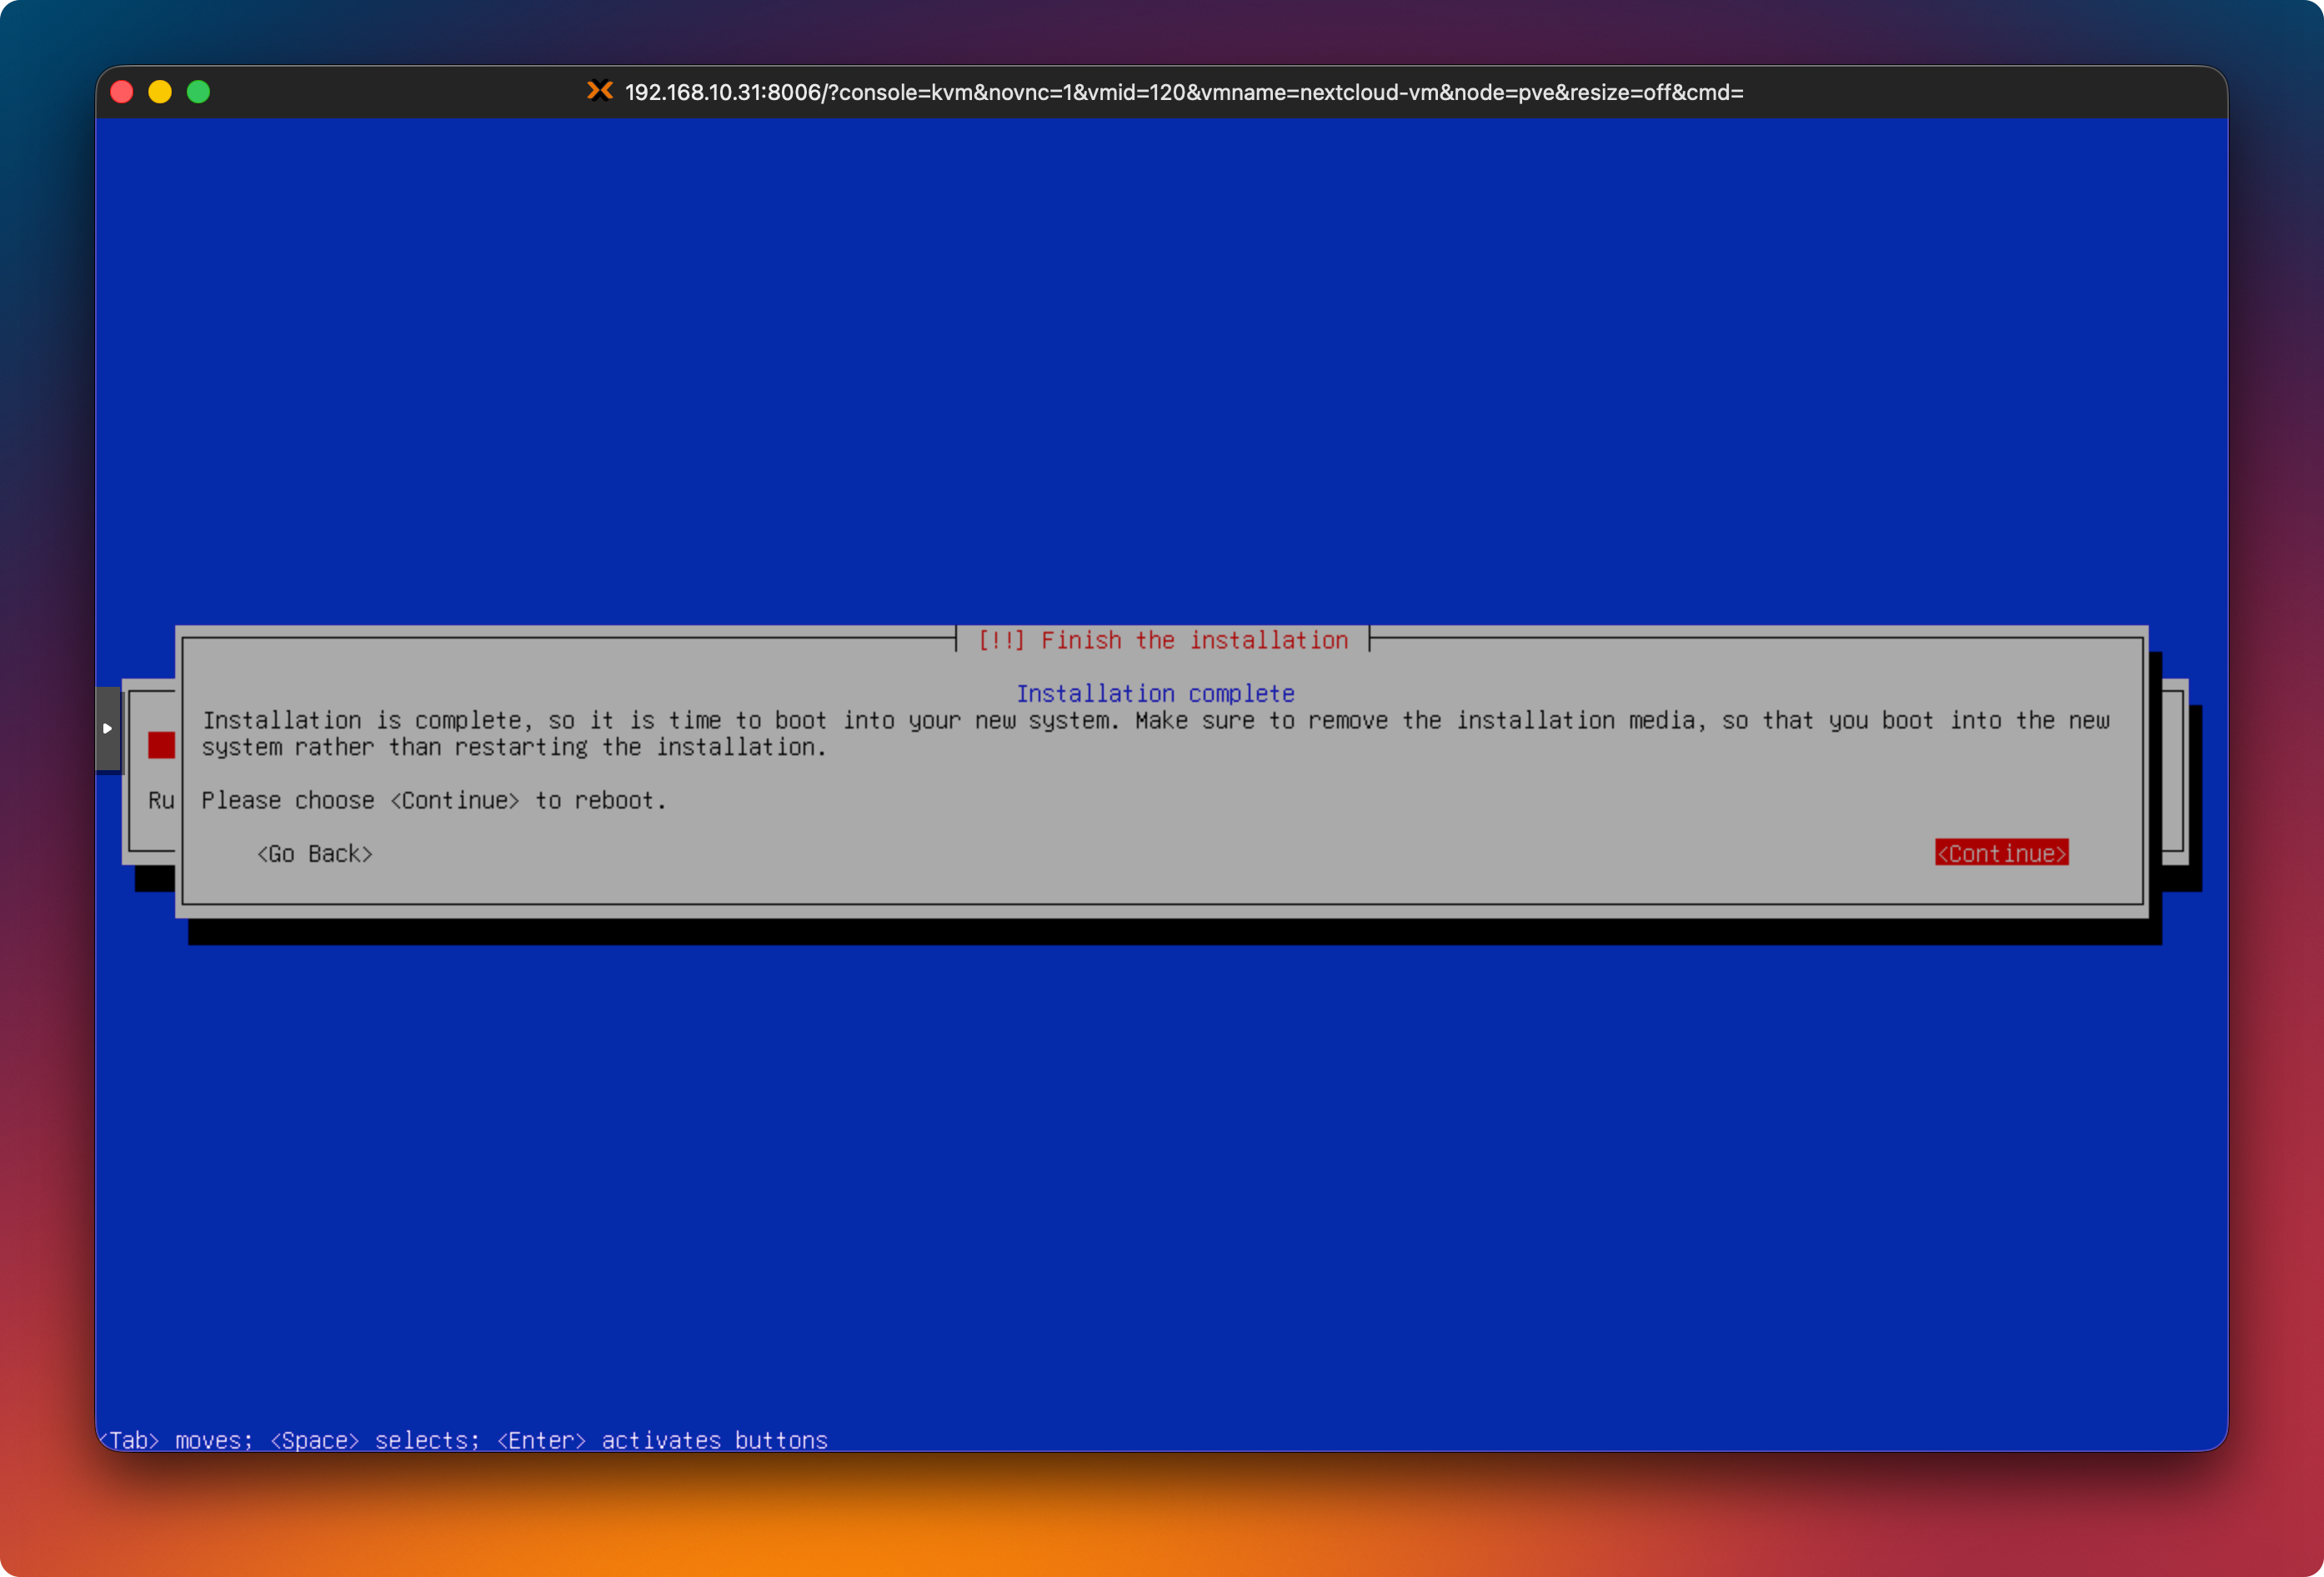
Step 4: Verify Boot Order
Remove the ISO from the VM’s CD/DVD drive and set the boot order to prioritize the hard disk. Otherwise, the VM may continuously attempt to boot from the empty ISO.
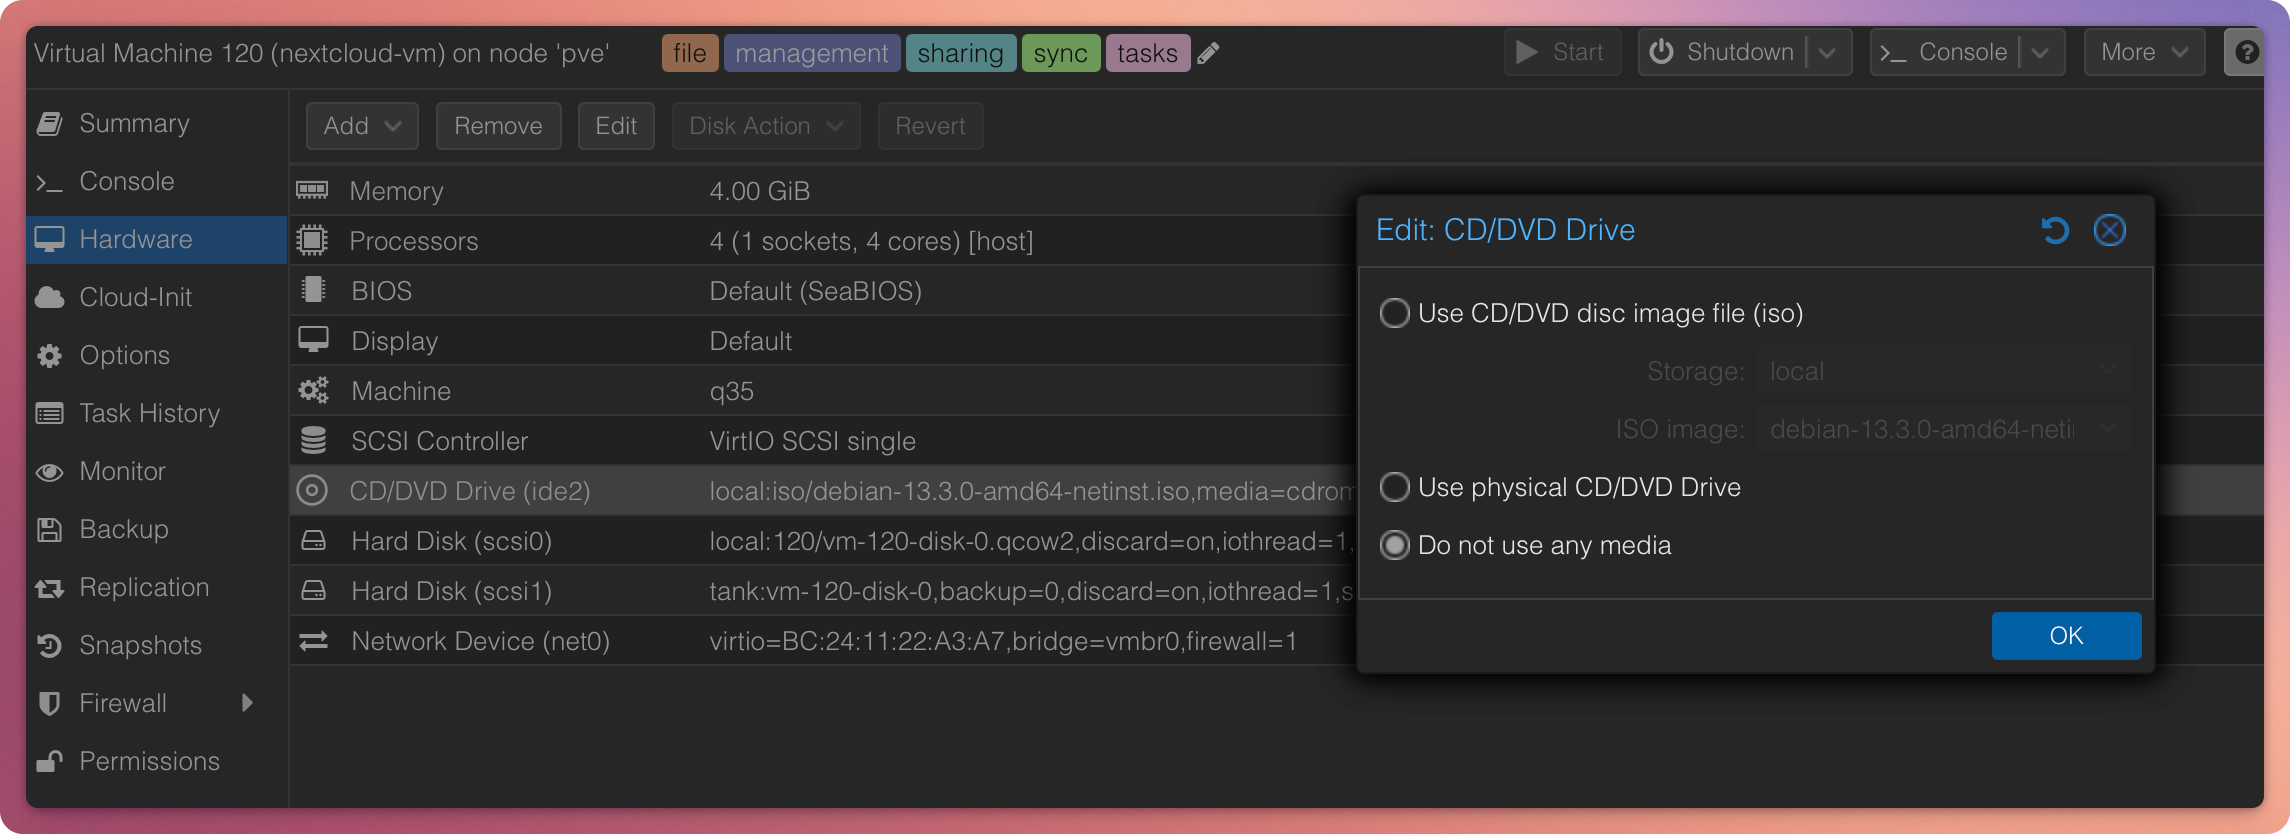
If the VM boots from the ISO again:
- Power off the VM
- Options → Boot Order
- Move the system disk to the top
- Move the ISO down or disable it
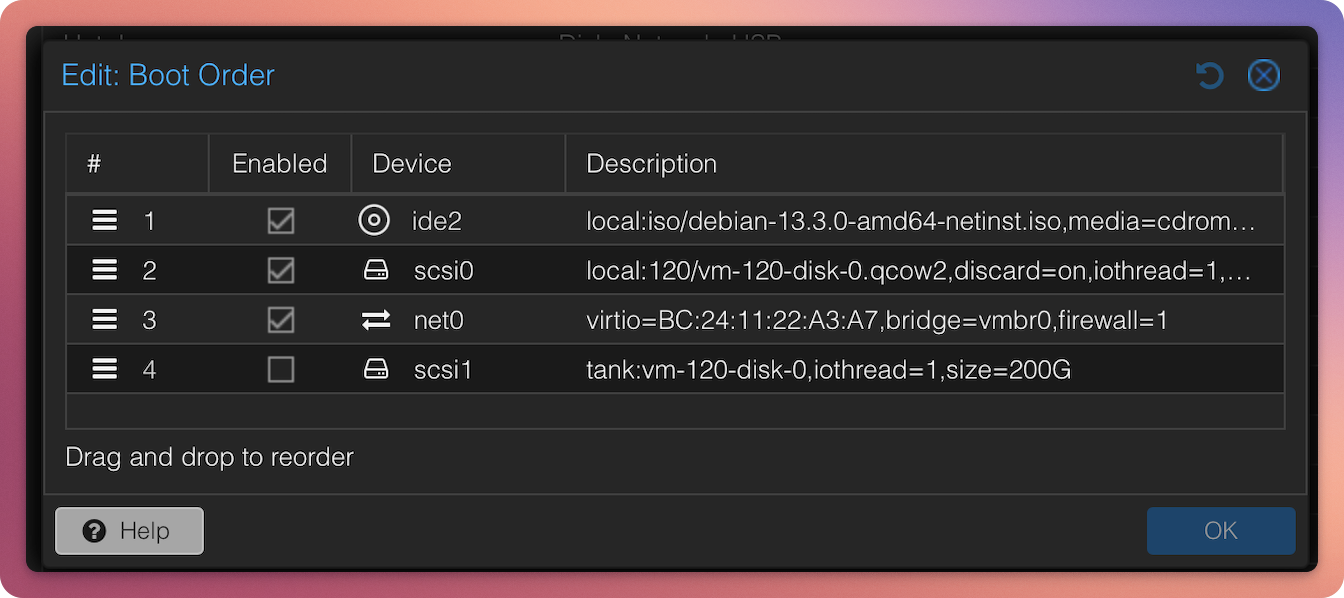
Boot order incorrect
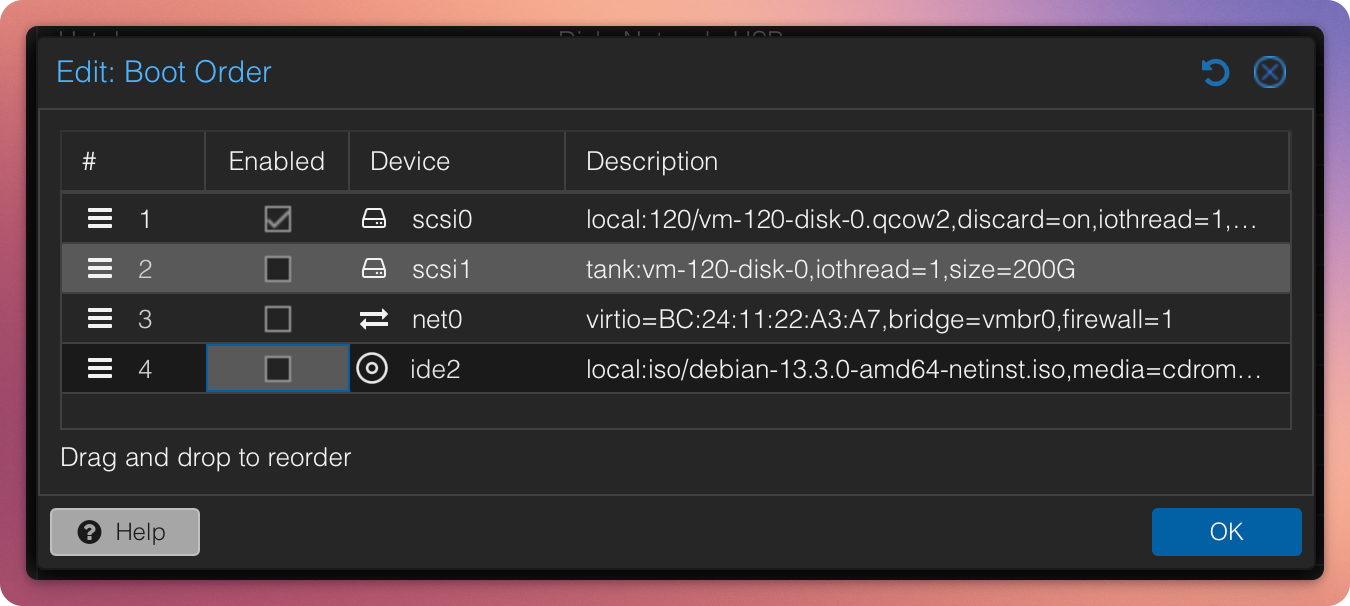
Boot order correct
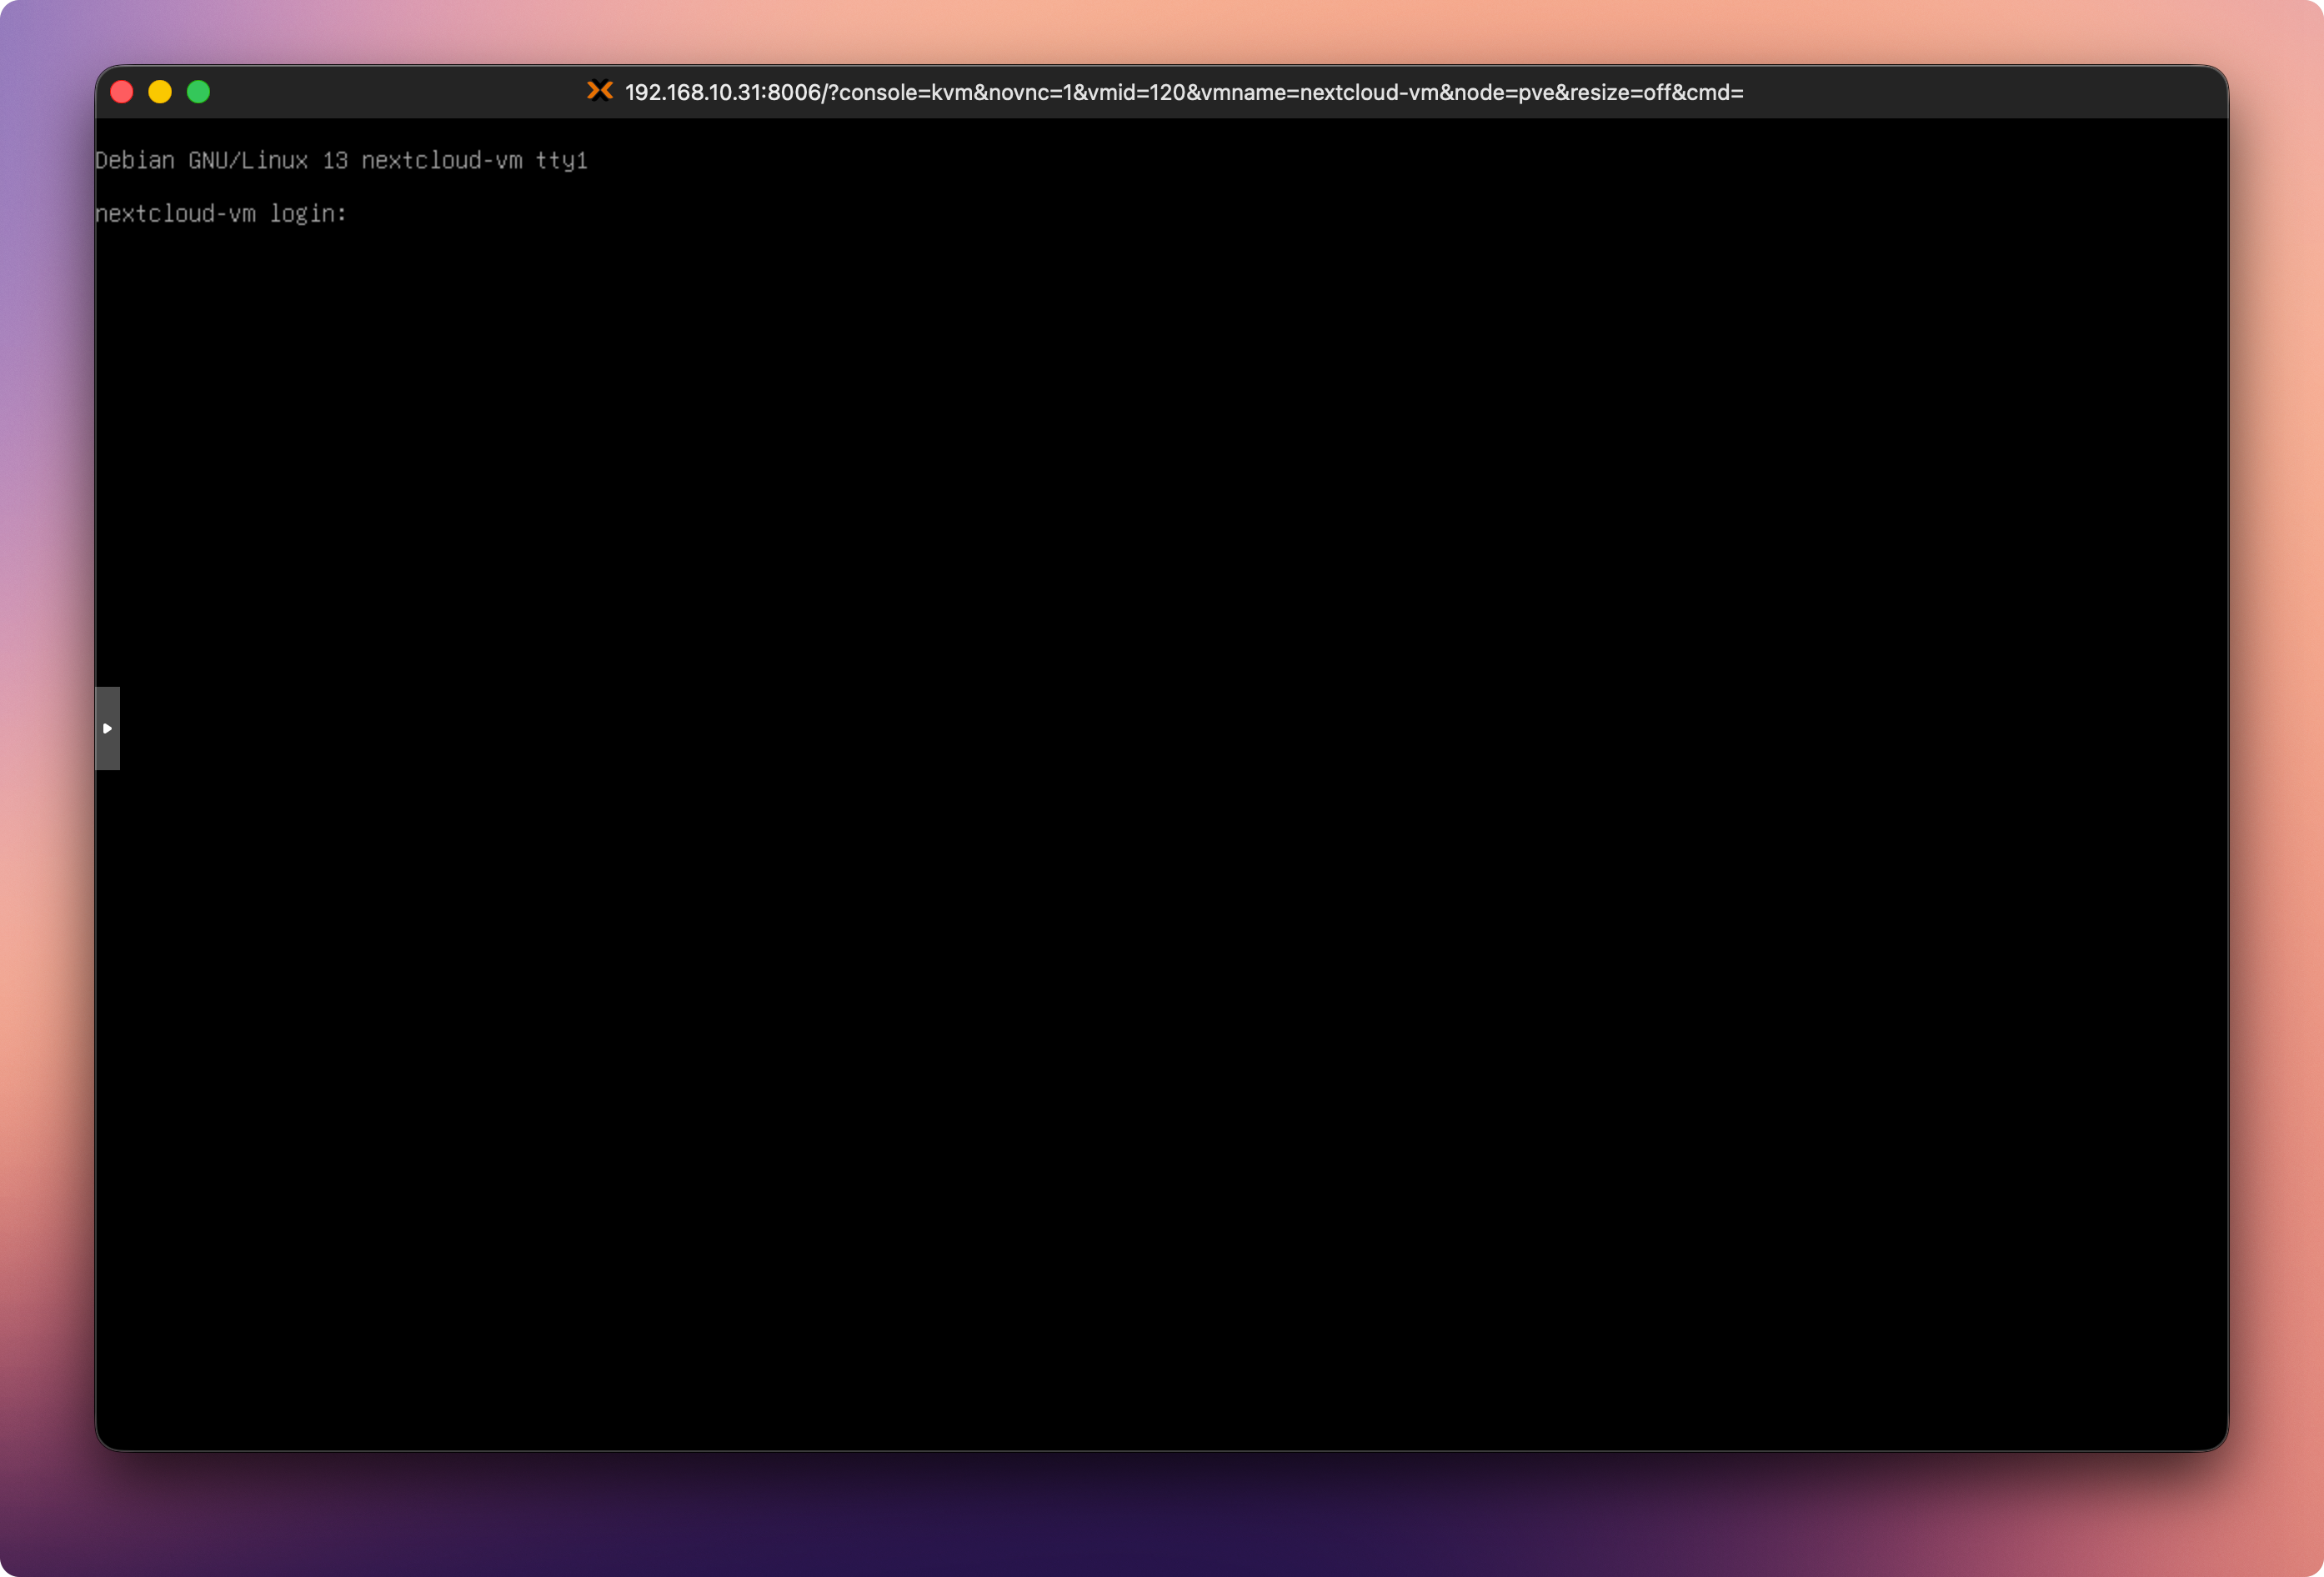
Result
If everything was completed correctly, you should now see the Debian 13 login console.
Next Step
Continue with:
Part 2: Configure IP, User Permissions, and Second Data Disk
- Configure a static IP
- Partition, format, and mount the second disk
- Prepare the base system
Part 2: Configuring IP, User Privileges, and the Second Data Disk

Objective of This Section
In this section, we further configure the freshly installed Debian VM. We assign a static IP address, establish proper user privileges, and permanently mount the second disk for Nextcloud data.
All packages will be updated to the latest state, and clean administrative privileges will be prepared.
At the end of this section:
- the VM is reachable via a static IP address
- a regular admin user with sudo privileges is configured
- the data disk is correctly mounted and persistently integrated
Step 1: Log In to the VM and Initial Overview
Prerequisites
- Debian 13 has been successfully installed
- The VM is running in Proxmox
- Access to the Proxmox web interface
- An SSH client (e.g., Tabby, Terminal, iTerm, PuTTY)
Hardware Recommendations
- The second virtual disk has already been added in Proxmox
- Size as required (e.g., 200 GB or more)
- The disk has not yet been configured inside Debian
VM Parameters (Example)
- Hostname:
nextcloud-vm - Static IP (example):
192.168.10.120 - Gateway:
192.168.10.1 - DNS: internal DNS + fallback
Required Credentials (Example)
- User:
ncadmin - Root password
- SSH access to the VM
Log In via SSH
Start the VM in Proxmox and determine the currently assigned IP address.
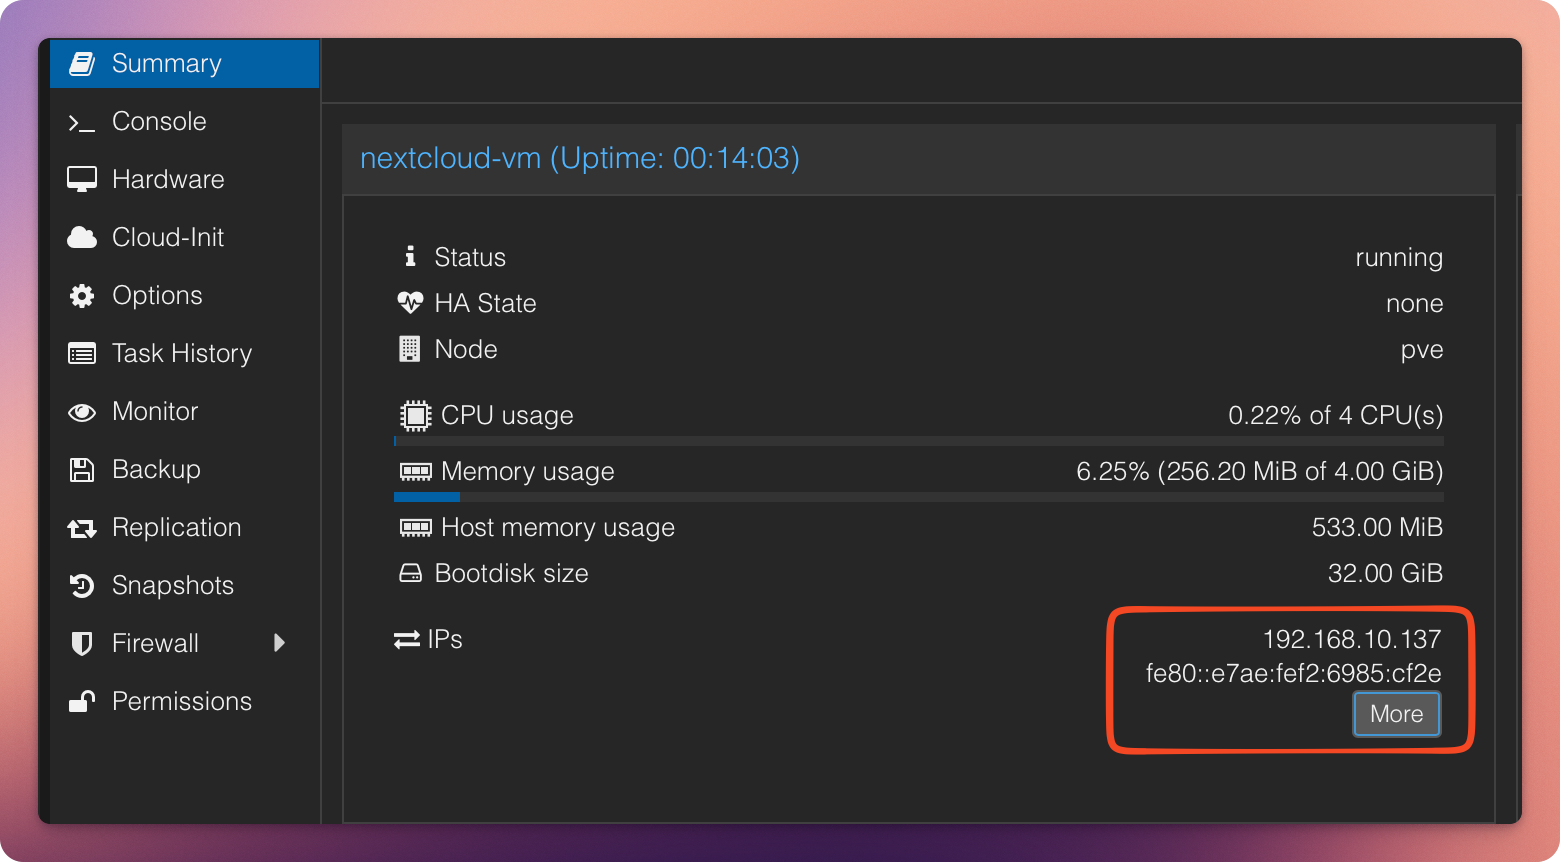
Then connect via SSH using the admin user ncadmin (or the user created in Part 1):
# Use your VM’s name and IP address
ssh ncadmin@192.168.10.120
On first connection, confirm the fingerprint with yes, then enter the password.

Step 2: Configure a Static IP Address
Objective
The VM must always be reachable under the same IP address. This is a prerequisite for DNS configuration, reverse proxy usage, and later for Nextcloud itself.
Edit Network Configuration
Open the file: /etc/network/interfaces:
sudo nano /etc/network/interfaces
Modify the primary interface as follows (the interface name may differ, often ens18):
# The primary network interface
allow-hotplug ens18
#iface ens18 inet dhcp
iface ens18 inet static
address 192.168.10.120
netmask 255.255.255.0
gateway 192.168.10.1
dns-nameservers 192.168.10.6 1.1.1.1
Adjust the IP addresses to match your network.
Save with CTRL+O, confirm with Enter, exit with CTRL+X.
To ensure that the dns-nameservers defined in the interfaces file are actually applied, the resolvconf package must be installed and enabled:
sudo apt install resolvconf
sudo systemctl enable resolvconf
sudo systemctl start resolvconf
Restart networking:
sudo systemctl restart networking
Important: Do not close the current terminal.
Instead, open a new terminal and test whether SSH login works again.
- Connection successful → configuration is correct
- Connection fails → use the existing terminal session to correct the network configuration
Step 3: Update the System and Root Access
Switch to Root Mode
su -
Update the System
apt update
apt full-upgrade
This updates both the package lists and all installed packages.
Optionally, the hostname can also be adjusted at this stage.
Step 4: Configure sudo Privileges
The regular user should be able to perform administrative tasks without remaining logged in as root.
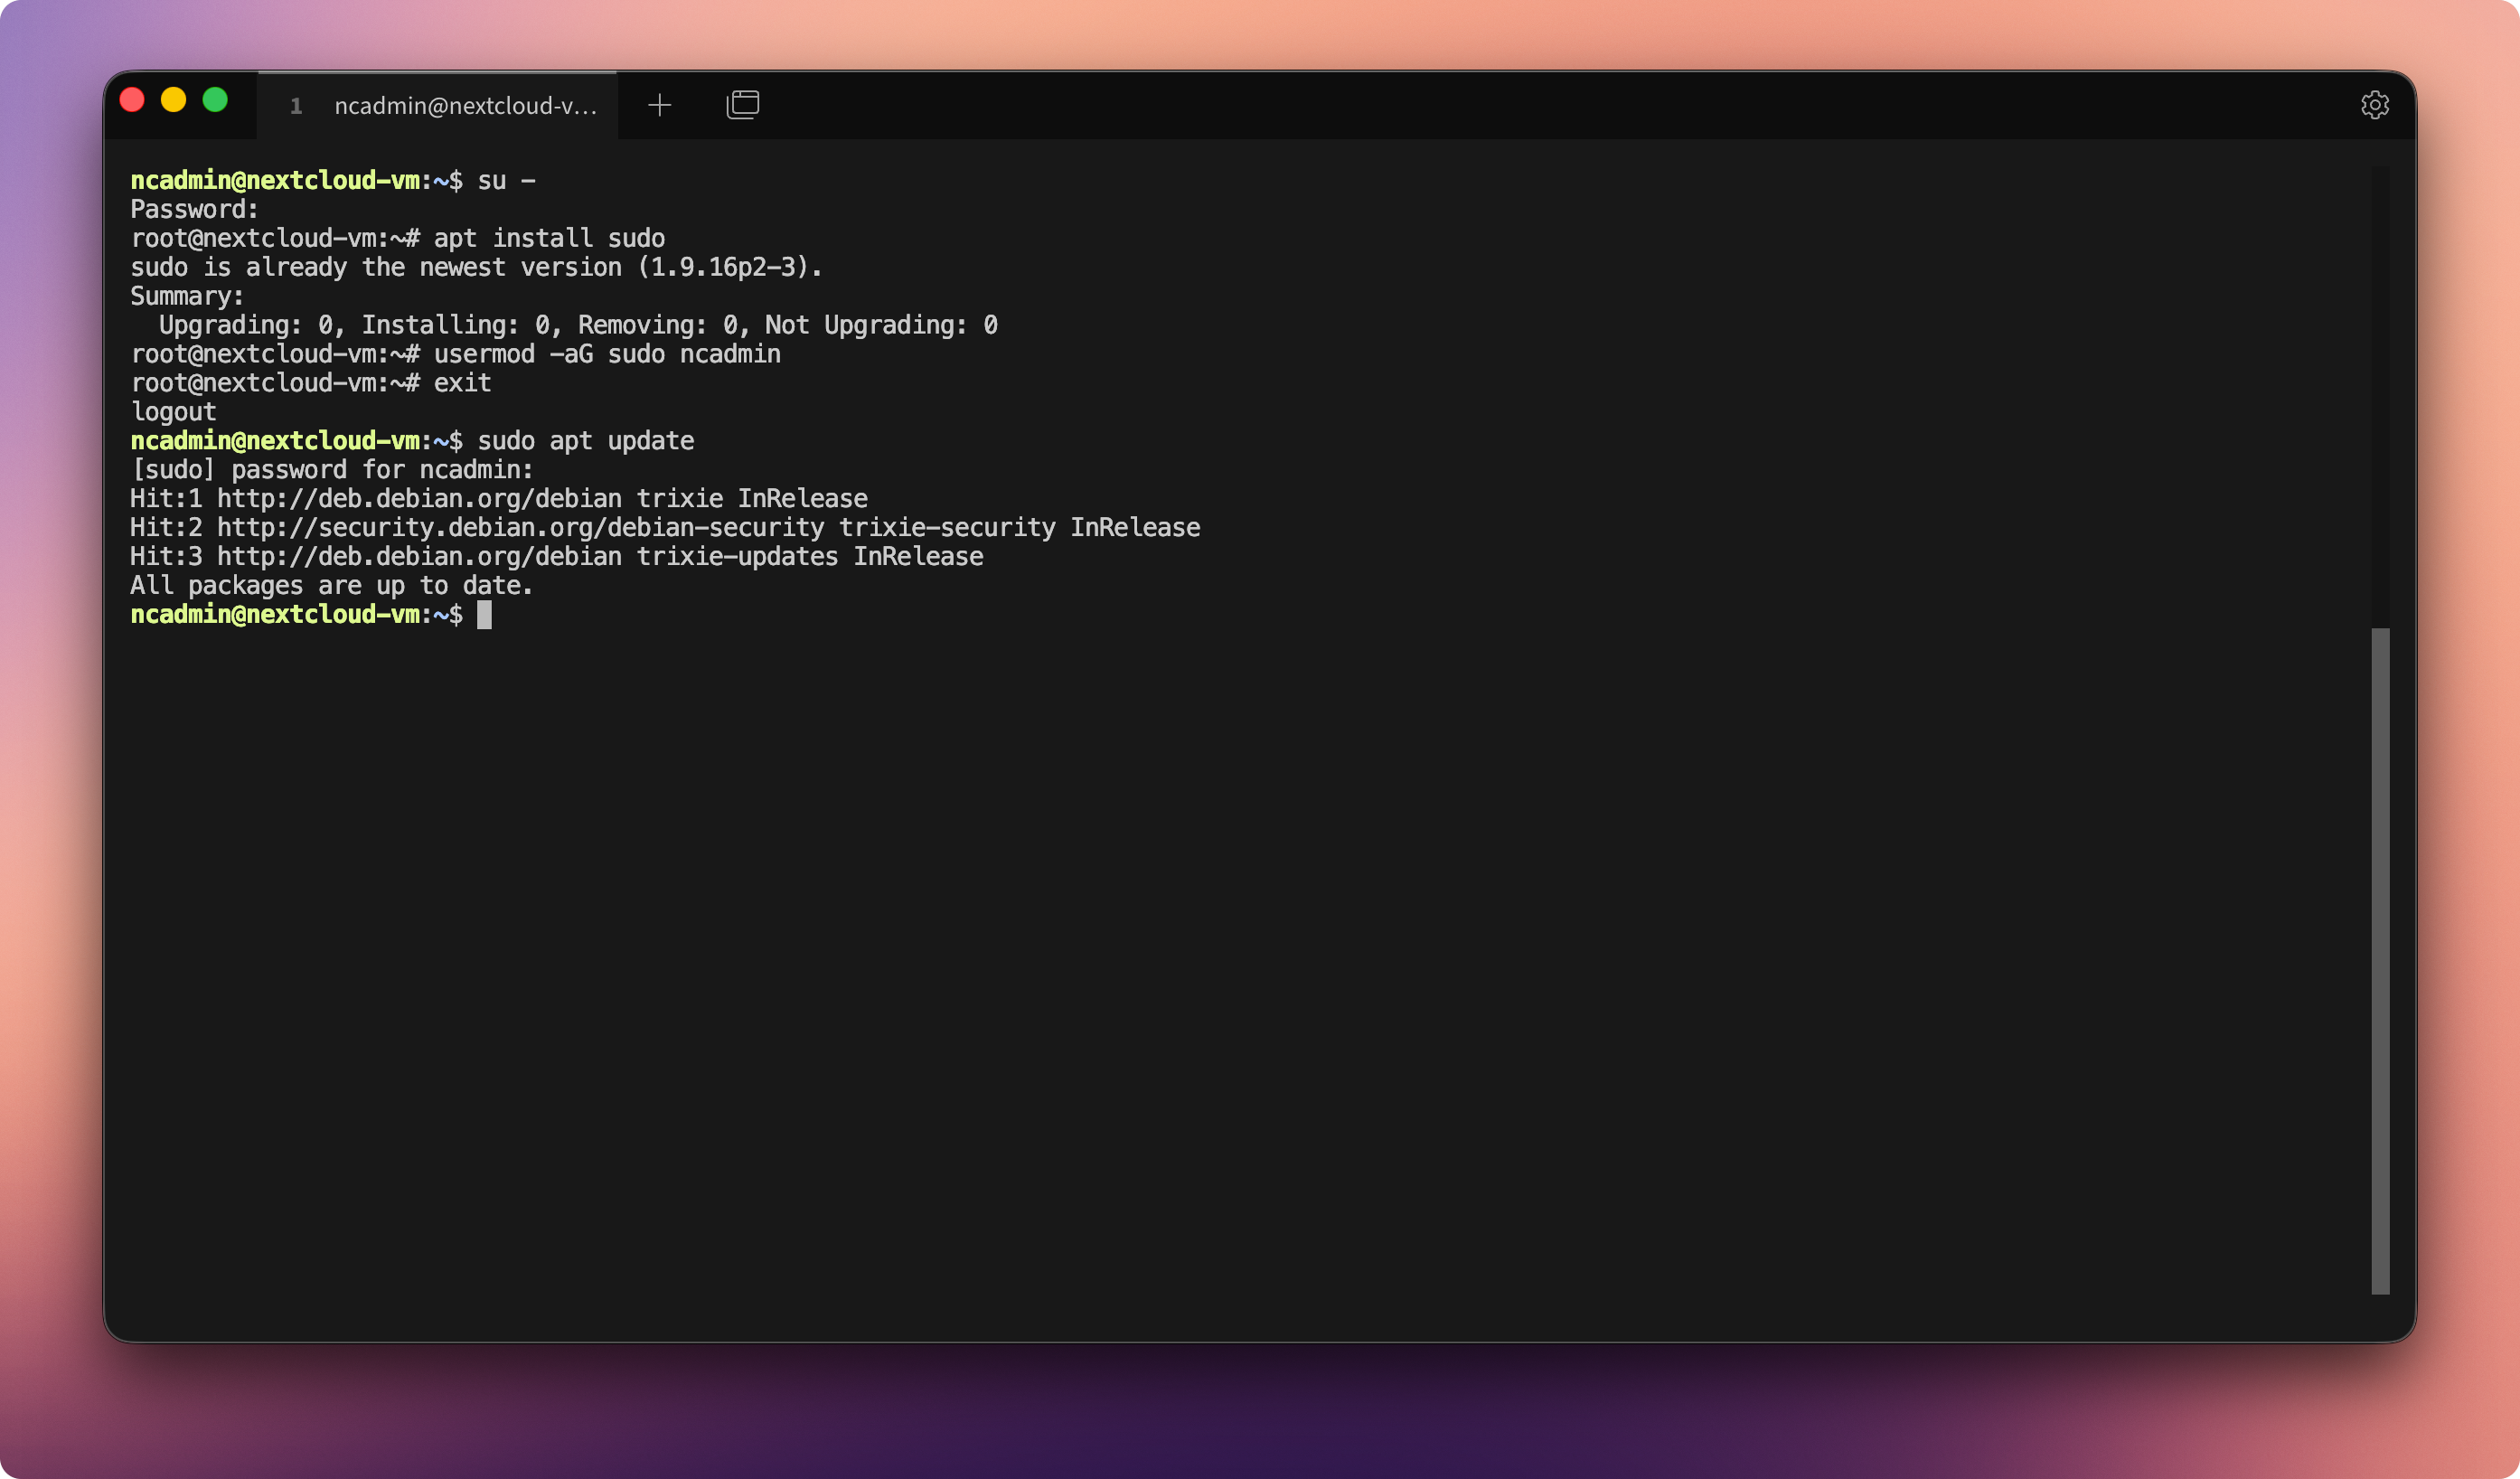
Install sudo
apt install sudo
Add User to sudo Group
usermod -aG sudo ncadmin
Afterward, log out from root. Future administrative commands can be executed using sudo.
Step 5: Prepare the Second Disk
The second virtual disk will be partitioned, formatted, and mounted as the data directory for Nextcloud.
⚠️ The mount point
/srv/cloud.zn80.netis only an example.
You may use any suitable path, such as/srv/nextcloud/data,/var/lib/nextcloud, or/home/ncadmin/cloud-data. Choose a structure that aligns with your system design and remains intuitive.
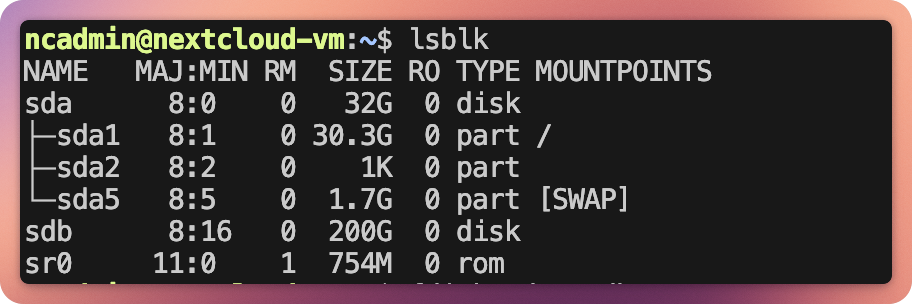
Overview of Available Drives
lsblk
The second disk is usually /dev/sdb.
Create Partition
sudo fdisk /dev/sdb
Within fdisk, enter:
n(new)p(primary)1- Enter (start)
- Enter (end)
w(write)
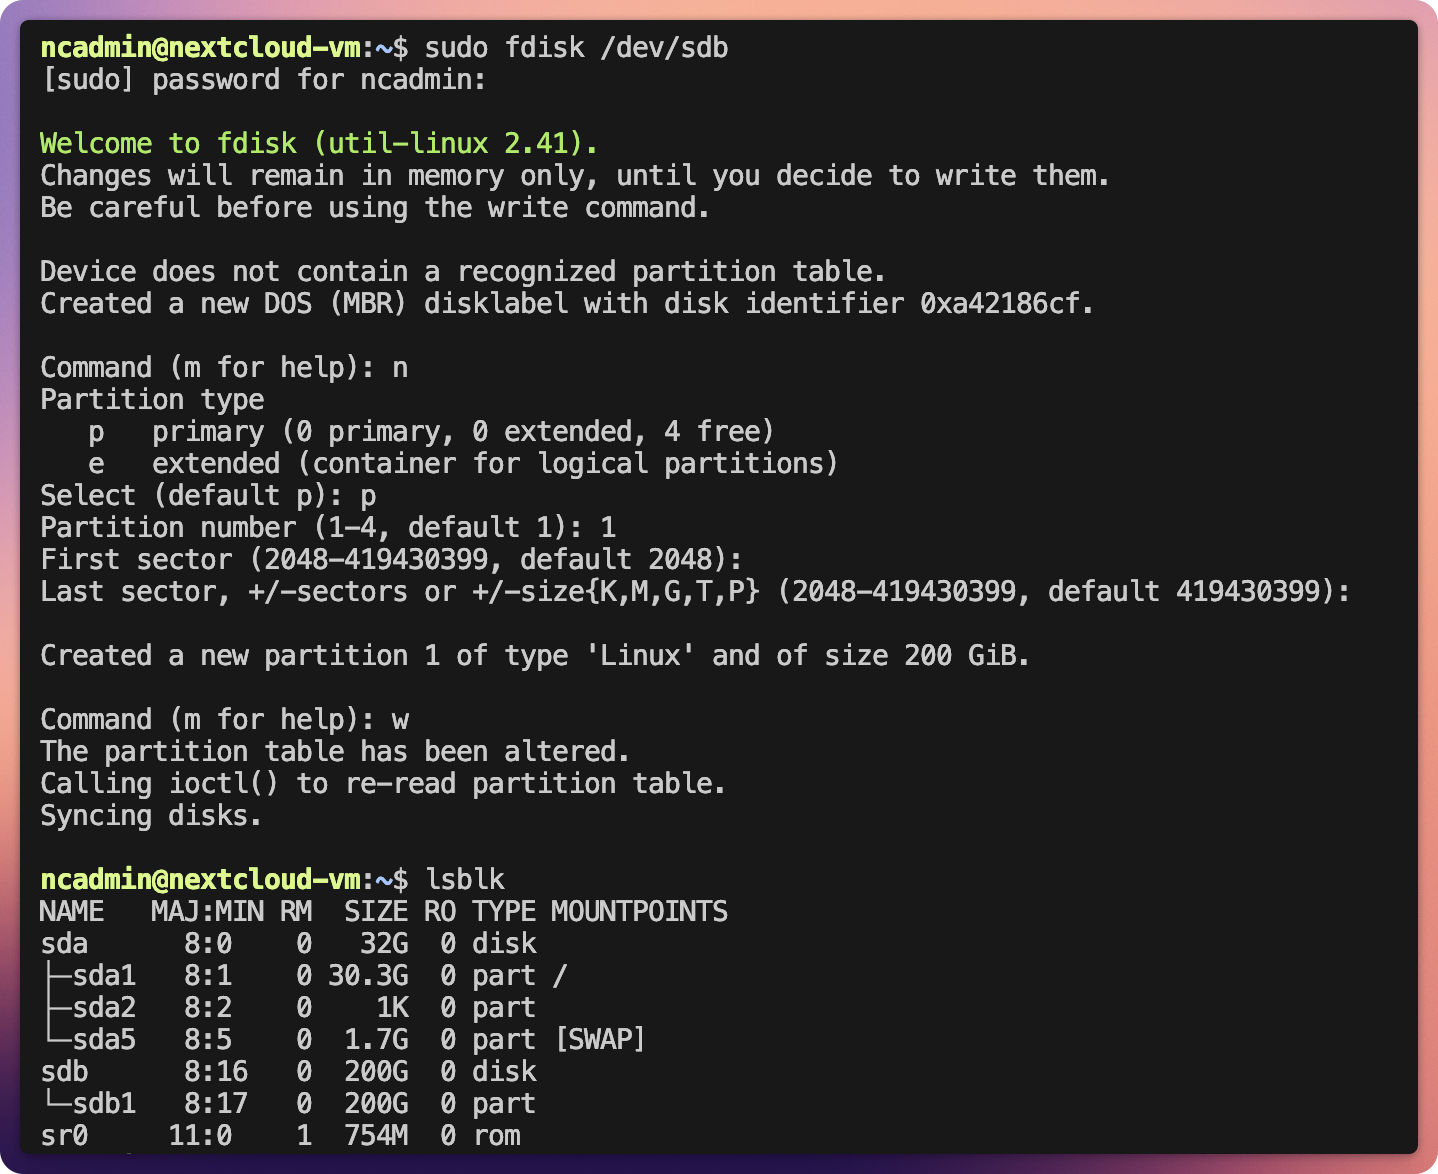
Create Filesystem
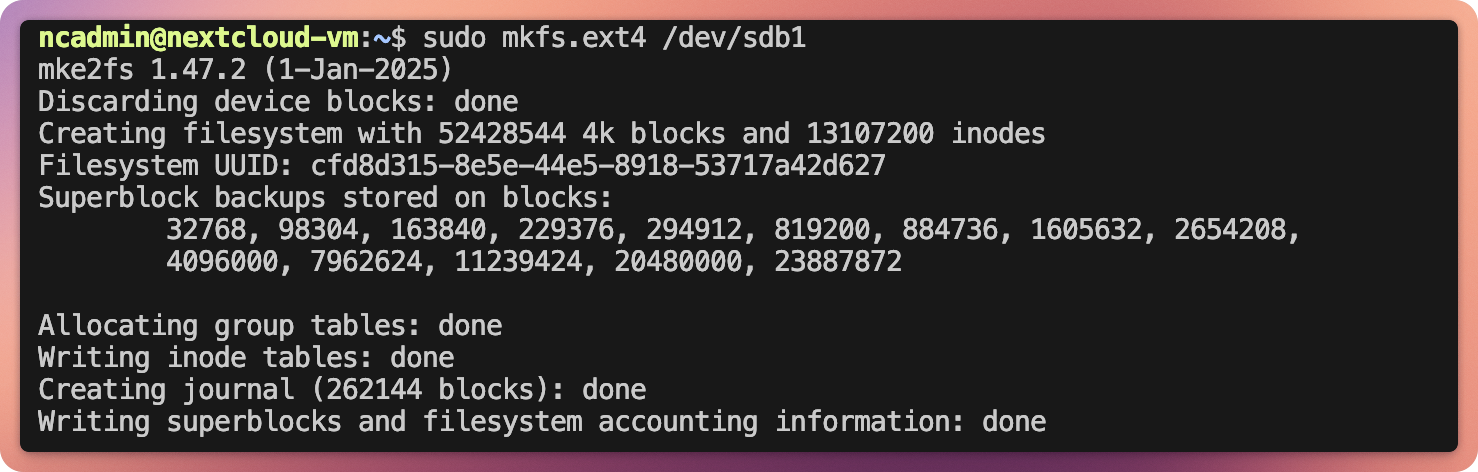
sudo mkfs.ext4 -L cloud.zn80.net /dev/sdb1
Create Mount Directory
sudo mkdir -p /srv/cloud.zn80.net
Step 6: Permanently Mount the Disk
Objective
The data disk should automatically mount at system startup.
Determine UUID
blkid
Note the UUID of /dev/sdb1.

The UUID is important because device names may change after reboot, whereas UUIDs remain constant.
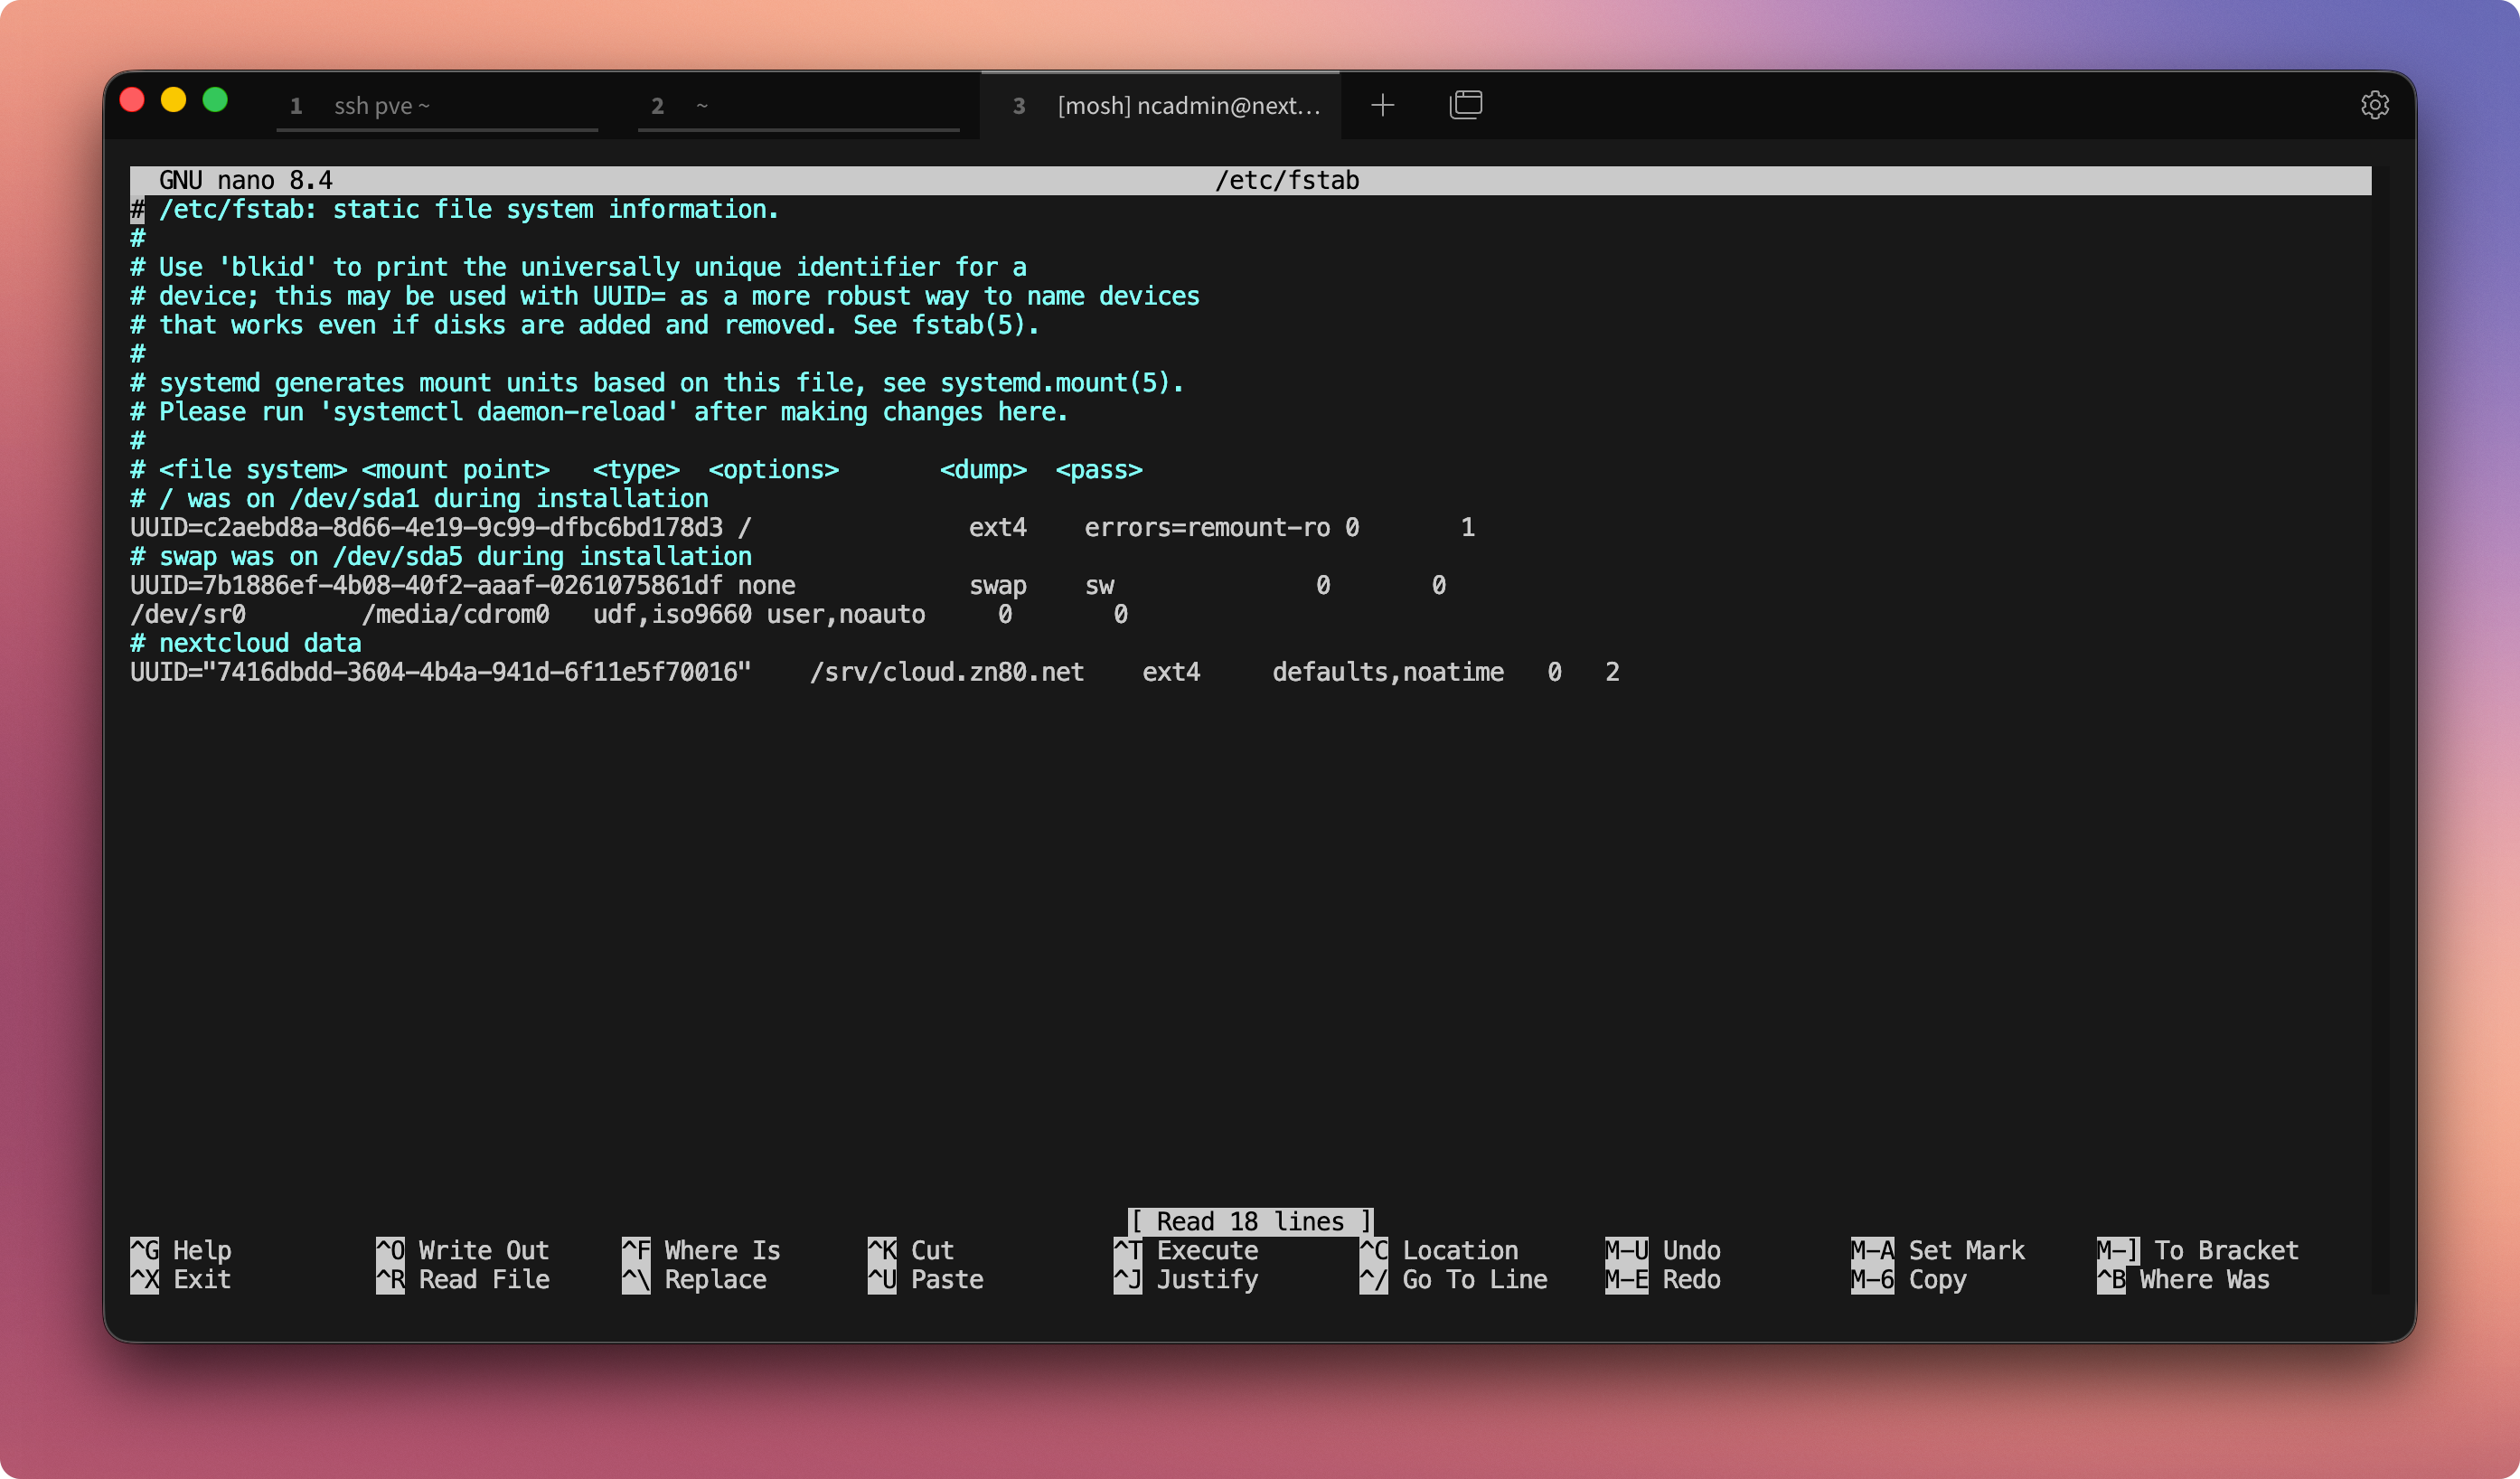
Edit /etc/fstab
sudo nano /etc/fstab
Add or modify the following line:
# nextcloud data
UUID=XXXXXXXX-XXXX-XXXX-XXXX-XXXXXXXXXXXX /srv/cloud.zn80.net ext4 defaults,noatime 0 2
Save and close the editor.
Test Mount
sudo mount -a
df -h
The disk should now be mounted under /srv/cloud.zn80.net.
The system is now fully prepared. The actual Nextcloud installation follows in:
Part 3: Downloading, Installing, and Configuring Nextcloud
Step 7: Resize the Disk (Optional)
⚠️ Important Notice Before Resizing
Before resizing the data disk, create a backup of the VM or critical data. A mistake (e.g., selecting the wrong partition) can result in complete data loss. The VM must be powered off and on again for the rescan and parted steps. Live resizing usingresize2fsworks only with ext4 and a mounted filesystem, but it is riskier and not always recommended. Proceed carefully and verify the partition before modifying it.
Objective
If additional storage is required later, the existing partition can be expanded without data loss.
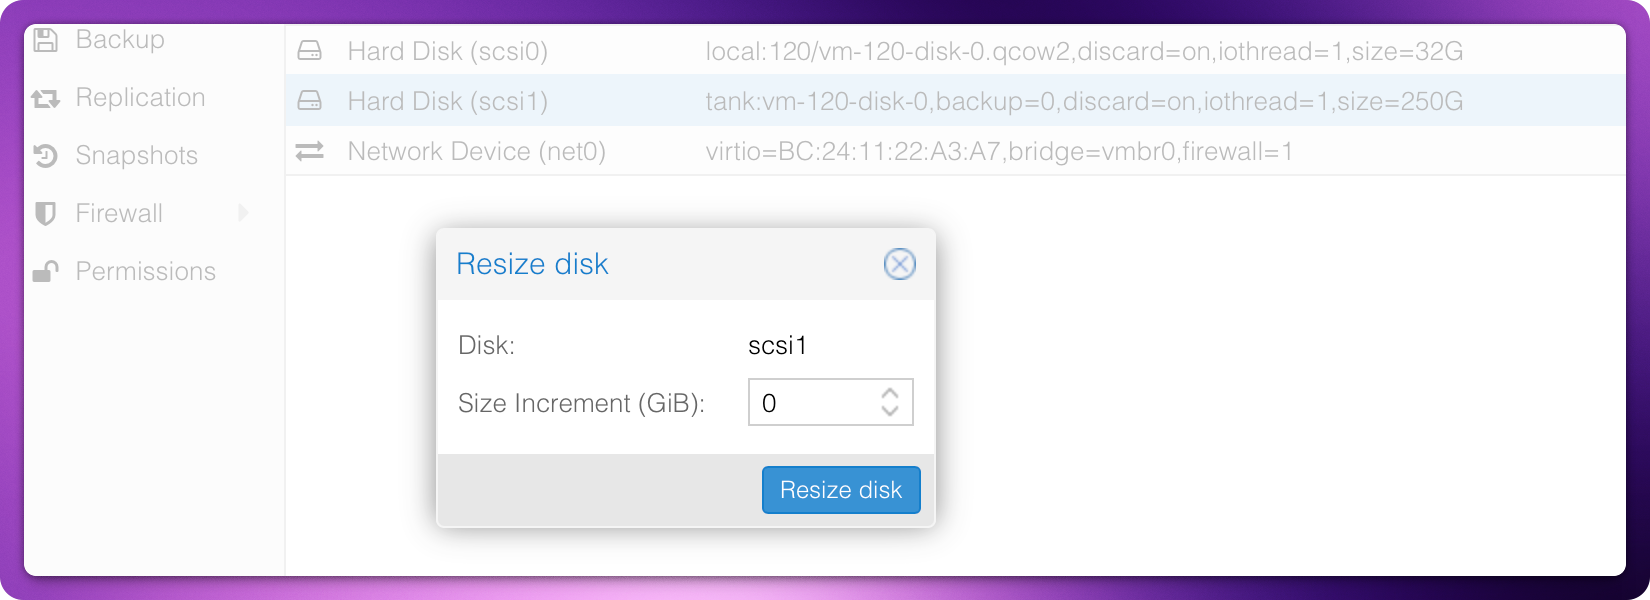
Resize Disk in Proxmox
- Select VM
- Disk → Resize
- Add desired capacity
Rescan in Debian
echo 1 > /sys/block/sdb/device/rescan
Reboot the VM if necessary.
Check Free Space
parted -s -a opt /dev/sdb "print free"
Resize Partition
parted -s -a opt /dev/sdb "resizepart 1 100%"
Resize Filesystem
e2fsck -f /dev/sdb1
resize2fs /dev/sdb1
Afterward, lsblk and df -h will reflect the new size.
Note: Differences in displayed sizes are due to GB vs. GiB.
Teil 3: Downloading, installing and configuring Nextcloud
Objective of This Section
In this section, we install Nextcloud completely on the prepared Debian 13 system. We set up the LAMP stack, configure Apache and PHP specifically for Nextcloud, integrate the data directory outside the webroot, and complete the installation including essential optimizations.
At the end of this section:
- Nextcloud is running under cloud.zn80.net
- All user data is stored cleanly under /srv/cloud.zn80.net/data
- The database is secured and properly connected
- Caching, proxy operation, and optional performance features are prepared
Important Security Notice
For secure operation on the public internet, a reverse proxy with HTTPS is mandatory (e.g., Nginx Proxy Manager, Traefik, or a standalone Nginx setup with Let’s Encrypt).
Without HTTPS (and HSTS), it is strongly discouraged to expose the Nextcloud instance beyond the local network. You may operate it internally first and enable external access later with a proxy and certificate at any time.
Further information:
- Nextcloud Admin Documentation: HTTPS Setup & Server Hardening
- Nextcloud Admin Documentation: SSL/TLS Configuration
- Let’s Encrypt Official Website
Update the System
Before beginning the installation, ensure the system is fully up to date:
sudo apt update && sudo apt full-upgrade -y
Install and Secure MariaDB
Install the database server and client:
sudo apt install mariadb-server mariadb-client-compat
Enter the MariaDB shell and create the Nextcloud database:
sudo mariadb
Inside the MariaDB shell:
CREATE DATABASE nextcloud;
GRANT ALL PRIVILEGES ON nextcloud.* TO 'nextcloud'@'localhost' IDENTIFIED BY '<DATABASE_PASSWORD>';
FLUSH PRIVILEGES;
EXIT;
Secure the MariaDB installation:
sudo mysql_secure_installation
Recommended answers:
- unix_socket authentication: n
- Set root password: Y
- Remove anonymous users: Y
- Disallow remote root login: Y
- Remove test database: Y
- Reload privilege tables: Y
Install Apache, PHP, and Required Extensions
Install Apache indirectly via PHP packages along with all required extensions:
sudo apt install imagemagick-7.q16 php php-apcu php-bcmath php-cli php-common php-curl php-gd php-gmp php-imagick php-intl php-mbstring php-mysql php-zip php-bz2 php-xml
Enable required PHP modules:
sudo phpenmod apcu bcmath gmp imagick intl unzip
Ensure unzip and wget are installed:
sudo apt install unzip wget
Download and Prepare Nextcloud
Download and extract the latest Nextcloud version:
wget https://download.nextcloud.com/server/releases/latest.zip
unzip latest.zip
Rename the extracted directory to the service FQDN and move it into Apache’s web directory:
mv nextcloud cloud.zn80.net
sudo chown -R www-data:www-data cloud.zn80.net
sudo mv cloud.zn80.net /var/www/
Disable the Apache default site:
sudo a2dissite 000-default.conf
Enable required Apache modules:
sudo a2enmod dir env headers mime rewrite ssl
sudo systemctl restart apache2
Note: Instead of
latest.zip, specific previous versions (e.g.,nextcloud-29.zipornextcloud-30.zip) can be downloaded from the official release archive if required for compatibility reasons. However, running outdated versions on the public internet is not recommended.
Create Apache Virtual Host for Nextcloud
Create the configuration file:
sudo nano /etc/apache2/sites-available/cloud.zn80.net.conf
Insert the following content:
<VirtualHost *:80>
ServerAdmin mail@example.com
DocumentRoot "/var/www/cloud.zn80.net"
ServerName cloud.zn80.net
<Directory "/var/www/cloud.zn80.net/">
Options FollowSymLinks
AllowOverride All
Header always set Referrer-Policy "no-referrer"
Require all granted
SetEnv HOME /var/www/cloud.zn80.net
SetEnv HTTP_HOME /var/www/cloud.zn80.net
</Directory>
TransferLog /var/log/apache2/cloud.zn80.net_access.log
ErrorLog /var/log/apache2/cloud.zn80.net_error.log
</VirtualHost>
Do not enable the site yet.
Optimize PHP for Nextcloud
Edit PHP configuration:
sudo nano /etc/php/8.4/apache2/php.ini
Adjust the following values:
memory_limit = 512M
upload_max_filesize = 200M
post_max_size = 200M
max_execution_time = 360
date.timezone = Europe/Amsterdam
opcache.enable=1
opcache.memory_consumption=128
opcache.interned_strings_buffer=16
opcache.max_accelerated_files=10000
opcache.revalidate_freq=1
opcache.save_comments=1
Enable the site and restart Apache:
sudo a2ensite cloud.zn80.net.conf
sudo systemctl restart apache2
Enable APCu for CLI:
sudo nano /etc/php/8.4/mods-available/apcu.ini
Append:
apc.enable_cli=1
Restart Apache again:
sudo systemctl restart apache2
Prepare the Data Directory
The Nextcloud data directory must not be located inside the webroot.
Ensure the mount point exists:
sudo mkdir -p /srv/cloud.zn80.net
Test mounting:
sudo mount -a
df -h /srv/cloud.zn80.net
Create the actual data directory and apply secure permissions:
sudo mkdir /srv/cloud.zn80.net/data
sudo chown -R www-data:www-data /srv/cloud.zn80.net/data
sudo chmod -R 750 /srv/cloud.zn80.net/data
Web-Based Nextcloud Installation
Open in your browser:
http://cloud.zn80.net
Provide the following:
Admin user:
- Username:
nextcloud_admin - Password: secure custom password
Data directory:
/srv/cloud.zn80.net/data
Database:
- User:
nextcloud - Database:
nextcloud - Password: database password
- Server:
localhost:3306
After installation, return to the command line.
Post-Installation Optimizations
Optimize the Nextcloud Database
Temporarily make the occ CLI tool executable:
sudo chmod +x /var/www/cloud.zn80.net/occ
Add missing database indices:
sudo /var/www/cloud.zn80.net/occ db:add-missing-indices
Run repair tasks:
sudo /var/www/cloud.zn80.net/occ maintenance:repair --include-expensive
Remove executable permission again:
sudo chmod -x /var/www/cloud.zn80.net/occ
Secure configuration file:
sudo chown root:www-data /var/www/cloud.zn80.net/config/config.php
sudo chmod 660 /var/www/cloud.zn80.net/config/config.php
Configure Trusted Proxies, Domains, and Caching
Edit configuration file:
sudo nano /var/www/cloud.zn80.net/config/config.php
Add:
'trusted_proxies' => [
'192.168.10.105',
],
'trusted_domains' => [
'cloud.zn80.net',
'192.168.10.120',
],
'overwrite.cli.url' => 'https://cloud.zn80.net',
'overwriteprotocol' => 'https',
'memcache.local' => '\\OC\\Memcache\\APCu',
'default_phone_region' => 'DE',
Run repair command:
sudo -u www-data php occ maintenance:repair
Install Redis (Optional, Recommended)
Install:
sudo apt install redis-server php-redis
Add configuration in config.php:
'filelocking.enabled' => true,
'memcache.locking' => '\\OC\\Memcache\\Redis',
'redis' => [
'host' => '/run/redis/redis-server.sock',
'port' => 0,
'timeout' => 0.0,
],
Restart services:
sudo systemctl restart redis
sudo systemctl restart apache2
The Nextcloud installation is now complete and properly configured.
In Part 4, additional security hardening and recommended configuration adjustments will be implemented.
Part 4: Recommended Security Settings and System Hardening
Below are several items you should review again after completing the setup. You may already have configured many of them, but a second verification is always advisable.
Update the System and Install Base Packages
After the first boot, log in as root or ncadmin (depending on console or SSH access) and immediately run:
apt update && apt full-upgrade -y
This installs all security updates and bug fixes released since the ISO was built.
Then install useful base utilities:
apt install sudo vim htop curl wget net-tools -y
This ensures sudo availability for regular users and provides improved system and networking tools.
Harden SSH – Disable Password Login and Use Keys
SSH is enabled during installation but not yet hardened.
Edit:
sudo nano /etc/ssh/sshd_config
Set:
PermitRootLogin prohibit-password
PasswordAuthentication no
Generate an SSH key on your client:
ssh-keygen
Copy the public key to the server:
ssh-copy-id ncadmin@your-vm-ip
Restart SSH:
systemctl restart ssh
From this point forward, only key-based authentication is allowed, effectively preventing password brute-force attacks.
Configure Cron for Nextcloud
Nextcloud requires a recurring background job (file scanning, mail delivery, app updates, etc.).
Create a cron job:
crontab -e
Add:
*/5 * * * * php -f /var/www/cloud.zn80.net/cron.php
Alternatively, use a systemd timer.
Without cron, background tasks run only during active web sessions, which can cause delays or stuck jobs.
Note: Normally, the cron job is created with:
crontab -u www-data -e
This may not work in this setup if the ownership of the configuration file has been changed earlier.
Install Fail2Ban Against Brute-Force Attacks
Install Fail2Ban:
apt install fail2ban -y
Enable and start it:
systemctl enable --now fail2ban
Fail2Ban monitors SSH logs and bans IP addresses after multiple failed login attempts (default: 5 attempts within 10 minutes). The Debian defaults are typically sufficient for a homelab environment.
Optional: Adjust /etc/fail2ban/jail.local for longer ban durations or email notifications.
.htaccess Optimization and Security Headers
After installation, update the .htaccess file:
sudo -u www-data php occ maintenance:repair
Add security headers in the Apache VirtualHost configuration (preferably under *:443) or in your reverse proxy configuration:
Header always set X-Content-Type-Options "nosniff"
Header always set X-Frame-Options "SAMEORIGIN"
Header always set X-XSS-Protection "1; mode=block"
Header always set Referrer-Policy "strict-origin-when-cross-origin"
If running behind Nginx Proxy Manager, add the following under the proxy host’s custom configuration:
add_header X-Content-Type-Options "nosniff" always;
add_header X-Frame-Options "SAMEORIGIN" always;
add_header X-XSS-Protection "1; mode=block" always;
add_header Referrer-Policy "strict-origin-when-cross-origin" always;
These headers mitigate:
- MIME sniffing attacks (
nosniff) - Clickjacking (
SAMEORIGIN) - Reflected XSS (
mode=block) - Unnecessary referrer exposure (
strict-origin-when-cross-origin)
Enable HSTS (Strict-Transport-Security)
Within the proxy host SSL settings, enable:
- Force SSL
- HSTS Enabled
- HSTS Subdomains (if applicable)
Nextcloud expects at least:
max-age=15552000
If necessary, manually add:
add_header Strict-Transport-Security "max-age=15552000; includeSubDomains" always;
Important: Only enable HSTS if HTTPS is permanently available.
Additional Reverse Proxy Adjustments (Optional)
To prevent header conflicts or WebSocket upgrade issues:
proxy_hide_header Upgrade;
proxy_hide_header Connection;
For additional protection:
add_header Permissions-Policy "geolocation=(), microphone=(), camera=()" always;
After saving, test the Nextcloud instance (Admin → Overview / Security scan).
Adjust Data Directory Permissions
The data directory /srv/cloud.zn80.net/data should preferably use:
chmod 770 /srv/cloud.zn80.net/data
chown -R www-data:www-data /srv/cloud.zn80.net/data
While 750 may work, 770 is recommended to prevent permission issues during app installation or large uploads.
Enable Firewall with UFW
If the server is directly exposed to the internet, install UFW:
apt install ufw -y
Allow necessary ports:
ufw allow OpenSSH
ufw allow 80,443/tcp
Enable and verify:
ufw enable
ufw status verbose
UFW blocks all other ports by default.
Additional Security Recommendations
- Use a dedicated sudo-capable user and avoid permanent root login.
- Enable automatic security updates:
apt install unattended-upgrades -y
Review configuration in:
/etc/apt/apt.conf.d/50unattended-upgrades
Check for updates regularly:
apt list --upgradable
With these measures in place, your Nextcloud instance should achieve strong security ratings (e.g., A/A+ on securityheaders.com or Mozilla Observatory) and display no major warnings in the Nextcloud admin security overview.