Part 1: Creating the VM and Installing Debian 13
Objective of This Section
In this first part, we create a virtual machine in Proxmox and install a minimal Debian 13 system on it.
At the end of this section:
- Debian is running successfully inside the VM
- the system is accessible via console
- we are ready for network, storage, and Nextcloud setup
Prerequisites
Hardware Recommendations
- RAM: at least 4 GB (recommended: 8 GB)
- System Disk: at least 32 GB (SSD/NVMe recommended)
- Data Disk: separate HDD or SSD for Nextcloud data
- CPU: 2–4 cores
VM Parameters (Example)
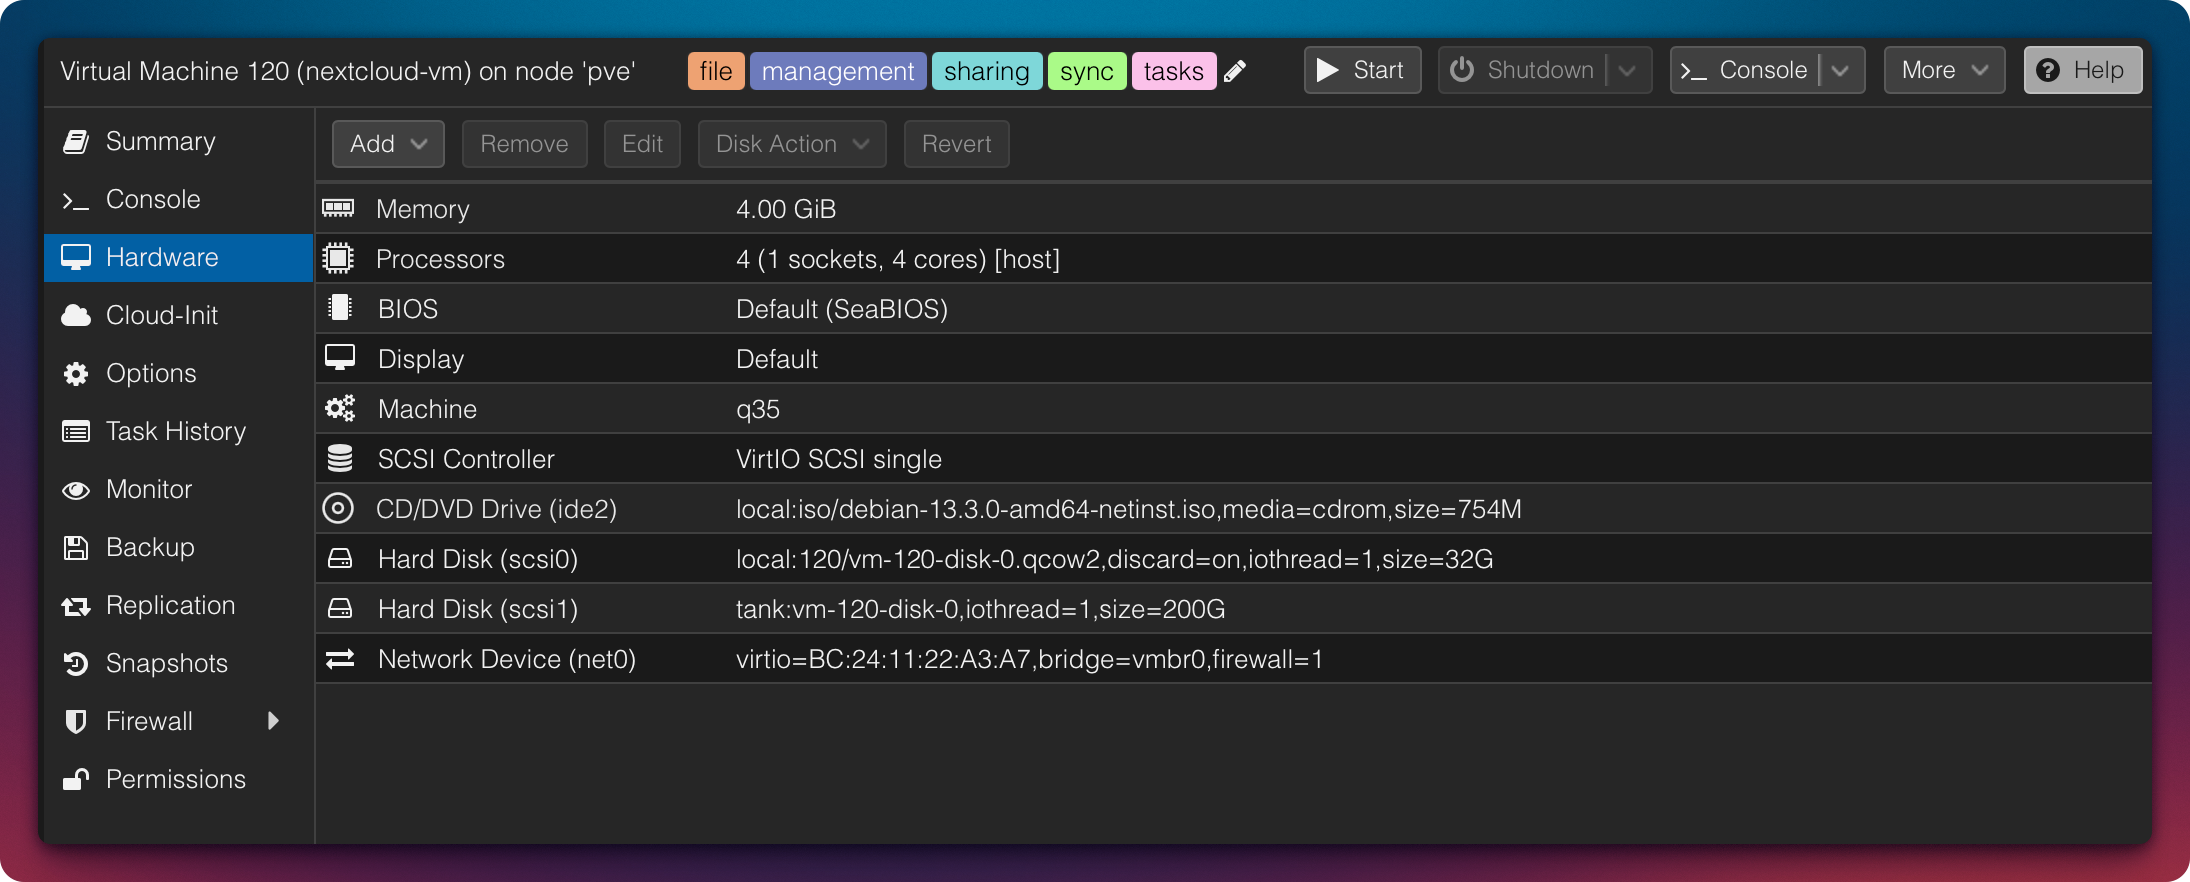
- VM ID: 120
- vCPUs: 4
- RAM: 4 GB
- Root Disk: 32 GB
- Data Disk: 200 GB (later 250 GB)
- Mount Target (later):
/srv/cloud.zn80.net/data
Note:
The data disk is not used during the Debian installation,
but will be mounted separately at a later stage.
Required Credentials (Example)
⚠️ Note:
In a production environment, use secure, unique passwords
and store them in a password manager.
- root (VM)
- ncadmin (VM)
- Database User:
nextcloud - Nextcloud Admin:
nextcloud_admin
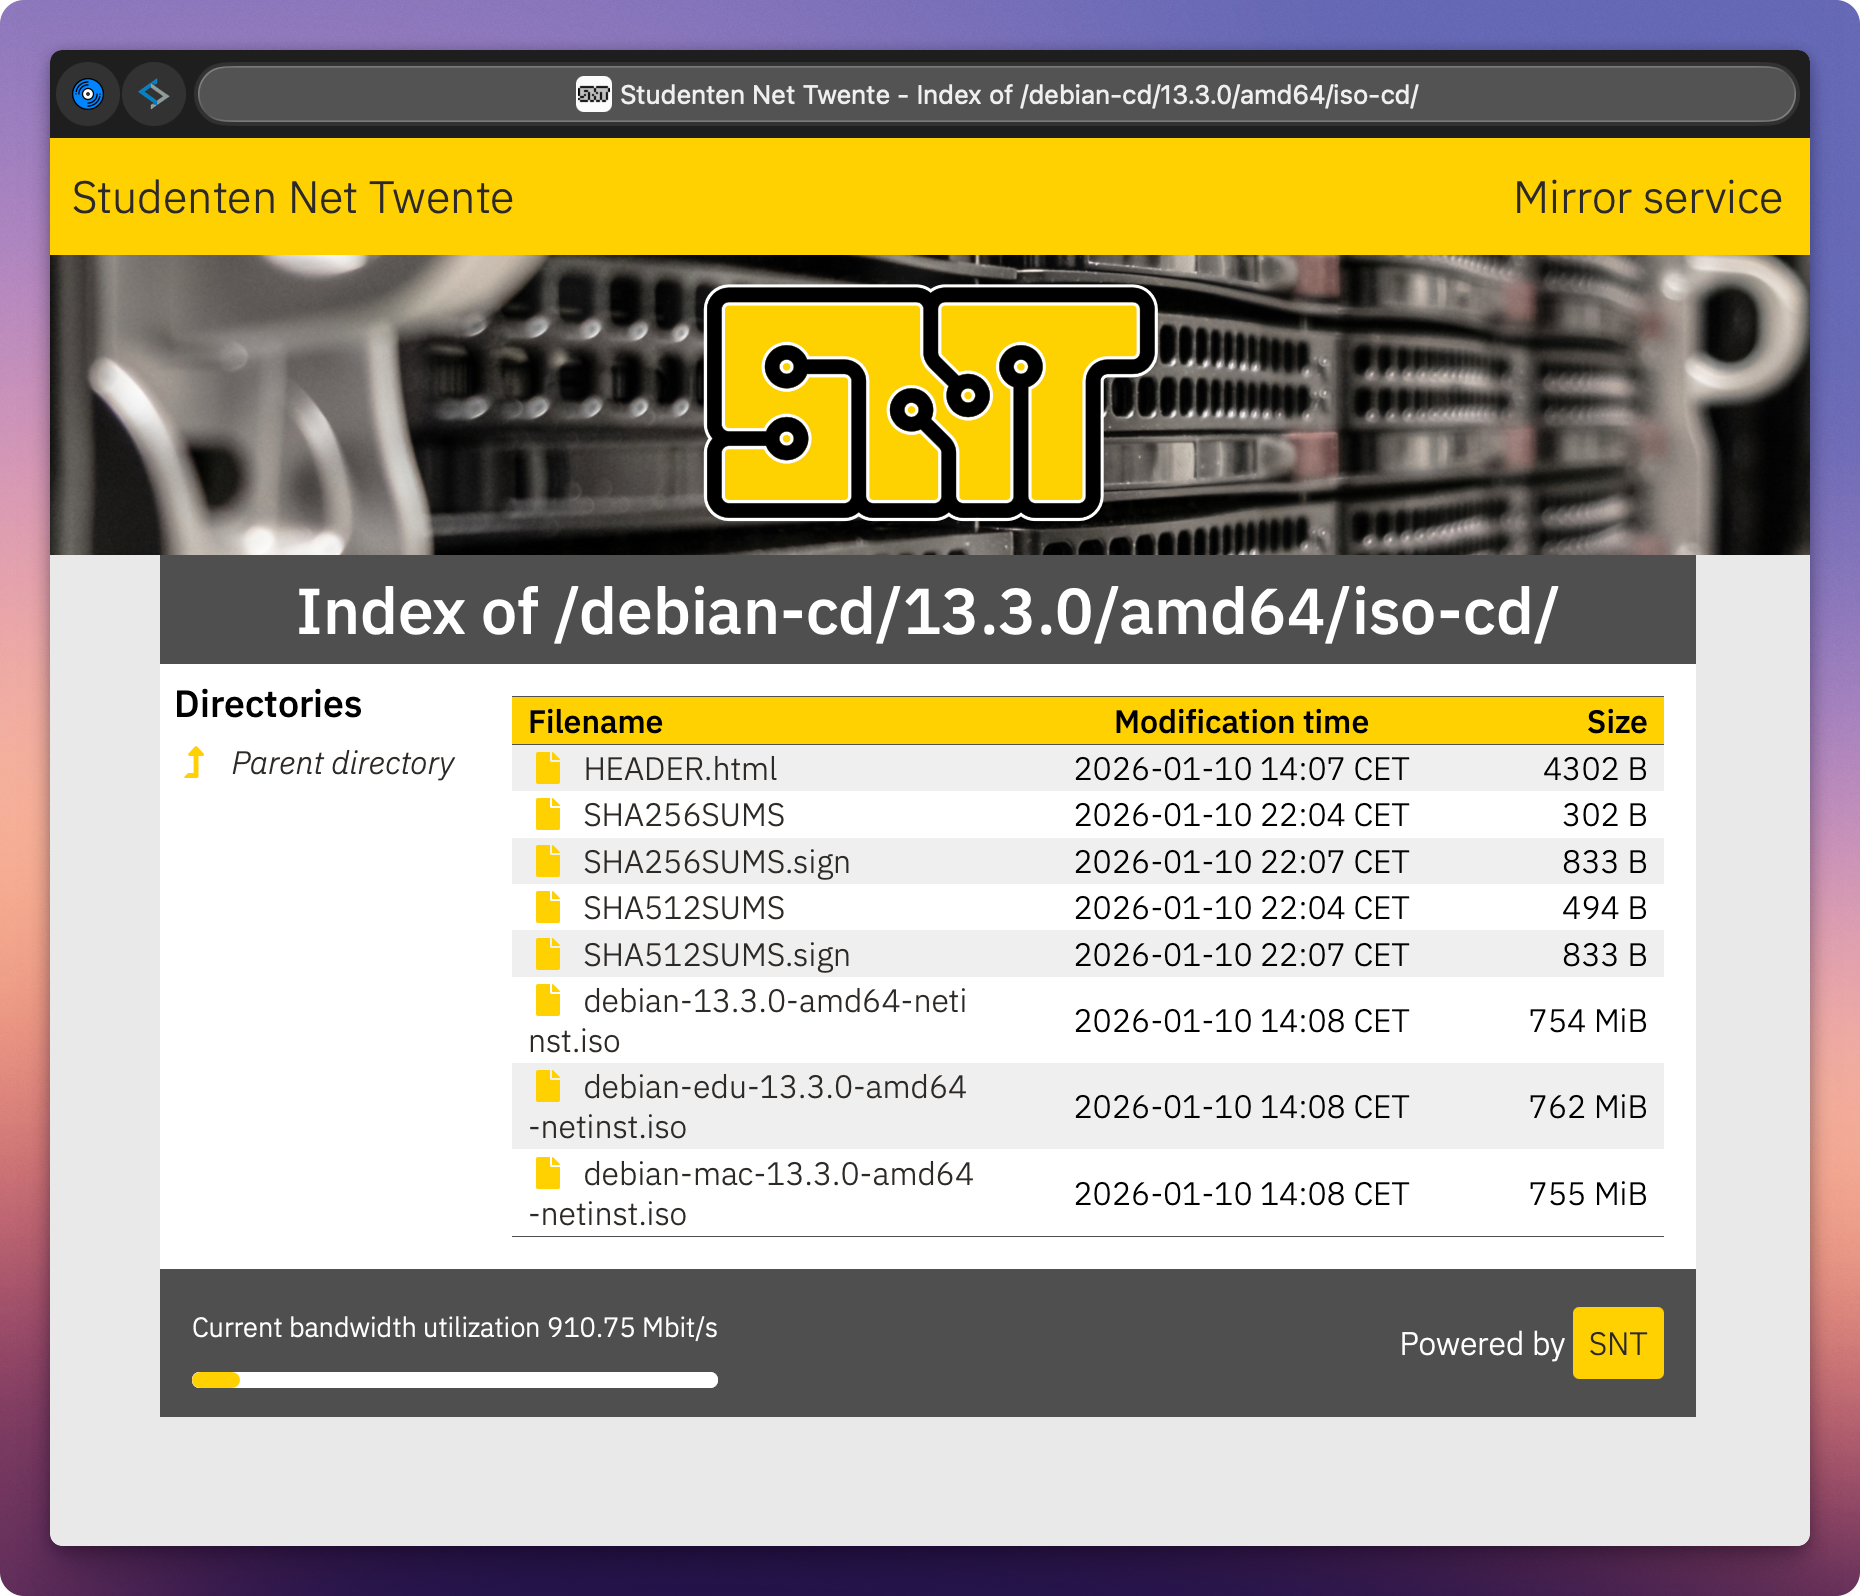
Debian Installation Medium
We use Debian 13 (amd64).
Download source (ISO): https://debian.snt.utwente.nl/debian-cd/13.3.0/amd64/iso-cd/
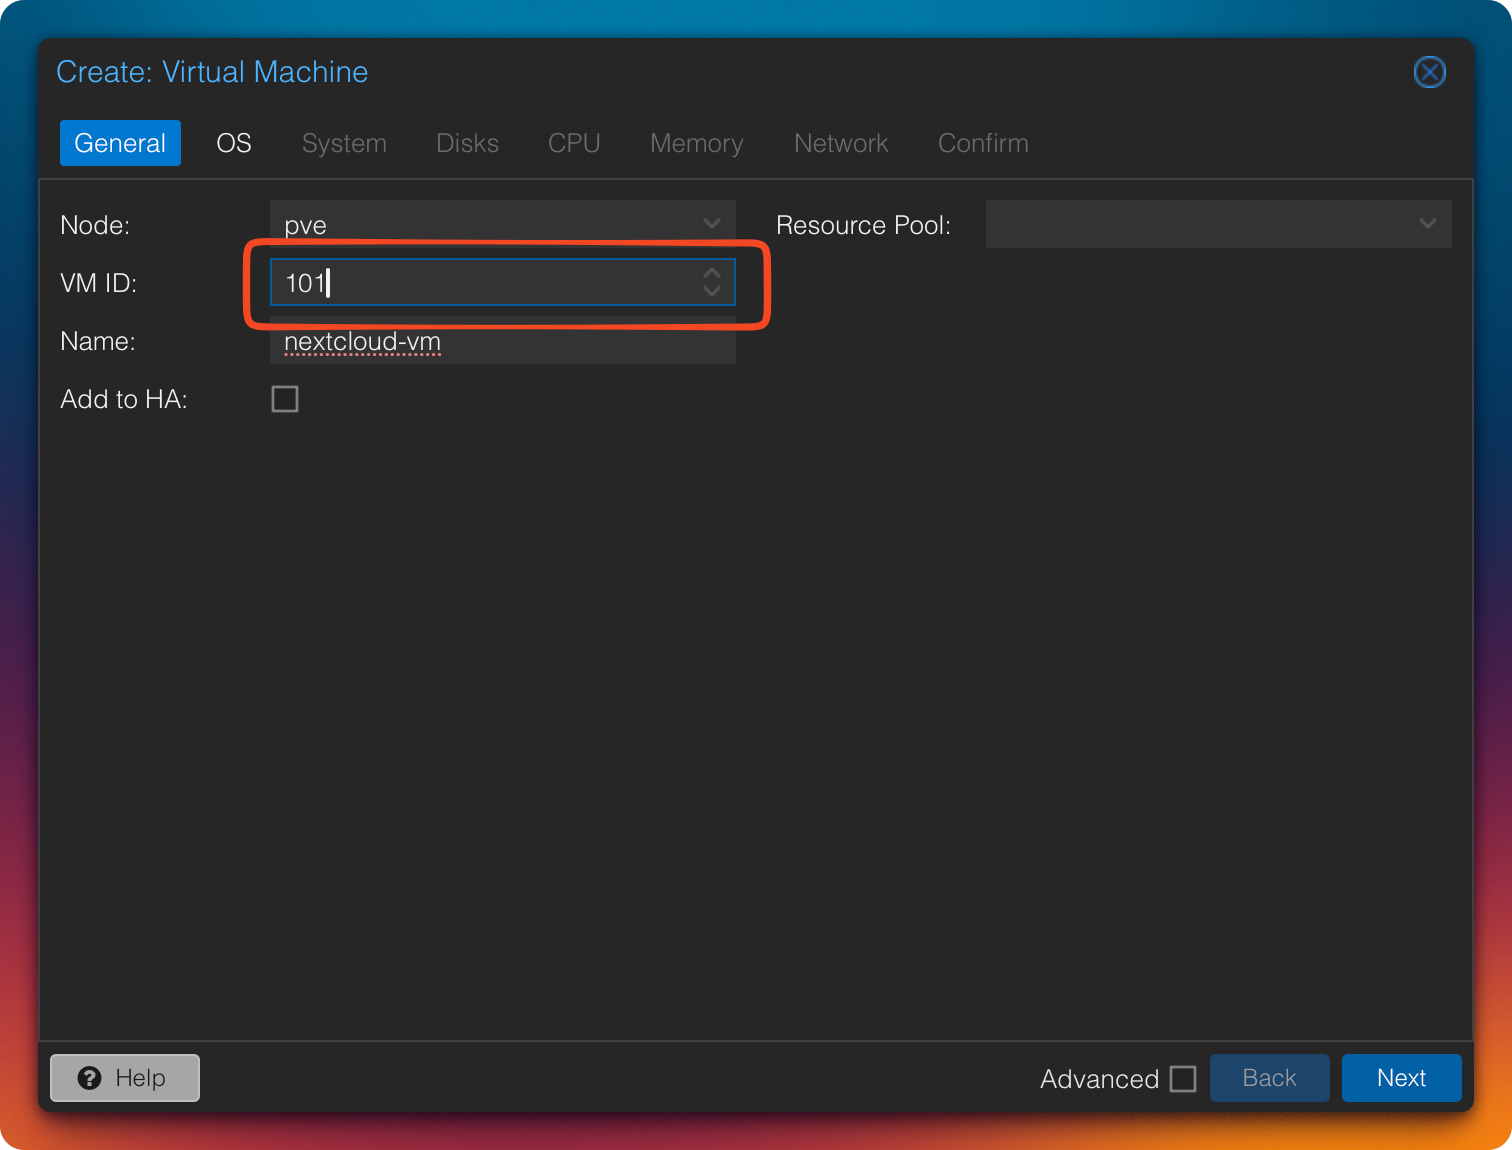
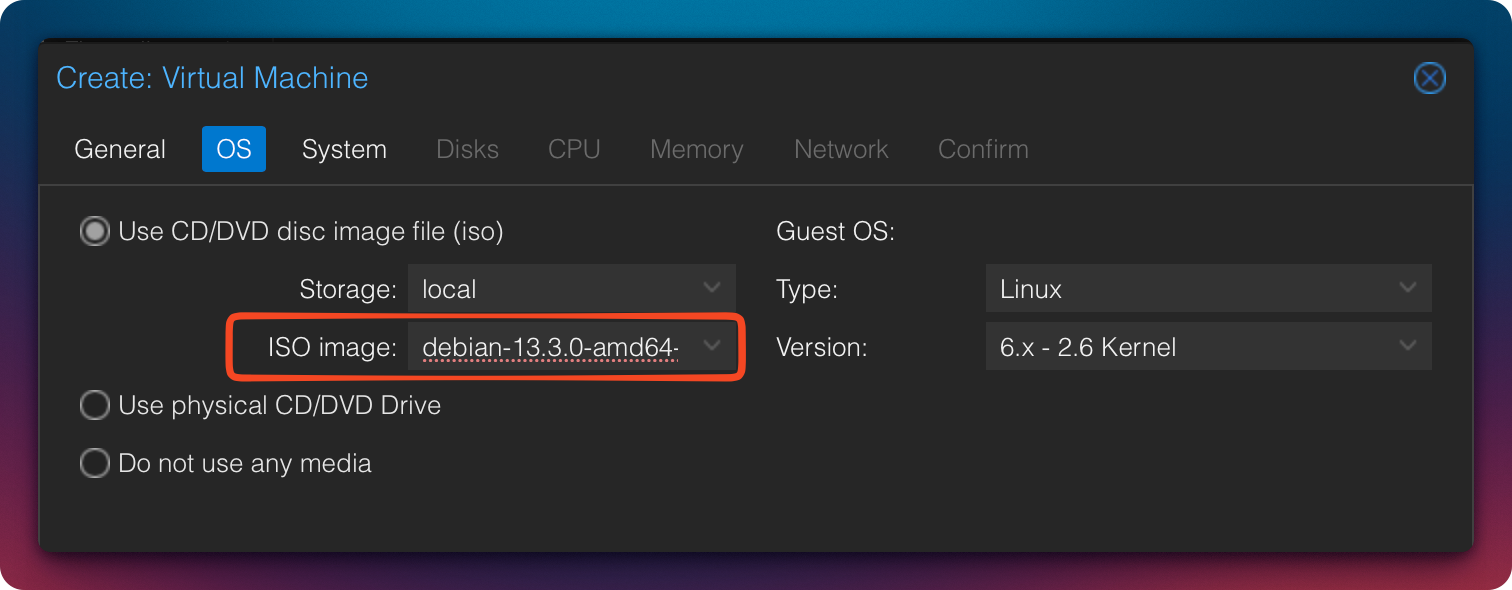
Step 1: Create the VM in Proxmox
- Create a new VM
- Assign the desired VM ID
- Select the previously downloaded Debian ISO
Step 2: VM System Configuration
Machine Type and Agent
-
Machine:
q35
→ modern CPU features such as improved PCIe, NVMe, and hardware emulation support -
QEMU Guest Agent: enable
→ improved status reporting and clean shutdown functionality
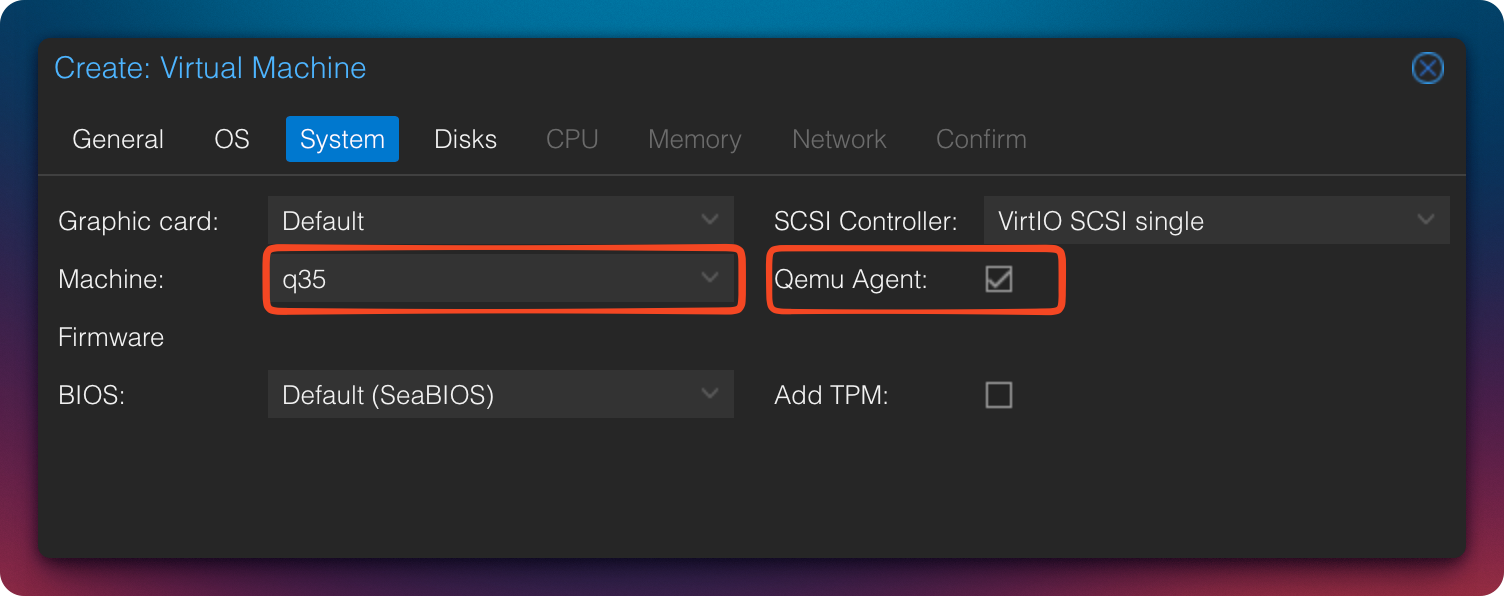
Why q35 instead of i440fx:
The q35 machine type emulates a modern Intel chipset with native PCIe support. This enables proper PCIe passthrough (e.g., for GPUs or NVMe devices), AHCI controllers, and vIOMMU emulation. Compared to the legacy i440fx, it is significantly better suited for modern guest systems and extensions.
QEMU Guest Agent:
The QEMU Guest Agent is a small daemon running inside the guest system that enables direct communication with Proxmox. It allows clean shutdowns (instead of ACPI force-off), freezes file systems before snapshots/backups (ensuring consistency), and provides accurate status information such as IP addresses and memory usage.
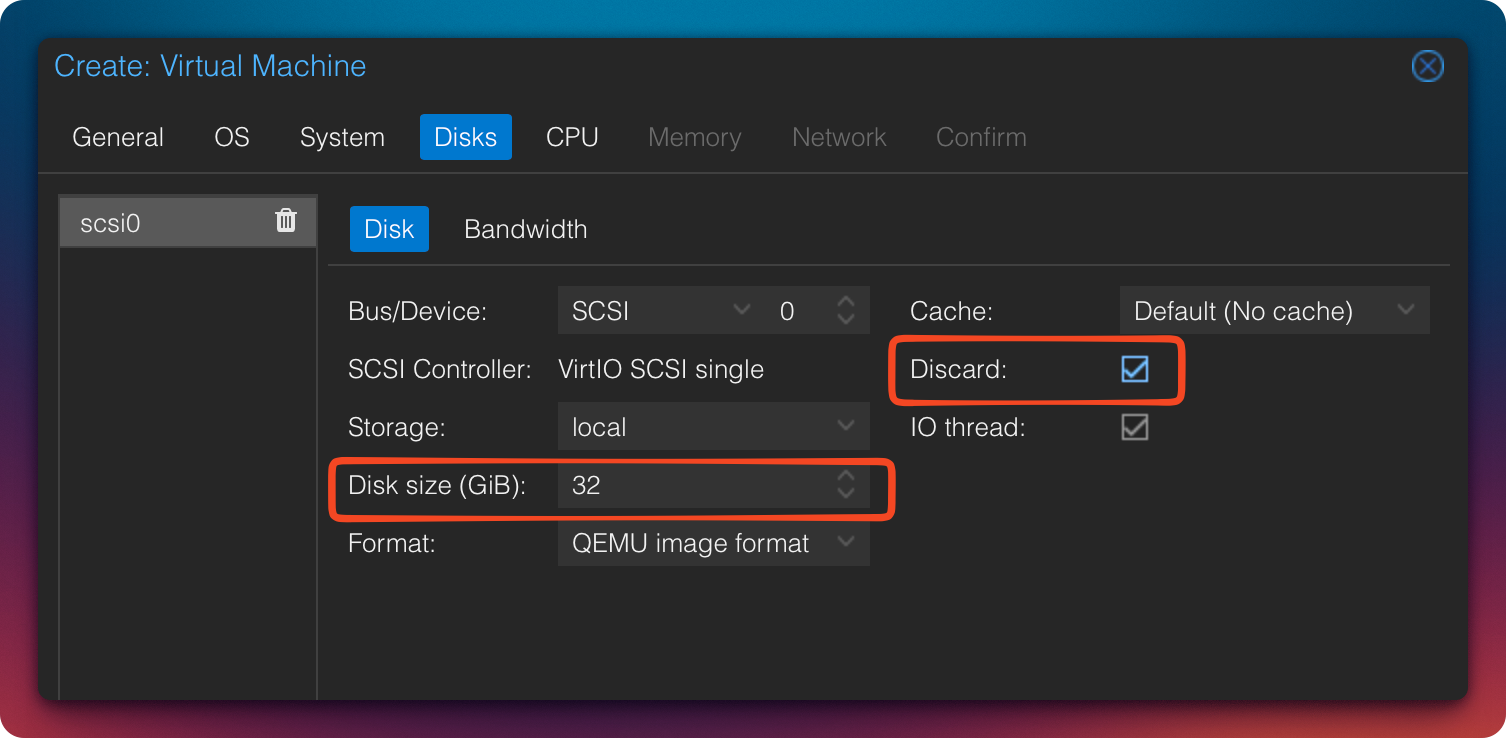
Configure the System Disk
- Disk Size: 32 GB
- Cache: Default
- Discard: Enable
(only relevant for SSD/NVMe)
Add Second Disk (Data)
We now add a second disk, which will later be used exclusively for Nextcloud data.
- Size: e.g., 200 GB
- Storage: according to your infrastructure
- Discard: enable (for SSD/NVMe)
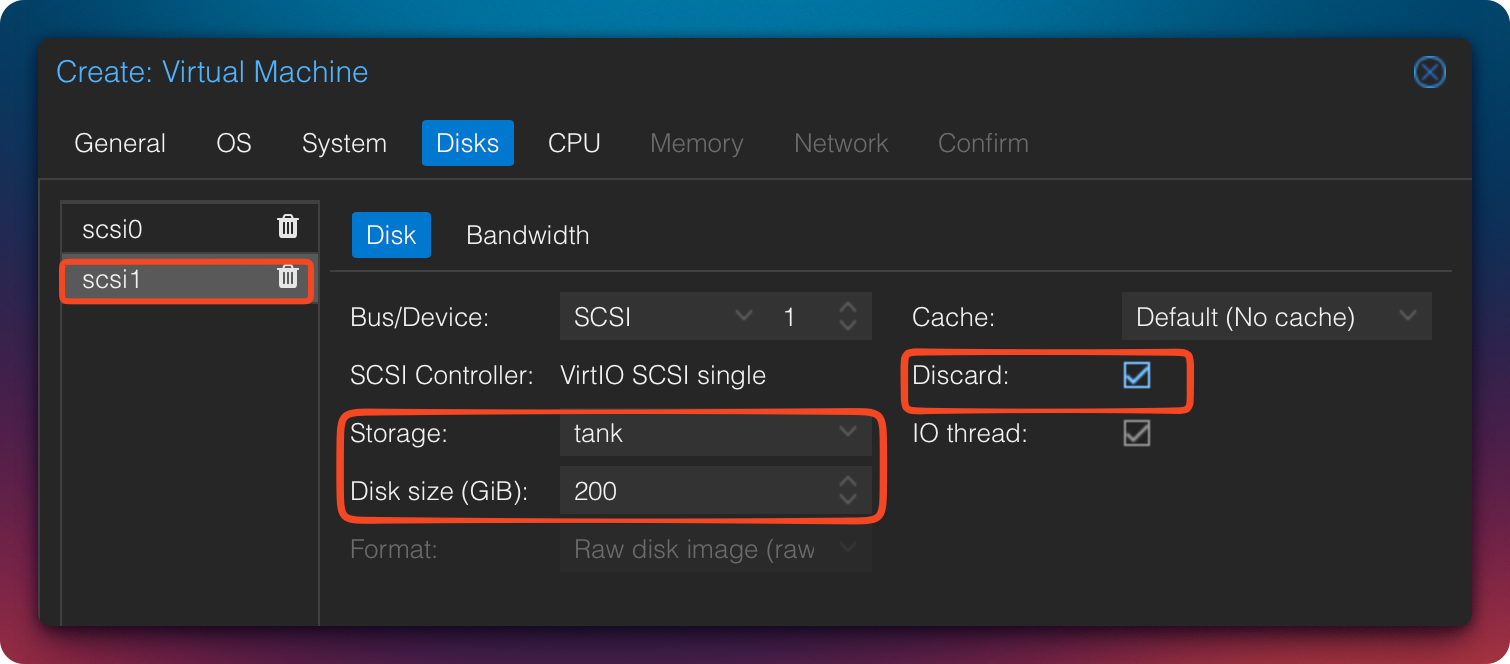
We deliberately start the data disk at 200 GB. It can later be expanded easily in Proxmox and within the guest system to demonstrate dynamic storage growth in a homelab environment.
CPU Configuration
-
Cores: 4
(2 are sufficient for small setups) -
Type:
host
→ exposes all CPU features to the VM
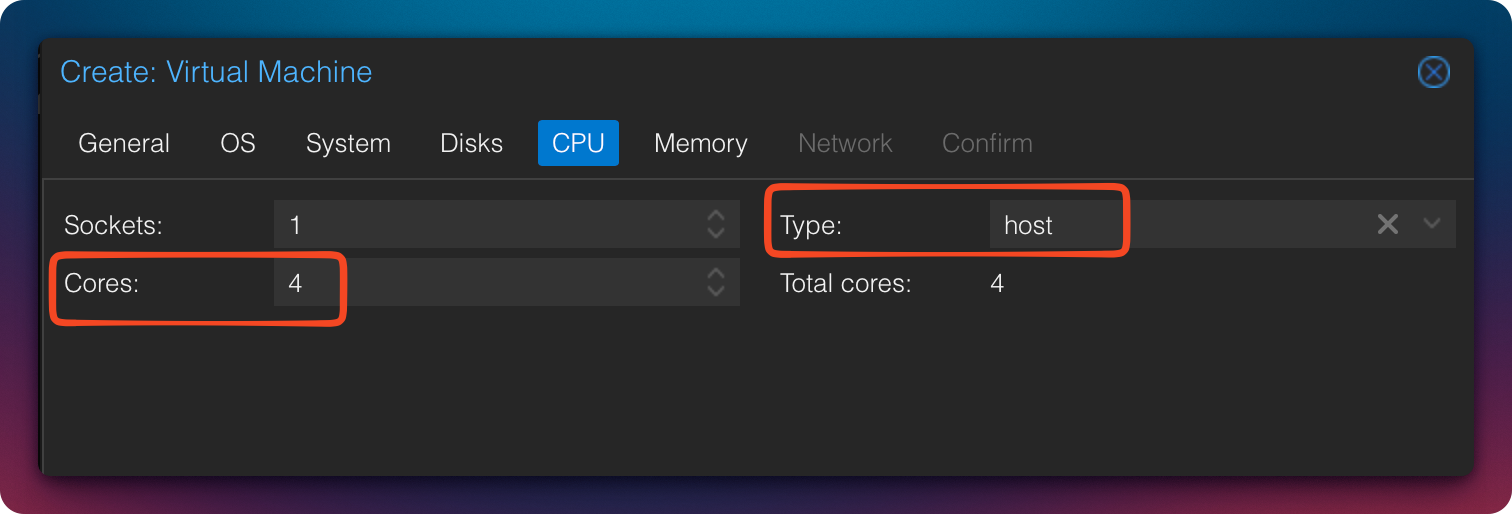
Why host:
The CPU type host passes all features and extensions of the physical host CPU (e.g., AVX, AES-NI) directly to the VM. This provides maximum performance. However, it is only recommended if you do not plan live migration between hosts with different CPU types, as this can cause migration failures.
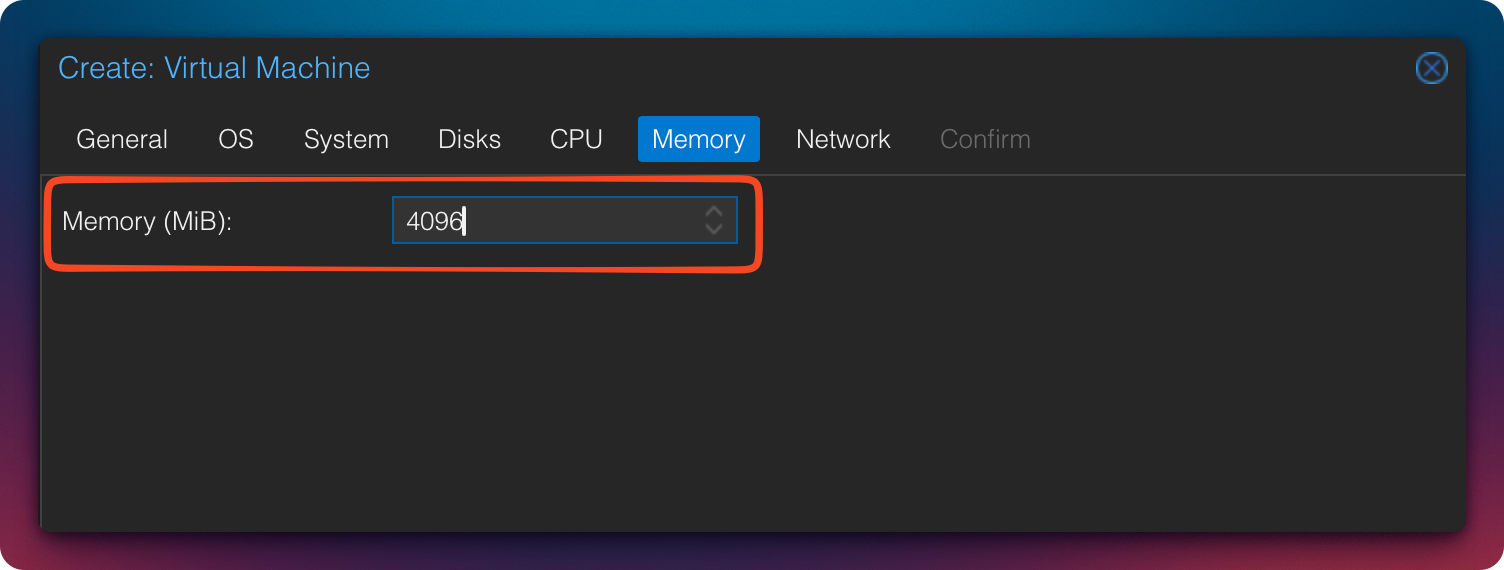
Memory
- Minimum: 2 GB (functional)
- Recommended: 4 GB
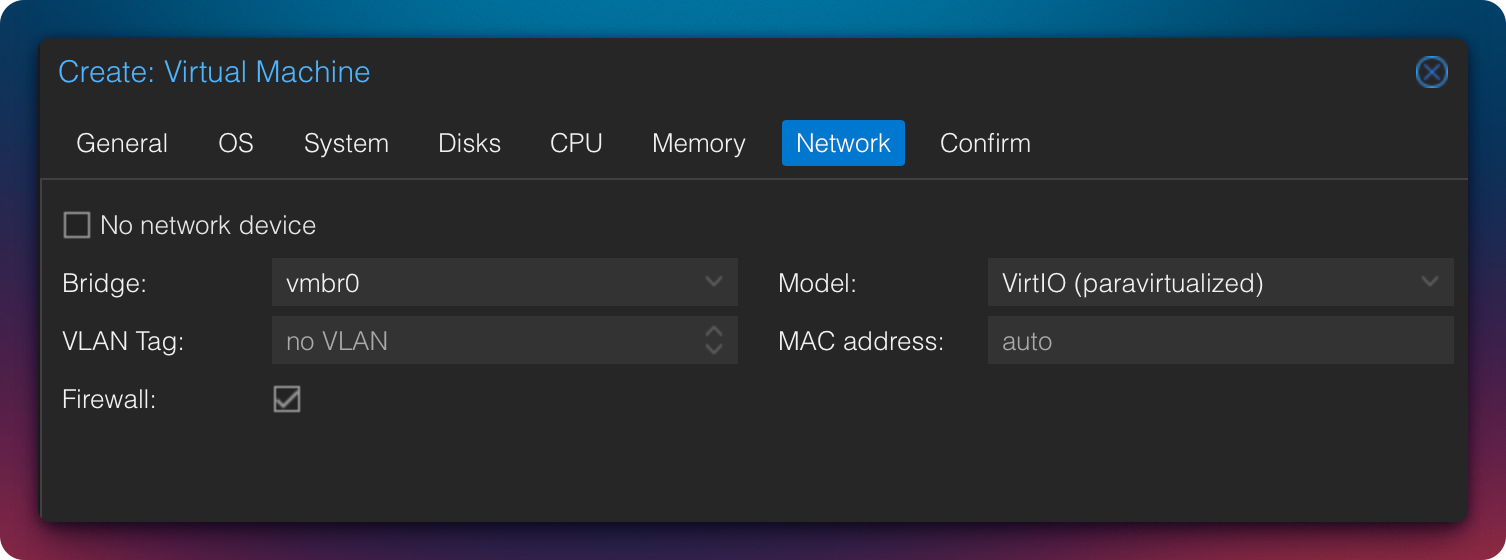
Network
The default network configuration can remain unchanged.
Review Configuration
If everything is configured correctly, the VM summary should look similar to this.
Now start the VM and begin the Debian installation.
Step 3: Install Debian
Language & Region
To select Germany:
OtherEuropeGermany
The keyboard layout can then be accepted as proposed.
Hostname & Domain
- Hostname: e.g.,
ncorcloud - Domain: either public or internal
(e.g.,intranet.zuhause.deorexample.org)
In this example, I chose:
cloudzn80.net
Set Root Password
Assign a strong root password.
Since direct SSH login as root poses a security risk, we will disable this capability after installation.
Create a Regular User
In addition to the root user, we require a regular user account.
In this example, the username is ncadmin. Assign a strong password here as well.
Partitioning
- Guided – use entire disk
- Important: select the small 32 GB disk
(usually/dev/sda) - All files in one partition
Then write the changes to disk.
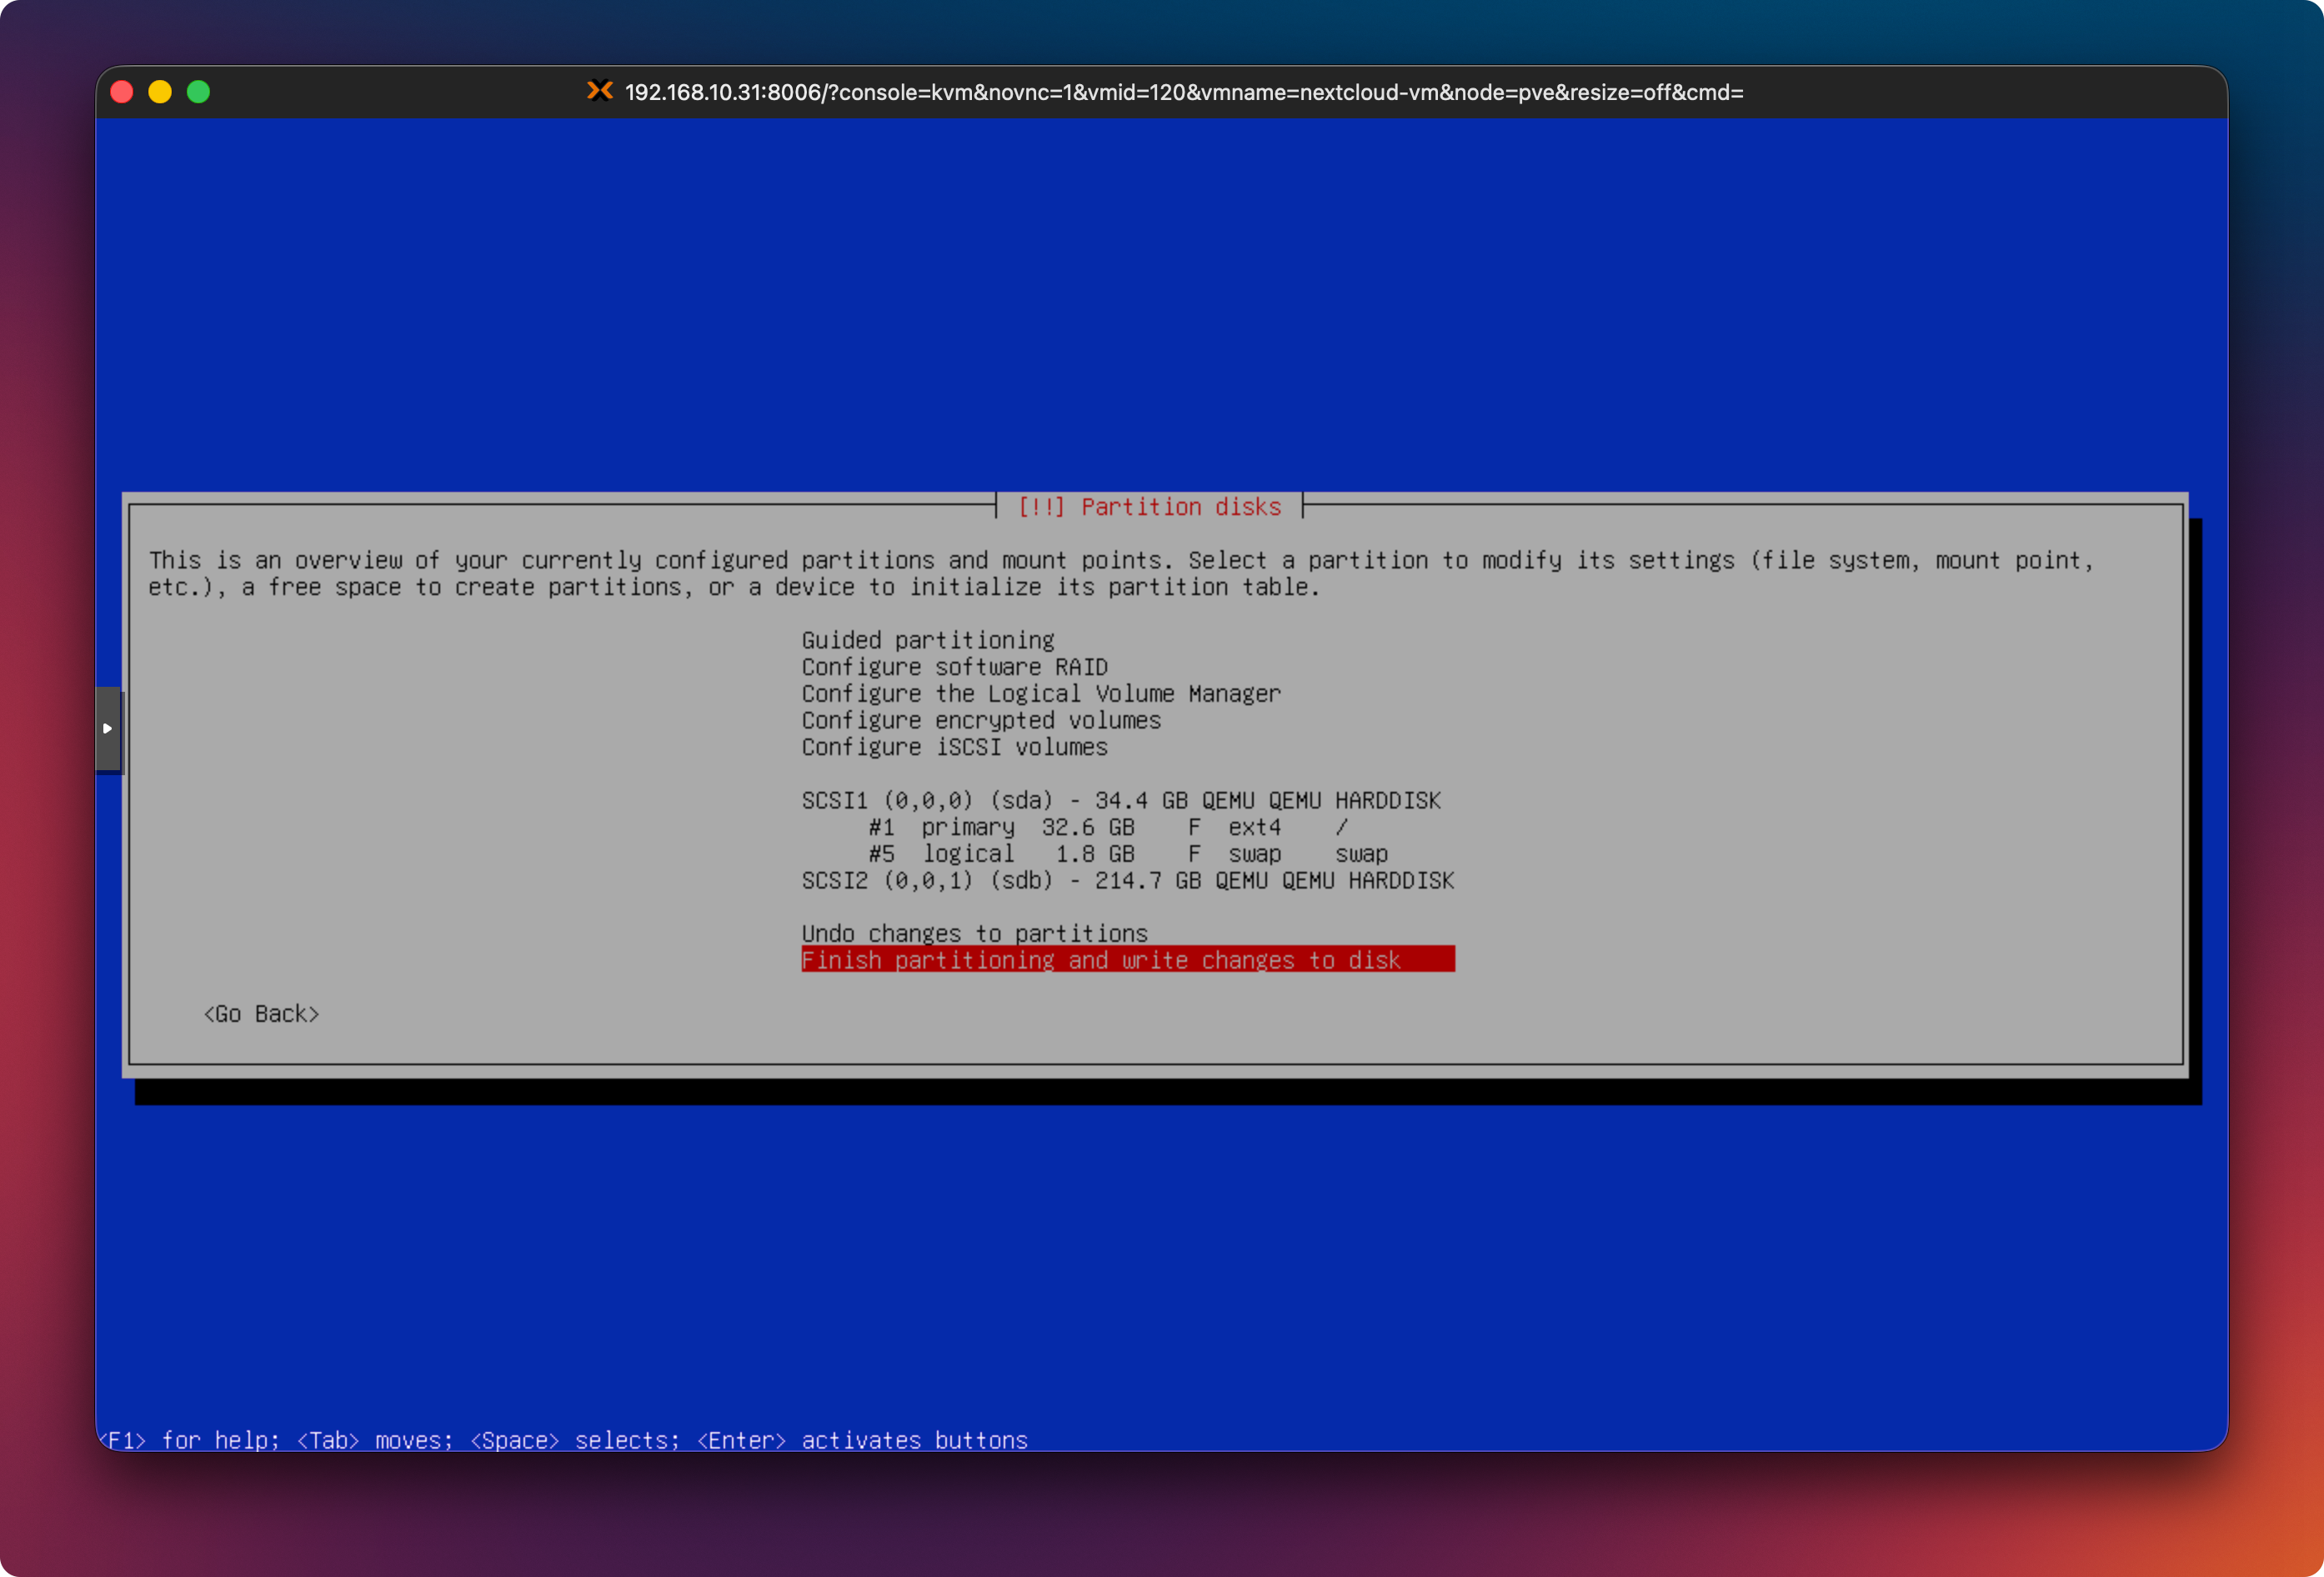
Partitioning Notes
During Debian installation, the commonly selected option is
“Guided – use entire disk.”
An alternative is:
“Guided – use entire disk and set up LVM.”
This creates Logical Volume Manager (LVM) volumes, allowing more flexible resizing of partitions (especially the root filesystem) later without repartitioning the disk.
Swap Area
Regardless of the partitioning method, a swap partition or swap file should be configured. In the screenshot above, a 1.8 GB swap partition is shown.
Typical guidelines:
- At least 2–4 GB swap for low-RAM systems
- For systems with ≤ 8 GB RAM, swap equal to RAM (1:1) is often recommended
- With large amounts of RAM (> 16–32 GB), significantly less swap (2–8 GB) or a swap file is usually sufficient
Package Sources & Updates
- Additional media: No
- Debian mirror:
- Country: Germany
- Mirror:
deb.debian.org
- Proxy: No
- Participate in package usage survey: No
Software Selection
We install no desktop environment.
- ❌ Debian Desktop Environment
- ❌ GNOME
- ✅ SSH Server
The web server will be installed manually later.

Bootloader
- Install GRUB to:
/dev/sda
(SCSI-0)
The Debian installation is now complete.
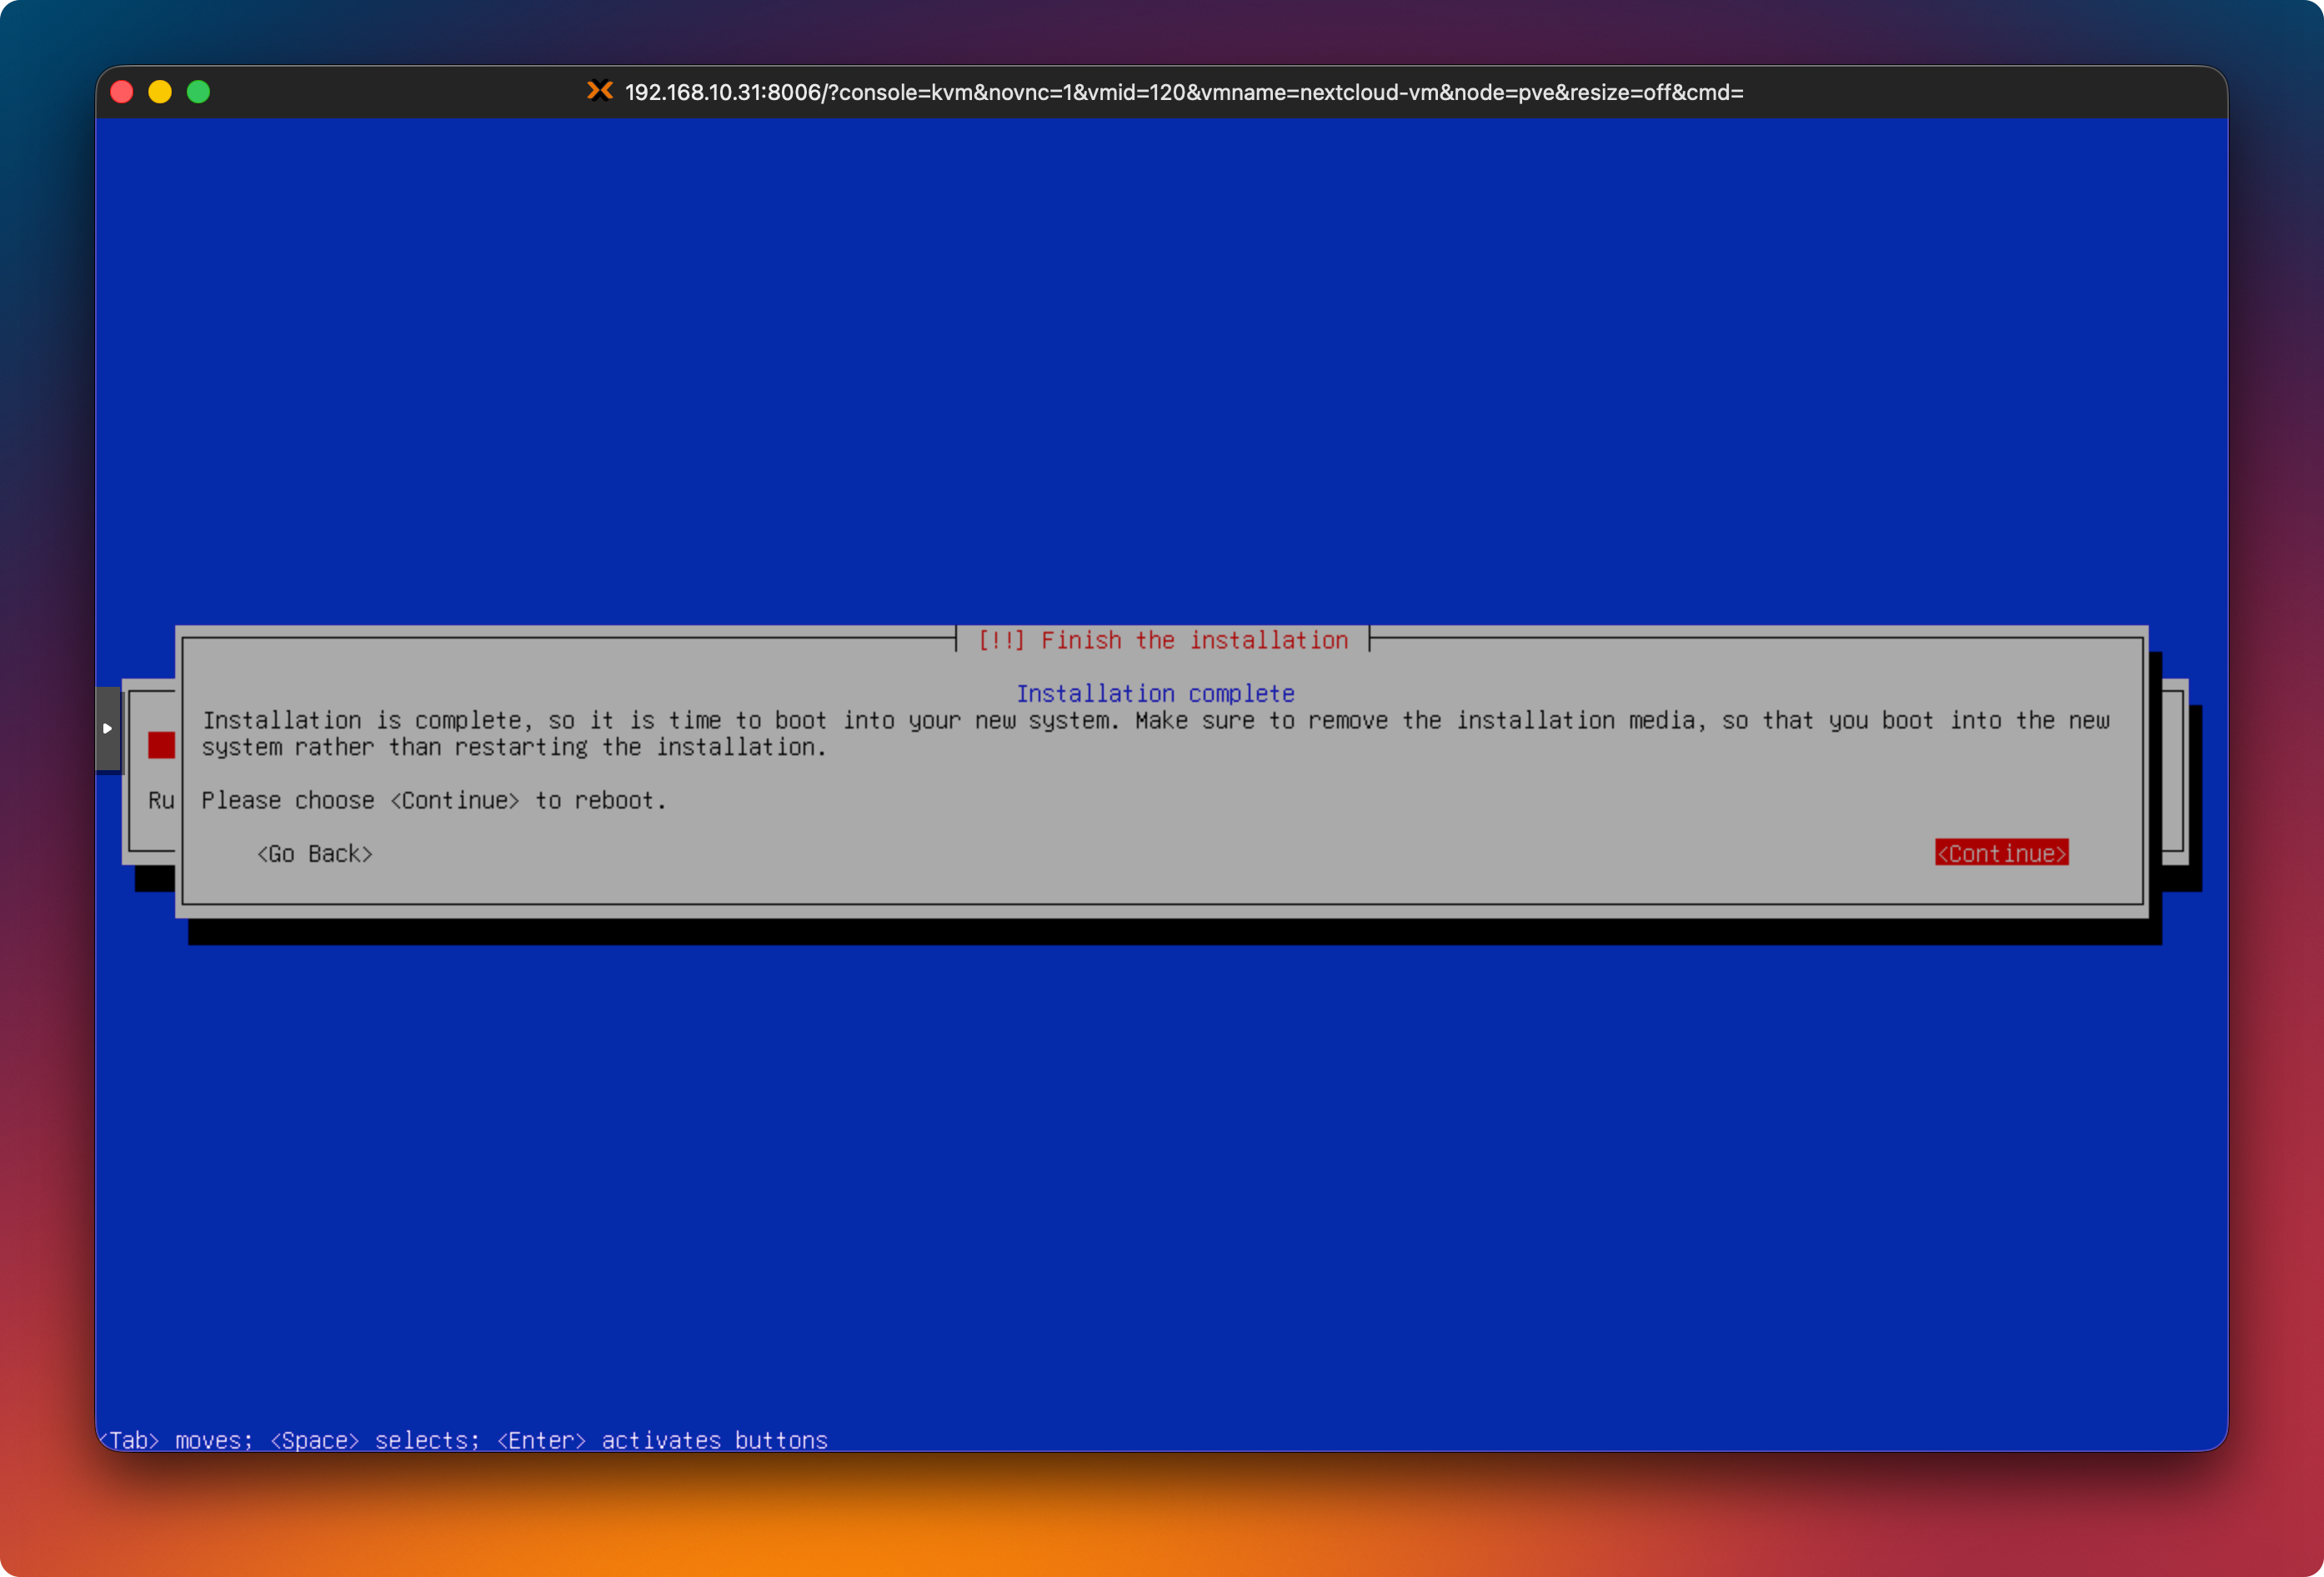
Step 4: Verify Boot Order
Remove the ISO from the VM’s CD/DVD drive and set the boot order to prioritize the hard disk. Otherwise, the VM may continuously attempt to boot from the empty ISO.
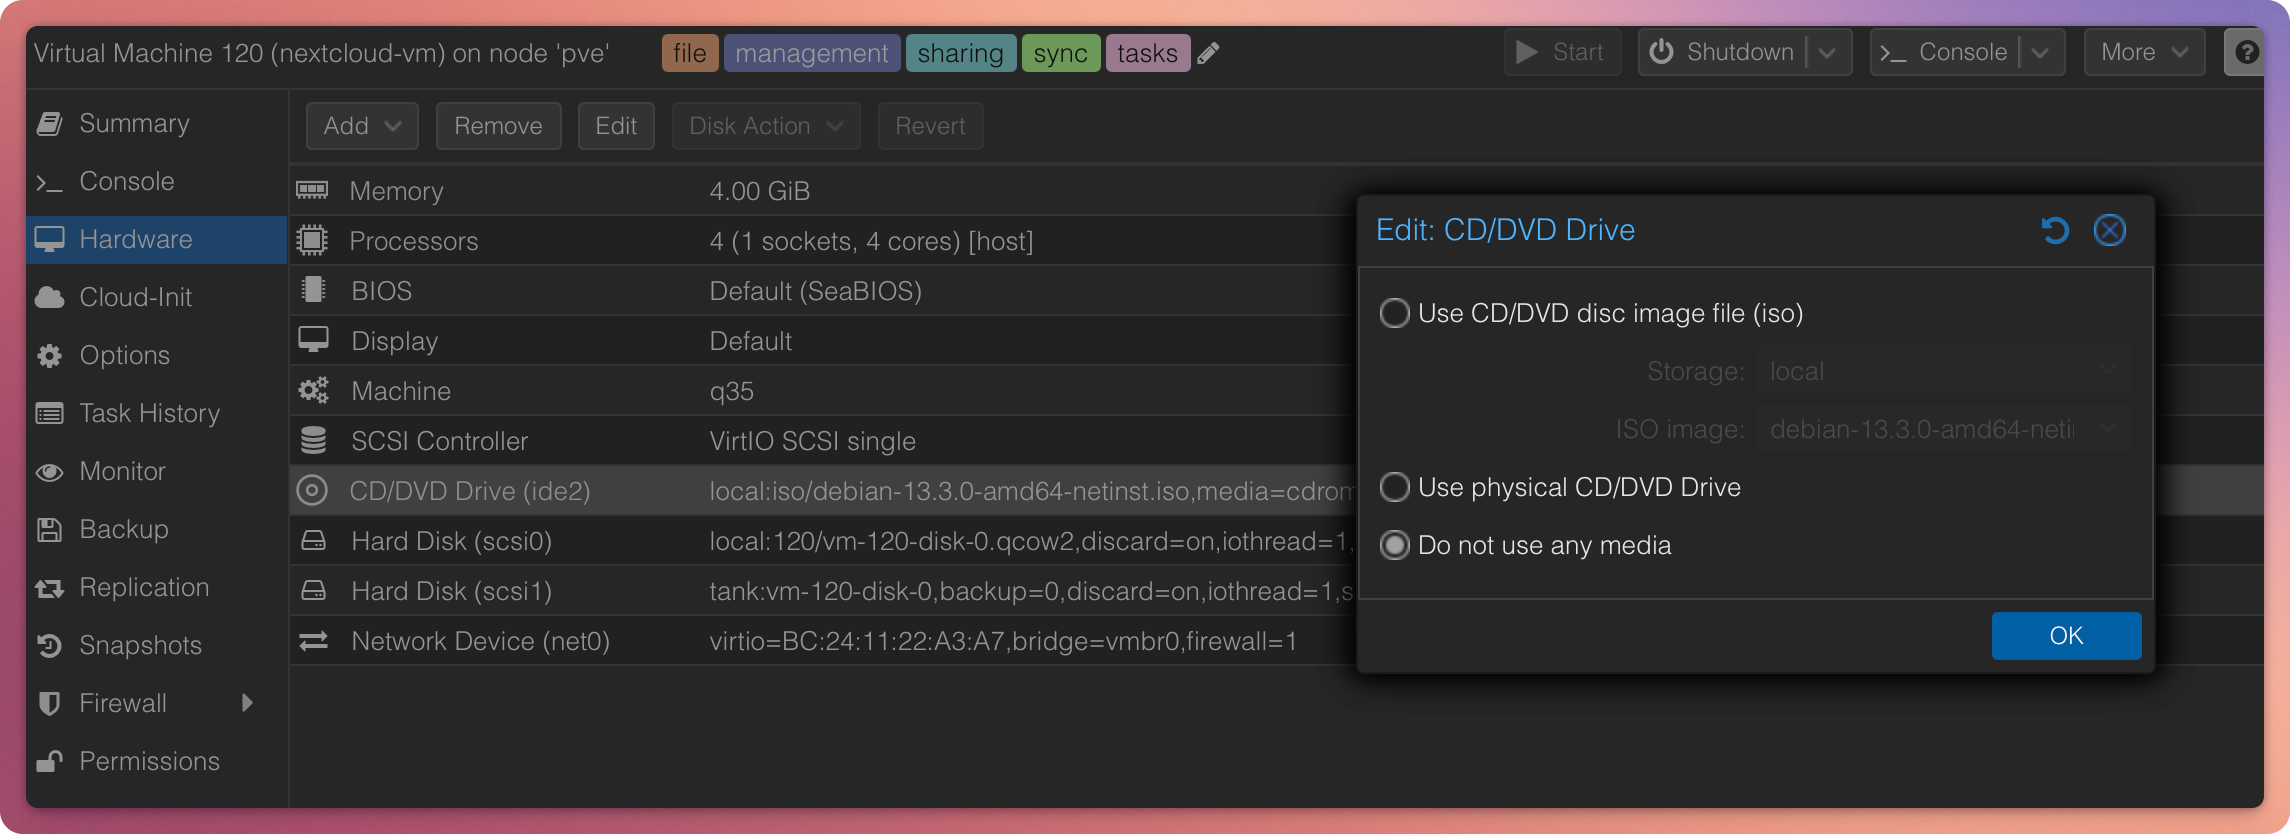
If the VM boots from the ISO again:
- Power off the VM
- Options → Boot Order
- Move the system disk to the top
- Move the ISO down or disable it
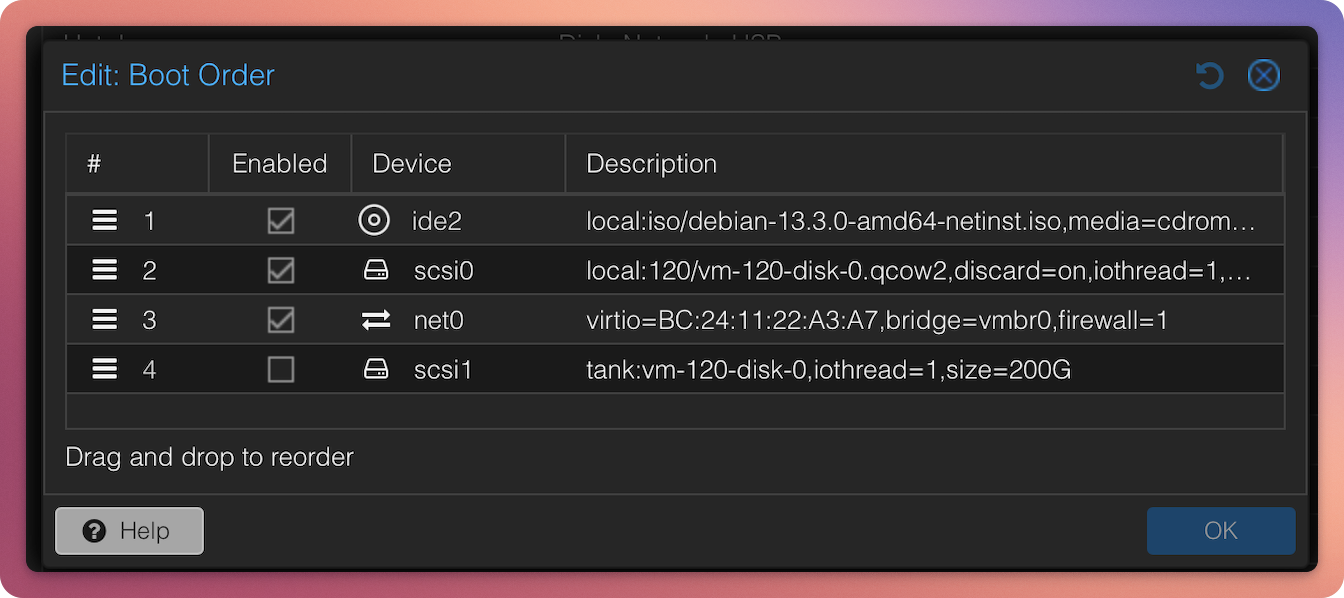
Boot order incorrect
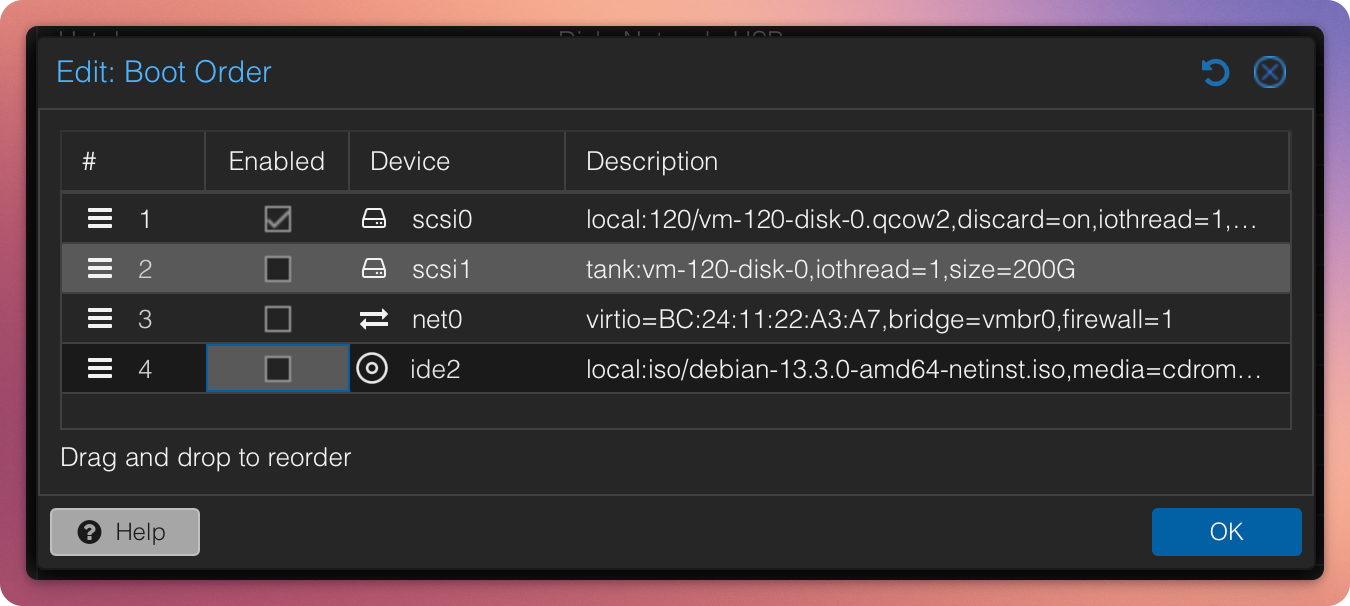
Boot order correct
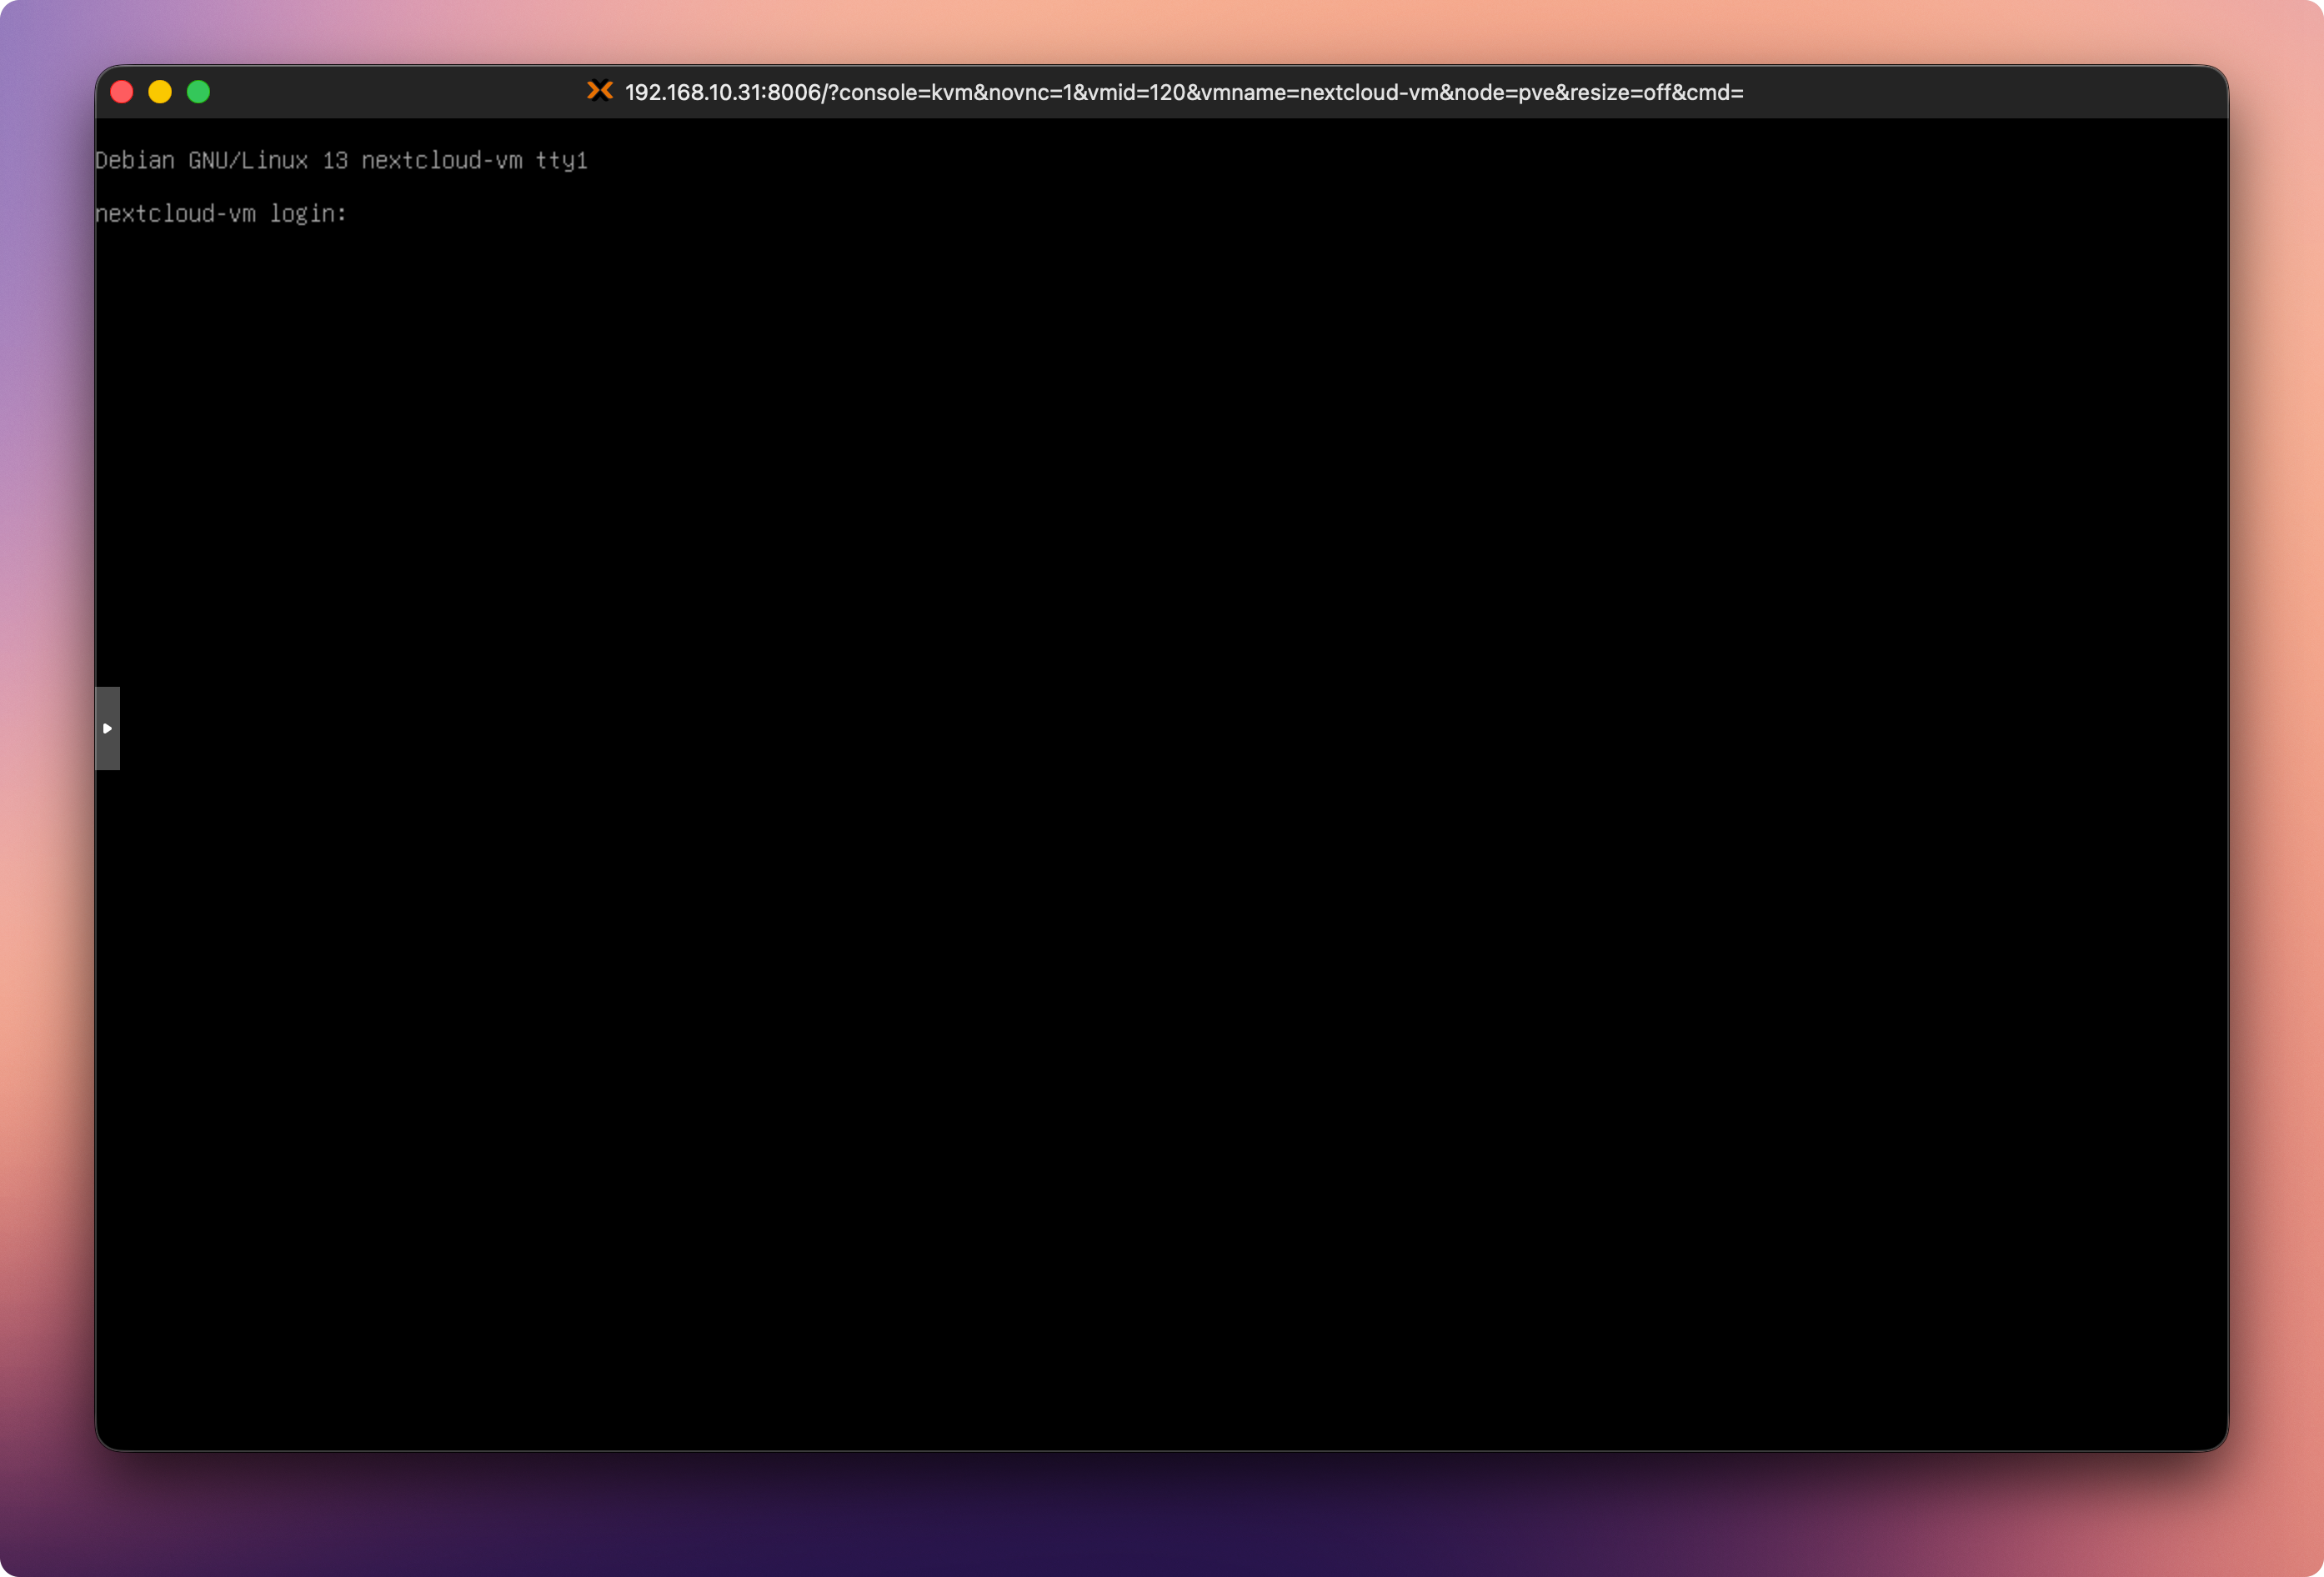
Result
If everything was completed correctly, you should now see the Debian 13 login console.
Next Step
Continue with:
Part 2: Configure IP, User Permissions, and Second Data Disk
- Configure a static IP
- Partition, format, and mount the second disk
- Prepare the base system