# Proxmox v9 Cluster Installation in VirtualBox

Installation of Proxmox v9 Cluster within VirtualBox for testing and learning

# Overview

This documenation describes a real-world virtualization lab by running Proxmox VE inside a VirtualBox VM, enabling a fully local environment for learning DevOps, infrastructure engineering, virtualization, and cloud concepts.

## Proxmox &amp; clustering — why it matters

Proxmox VE is a Debian-based, open-source hypervisor that runs KVM virtual machines and LXC containers, all managed through a web UI.

#### Benefits of clustering

- Single control plane: manage multiple Proxmox nodes from one dashboard.
- Live migration: move VMs between nodes with minimal downtime.
- High availability (HA): automatically restart VMs on healthy nodes if a node fails.
- Replication: scheduled syncing of VM data across nodes for fast recovery.
- Scalability: add nodes to increase capacity without reorganizing your setup.
- Better resource utilization: distribute CPU, memory, and storage load across the cluster.

#### When to use it

- Learning DevOps, infrastructure, or cloud concepts.
- Testing HA, migration, and replication workflows.
- Running multi-node labs that mirror production operations.

#### Key trade-offs

- Network and storage design become more important (latency, bandwidth, shared storage).
- Cluster management adds operational complexity and requires monitoring.
- Some features (e.g., HA, efficient replication) need reliable networking and proper fencing/qpinger setup.

#### Quick checklist to get started

1. Ensure time sync (NTP) and reliable networking between nodes.
2. Use separate networks for management, replication (migration), and cluster communication.
3. Configure fencing/qdevice or quorum helpers for safety in failure scenarios.
4. Test live migration and replication in your lab before trusting production workloads.

## Key components

- Three computers or VMs with at least 6 GB RAM and 100 GB storage space per machine 
    - Storage can be lower as we will be using dynamically allocated virtual disks
- VirtualBox — host hypervisor that runs the Proxmox VM
- Proxmox VE ISO — installed as the nested hypervisor inside VirtualBox
- Ubuntu Server ISO — guest OS installed in a VM managed by Proxmox
- Debian Server ISO — guest OS install in a VM managed by Proxmox
- VBoxManage — CLI for creating and configuring the outer VirtualBox VM
- Proxmox Web UI — dashboard used to manage the inner guest VMs

## 2-Nods vs 3-Node Cluster

A 2-node cluster is simpler to set up and fine for learning, but it lacks a proper quorum (the voting system that keeps a cluster running when a node fails). That means HA isn’t reliable without extra workarounds to prevent the cluster from stalling.

A 3-node cluster includes quorum by default: two of three nodes can keep the cluster running if one goes down. It’s more stable, supports real HA testing, and scales better—though it requires one more machine and a bit more setup.

We’ll use a 3-node cluster because it’s the best balance of stability and realistic, hands-on experience.

## Lab architecture (my current setup)

- AMD Ryzen 7 7800X3D
- 32 GB RAM
- 1 TB NVMe storage

## Overview of what will be built

- Server Template inside VirtualBox to clone
- Installation Proxmox VE inside a VirtualBox VM clones
- Configured networking so the Proxmox Web UI is reachable from the host browser.
- Uploaded the Ubuntu Server ISO into Proxmox and created a guest VM.
- Launched and installed Ubuntu inside Proxmox.
- Resolved nested-virtualization KVM errors by disabling KVM for the guest.

## Network configuration

- Adapter 1: Bridge — outbound internet access and management network.
- Adapter 2: Host-Only — host ↔ Proxmox cluster communication (coresync) network.
- Adapter 3: Host-Only — host ↔ Proxmox replication (migration) network.

I have choosen the following IP-Addresses for management, coresync and replication:

- Node 1:
  - nic0 `192.168.0.201` (hostname `prox01.local`)
  - nic1 `172.20.1.201`
  - nic2 `172.20.2.201`
- Node 2:
  - nic0 `192.168.0.202` (hostname `prox02.local`)
  - nic1 `172.20.1.201`
  - nic2 `172.20.2.201`
- Node 3:
  - nic0 `192.168.0.203` (hostname `prox03.local`)
  - nic1 `172.20.1.201`
  - nic2 `172.20.2.201`

You should adapt the IP address of nic0 (the main interface of the Proxmox node) so that it is in the same subnet as your PC (for example, both in 192.168.0.0/24). This allows direct communication without additional configuration. If they are in different subnets, a router with the correct routing rules is required — otherwise, your PC will not be able to reach the Proxmox node.

---

Once you have downloaded all the ISO images, continue on the next page with the installation and setup of the Proxmox nodes and networking.

# Setting up the Proxmox Nodes

On the first page of this chapter, we defined our requirements and made some key decisions. Now, let’s set up the Proxmox nodes in VirtualBox and install Proxmox VE on them.

[![proxmox-logo](https://wiki.zn80.net/uploads/images/gallery/2026-03/scaled-1680-/grafik.png)](https://wiki.zn80.net/uploads/images/gallery/2026-03/scaled-1680-/grafik.png)

To ensure cluster stability and prevent traffic saturation, your test environment requires a minimum of three separate network interfaces:

- **Management Interface:**<span style="white-space: pre-wrap;"> For host access and configuration.</span>
- **Cluster Communication (Heartbeat):**<span style="white-space: pre-wrap;"> Isolated traffic for node health and HA voting.</span>
- **VM Migration &amp; Storage Replication:**<span style="white-space: pre-wrap;"> High-bandwidth link for data synchronization.</span>

> **Note:**<span style="white-space: pre-wrap;"> While dedicating a network segment for NAS storage is a best practice in production, it is excluded from the scope of this virtualized test exercise.</span>

## Creating the Master Virtual Machine (Hardware Mode)

<span style="white-space: pre-wrap;">
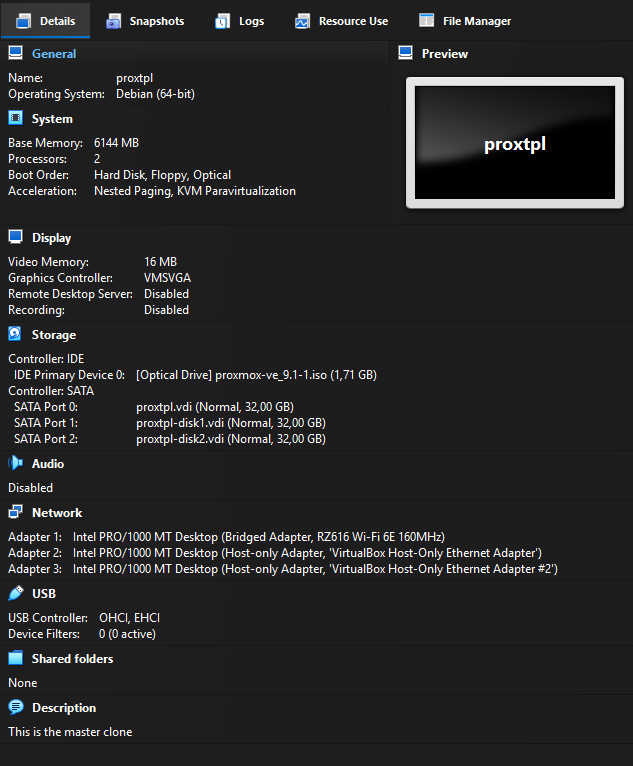
To avoid missing critical settings or having to restart the process, it is recommended to build a single VirtualBox Virtual Machine (VBVM) to act as a template. You can name this master image </span>`<span class="editor-theme-code">proxtpl</span>`<span style="white-space: pre-wrap;"> so that it remains at the bottom of your VM list. </span>**Ensure that you never actually start the master image; it must remain powered off.**

- **Name:**<span style="white-space: pre-wrap;"> </span>`<span class="editor-theme-code">proxtpl</span>`
- **Type:**<span style="white-space: pre-wrap;"> Linux, Debian (64-bit)</span>
- **RAM:**<span style="white-space: pre-wrap;"> 2 GB minimum (4 GB or 6 GB is recommended if your host hardware allows).</span>
- **Storage (SATA0):**<span style="white-space: pre-wrap;"> Create a 32 GB boot drive for the Proxmox installation.</span>
- **Storage (SATA1 &amp; SATA2):**<span style="white-space: pre-wrap;"> Create two 32 GB dynamically allocated disks; these will be used for the ZFS storage pool. You may use 64 GB if you have sufficient space.</span>
- **Boot Order:**<span style="white-space: pre-wrap;"> Adjust the order to set </span>**Hard Disk**<span style="white-space: pre-wrap;"> first and </span>**Optical**<span style="white-space: pre-wrap;"> second.</span>
- **Optical Drive:**<span style="white-space: pre-wrap;"> Mount the Proxmox ISO.</span>
- **Network Adapters:**<span style="white-space: pre-wrap;"> Attach 3 adapters:</span>
    - **nic0:**<span style="white-space: pre-wrap;"> BRIDGED (Management interface)</span>
    - **nic1:**<span style="white-space: pre-wrap;"> HOST-ONLY (Cluster interface / Core sync) — </span>**Disable DHCP**
    - **nic2:**<span style="white-space: pre-wrap;"> HOST-ONLY (Replication / Migration interface) — </span>**Disable DHCP**

Once configured, your setup should look like this:

[![{5D424EF4-3EE5-4FC9-81CC-4CE2B4252D91}.png](https://wiki.zn80.net/uploads/images/gallery/2026-03/scaled-1680-/5d424ef4-3ee5-4fc9-81cc-4ce2b4252d91.png)](https://wiki.zn80.net/uploads/images/gallery/2026-03/5d424ef4-3ee5-4fc9-81cc-4ce2b4252d91.png)

<span style="white-space: pre-wrap;">Once the master is configured, create three clones and name them </span>`<span class="editor-theme-code">prox01</span>`<span style="white-space: pre-wrap;">, </span>`<span class="editor-theme-code">prox02</span>`<span style="white-space: pre-wrap;">, and </span>`<span class="editor-theme-code">prox03</span>`.

## Installing Proxmox VE (Software Mode)

With your three clones created, start them up to begin the installation.

- **Ignore KVM Virtualization errors:**<span style="white-space: pre-wrap;"> You will likely see an error stating that KVM Virtualization is not detected. This is expected, as VirtualBox may not pass VT-x/AMD-V instructions through to the guest. This is not an issue for this lab, as </span>**the test cluster will run Linux Containers (LXC)**<span style="white-space: pre-wrap;"> instead of full VMs.</span>
- **Verify hostnames:**<span style="white-space: pre-wrap;"> Ensure you correctly name each node (e.g., </span>`<span class="editor-theme-code">prox01.local</span>`<span style="white-space: pre-wrap;">, </span>`<span class="editor-theme-code">prox02.local</span>`<span style="white-space: pre-wrap;">, </span>`<span class="editor-theme-code">prox03.local</span>`) during setup. Renaming a node after a cluster is established is a complex and difficult procedure.
- **Select the 32GB boot drive**<span style="white-space: pre-wrap;"> for the installation target.</span>
- **Configure sequential IP addresses:**<span style="white-space: pre-wrap;"> Base these on the hostnames to simplify management (e.g., </span>`<span class="editor-theme-code">prox01</span>`<span style="white-space: pre-wrap;"> – 192.168.10.201, </span>`<span class="editor-theme-code">prox02</span>`<span style="white-space: pre-wrap;"> – 192.168.10.202, </span>`<span class="editor-theme-code">prox03</span>`<span style="white-space: pre-wrap;"> – 192.168.10.203).</span>
- **Network Settings:**<span style="white-space: pre-wrap;"> Set the Netmask to </span>`<span class="editor-theme-code">255.255.255.0</span>`<span style="white-space: pre-wrap;"> or use CIDR notation (e.g., </span>`<span class="editor-theme-code">192.168.10.201/24</span>`).
- **Gateway:**<span style="white-space: pre-wrap;"> Set this to your network's gateway, most likely </span>`<span class="editor-theme-code">192.168.10.1</span>`.
- **DNS Server:**<span style="white-space: pre-wrap;"> Set this to your local DNS configuration, also likely </span>`<span class="editor-theme-code">192.168.10.1</span>`.
- **Finalize:**<span style="white-space: pre-wrap;"> After installation, shut down the hosts and </span>**reboot them in headless mode**. This is where the boot order change from earlier comes in handy.

[![proxmox installation network settings](https://wiki.zn80.net/uploads/images/gallery/2026-03/scaled-1680-/dc80617e-4ef6-4a60-a2ef-294b42277024.png)](https://wiki.zn80.net/uploads/images/gallery/2026-03/scaled-1680-/dc80617e-4ef6-4a60-a2ef-294b42277024.png)

<details id="bkmrk-unfold-to-see-predef"><summary>Unfold to see predefined IP Configuration</summary>

<span style="white-space: pre-wrap;">Remember the IP Configuration from the </span>[Overview-Page](https://wiki.zn80.net/books/proxmox-ve/page/overview#bkmrk-network-configuratio):

{{@387#bkmrk-node-1%3A-nic0-192.168}}

</details><span style="white-space: pre-wrap;">After the reboot, access the web interface on </span>**port 8006**<span style="white-space: pre-wrap;"> (HTTPS). You will likely be prompted to accept a self-signed certificate. Once you accept the security risk, you should see the Proxmox dashboard.</span>

[![proxmox web interface after fresh installation](https://wiki.zn80.net/uploads/images/gallery/2026-03/scaled-1680-/82bed3a1-957c-4291-bde7-2df1a56000ae.png)](https://wiki.zn80.net/uploads/images/gallery/2026-03/82bed3a1-957c-4291-bde7-2df1a56000ae.png)

## Post-Installation

<span style="white-space: pre-wrap;">Once your Proxmox nodes have successfully booted, there are several essential post-installation tasks to complete, such as managing repositories and removing subscription warnings. The most efficient way to handle this is by using the </span>[Proxmox VE Community Post-Install Script](https://community-scripts.org/scripts/post-pve-install). This interactive script automates the removal of the "No Valid Subscription" nag-screen, configures the correct non-subscription repositories, and optimizes system settings.

```
bash -c "$(curl -fsSL https://raw.githubusercontent.com/community-scripts/ProxmoxVE/main/tools/pve/post-pve-install.sh)"
```

These are my recommended choices:

- disable pve-enterprise repository
- disable ceph enterprise repository
- enable/keep pve-no-subscription repository
- select NO to the pve-test repository
- select YES to disable the subscription nag
- select NO when asked to disable high availability
- select NO when asked to update (we will set up the ZFS Storage first)
- select NO when asked to reboot (we will set up the ZFS Storage first)

### Install on an Air-Gapped environment

<span style="white-space: pre-wrap;">For an </span>**air-gapped (offline) environment**, the standard script cannot reach external Proxmox servers. To resolve this, you can host a local version of the script within your network.

### 1. Host the Script Locally

Download the script to a machine that has network access to your Proxmox nodes. Navigate to the folder containing the script and start a temporary web server using Python:

```
# Start a local web server on port 8000
python3 -m http.server 8000
```

### 2. Execute on the Proxmox Node

Log into your Proxmox node's console and run the following command to pull and execute the script from your local server.

> **Note:**<span style="white-space: pre-wrap;"> Replace </span>`<span class="editor-theme-code">192.168.0.20</span>`<span style="white-space: pre-wrap;"> with the actual IP address of the machine running the Python server.</span>

```
bash -c "$(curl -L http://192.168.0.10:8000/post-pve-install.sh)"
```

This method allows you to maintain a consistent configuration across all nodes in your cluster without requiring direct internet access for each individual machine.

## Setting up ZFS Storage

## Updating and final reboot

## About the Network Interface Design

<span style="white-space: pre-wrap;">A successful Proxmox cluster requires careful network segregation to prevent traffic saturation. At a minimum, you will need </span>**three separate network interfaces**<span style="white-space: pre-wrap;"> for your VirtualBox test cluster:</span>

1. **Management Interface:**<span style="white-space: pre-wrap;"> This connects to your internal network and serves as the primary way to access and manage the Proxmox hosts.</span>
2. **Cluster Communication Heartbeat:**<span style="white-space: pre-wrap;"> This interface acts as the lifeline for the Proxmox hosts to communicate. It </span>**must be placed on its own isolated network segment**<span style="white-space: pre-wrap;"> (or physically isolated switch) because constant cluster "chatter" and High Availability (HA) voting can easily overwhelm a shared network link.</span>
3. **VM Migration &amp; Storage Replication:**<span style="white-space: pre-wrap;"> A dedicated interface is needed for migrating machines and handling Storage Replication, which copies data across nodes every 15 minutes. Combining this heavy file synchronization traffic with standard cluster communication can quickly saturate a single network connection, potentially leading to false-positive node failures.</span>

# Building the Cluster

Setting IP ADdress

I did my best to simplify the network design:

<span style="white-space: pre-wrap;">There are 3 PVE hosts with corresponding management IP’s: </span>

- prox1 – 192.168.0.201
- prox2 – 192.168.0.202
- prox3 – 192.168.0.203

<span style="white-space: pre-wrap;">Each PVE host has 3 network adapters: </span>

- Adapter 1: A Bridged Adapter that connects to the \[physical\] internal network.
- <span style="white-space: pre-wrap;">Adapter 2: Host only Adapter #2 that will serve as the \[virtual\] isolated cluster network. </span>
- <span style="white-space: pre-wrap;">Adapter 3: Host only Adapter #3 that will serve as the \[virtual\] dedicated migration network. </span>

<span style="white-space: pre-wrap;">Each network adapter plugs into a different \[virtual\] network segment with a different ip range: </span>

- <span style="white-space: pre-wrap;">Adapter 1 (vmbr0) (nic0) – 192.168.0.0/24 </span>
- <span style="white-space: pre-wrap;">Adapter 2 (nic1) – 192.168.101.0/24 </span>
- <span style="white-space: pre-wrap;">Adapter 3 (nic2) – 192.168.102.0/24 </span>

<span style="white-space: pre-wrap;">Each PVE hosts’ IP on each network roughly corresponds to its hostname: </span>

- <span style="white-space: pre-wrap;">prox1 – 192.168.0.201, 192.168.101.1, 192.168.102.1 </span>
- <span style="white-space: pre-wrap;">prox2 – 192.168.0.202, 192.168.101.2, 192.168.102.2 </span>
- rox3 – 192.168.0.203, 192.168.101.3, 192.168.102.3

## Prox 1 Example

```
auto lo
iface lo inet loopback

iface nic0 inet manual

auto vmbr0
iface vmbr0 inet static
        address 192.168.0.201/24
        gateway 192.168.0.1
        bridge-ports nic0
        bridge-stp off
        bridge-fd 0

# cluster network
auto nic1
iface nic1 inet manual
        address 192.168.101.1/24
        
# migration network
auto nic2
iface nic2 inet manual
        address 192.168.102.1/24

source /etc/network/interfaces.d/*
```

[![{A92F3188-2A76-407B-8D93-25476AE1360D}.png](https://wiki.zn80.net/uploads/images/gallery/2026-03/scaled-1680-/a92f3188-2a76-407b-8d93-25476ae1360d.png)](https://wiki.zn80.net/uploads/images/gallery/2026-03/a92f3188-2a76-407b-8d93-25476ae1360d.png)

# Proxmox VE 9 & Debian 13 Air-Gapped Update Guide

This guide describes how to set up an intermediate APT cache on an internet-connected machine (via VirtualBox) and transfer that cache to an air-gapped environment to update Proxmox VE 9 installations.

## Phase 1: VirtualBox Setup (Internet-Facing Host)

On your internet-connected machine, you need two virtual entities: the **Cache Server** and a **Template Proxmox VM** to "pull" the initial data.

### 1.1 Debian 13 (Trixie) Cache VM
1.  **Create VM:** 2 vCPUs, 2GB RAM, 50GB+ Disk (depending on how many packages you cache).
2.  **Networking:** Use **Bridged Adapter** to ensure it has its own IP on your local network.
3.  **OS Installation:** Install a minimal Debian 13 (Netinst). Ensure `SSH server` and `Standard system utilities` are selected.

I did set it up with the hostname `prox-cache` in my lan with the domain `lan.zn80.net` with the IP `192.168.0.240/24`.

When you get asked what to install in addition to the basis system, deselct the `Desktop Environment` and select only `WebServer`, `SSH Server` and `Standard System Utilities`.

After starting the system, enable the `sshd.service`

```bash
systemctl enable sshd.service
systemctl start sshd.service
```

Also add a static IP address by editing the `/etc/network/interfaces` file:

```bash
# The primary network interface
allow-hotplug enp0s3
iface enp0s3 inet static
        address 192.168.0.240/24
        gateway 192.168.0.1

```

This should be it for now. Continue with installing the Proxmox-Feeder.

### 1.2 Proxmox VE 9 "Feeder" VM
To populate the cache, you need a machine that requests the specific Proxmox 9 packages.
1.  **Create VM:** 2 vCPUs, 4GB RAM, 20GB Disk.
2.  **OS Installation:** Install Proxmox VE 9 (or Debian 13 + PVE 9 packages).
3.  **Networking:** Ensure it can reach the Debian 13 Cache VM.

Id did set it up with the hostname `prox-feeder` in my lan with the domain `lan.zn80.net` with the IP `192.168.0.241/24`.

After installing the proxmox feeder  vm we need to configure the in the next steps. Do not update the initial installation yet.

---

## Phase 2: Setting up APT-Cacher-NG (Cache Server)
Before installing the cache, we will optimize the Debian mirror selection to ensure the fastest download speeds.

### 2.1 Optimization: Selecting the Fastest Mirror

Install `netselect-apt` to automatically determine the best mirror for Debian 13.

```bash
# Install netselect-apt
sudo apt update
sudo apt install netselect-apt -y

# Find the fastest mirror for Debian 13 (Trixie)
# This creates a 'sources.list' file in the current directory
sudo netselect-apt trixie

# Backup existing sources and apply the new optimized list
sudo mv /etc/apt/sources.list /etc/apt/sources.list.bak
sudo mv sources.list /etc/apt/sources.list
sudo apt update
```

### 2.2 Install and Configure APT-Cacher-NG
Now, install the caching service which will use the fast mirrors selected above.

### Installation
```bash
sudo apt install apt-cacher-ng -y
```

### Configuration
Edit the configuration to ensure it allows Proxmox repositories:
```bash
sudo nano /etc/apt-cacher-ng/acng.conf
```
Ensure the following line is active to allow HTTPS tunneling if necessary:
`PassThroughPattern: .*`

### Restart Service
```bash
sudo systemctl restart apt-cacher-ng
```

---

## Phase 3: Populating the Cache

On your **Proxmox VE 9 "Feeder" VM**, tell APT to use the Cache Server.

1. Create a proxy configuration file:
````bash
echo 'Acquire::http::Proxy "http://<IP-OF-CACHE-SERVER>:3142";' | sudo tee /etc/apt/apt.conf.d/00proxy
````

2. Run the updates to pull data into the cache:
````bash
apt update
apt dist-upgrade -y
```
Now, all downloaded `.deb` files are stored on the Debian 13 Cache VM in `/var/cache/apt-cacher-ng`.
````

---

## Phase 4: Exporting the Cache to the Air-Gapped System

Since the target system is air-gapped, we must physically move the data.

### 4.1 On the Internet-Connected Cache VM:
Compress the cache data:
```bash
sudo tar -cvzf pve-cache-export.tar.gz /var/cache/apt-cacher-ng
```
Copy `pve-cache-export.tar.gz` to a USB drive or mobile storage.

### 4.2 On the Air-Gapped Target System:
You need a machine (or LXC container) in the air-gapped network to act as the **Local Cache Server**.
1. Install a Debian 13 LXC or VM on your air-gapped Proxmox.
2. Install `apt-cacher-ng` (you might need to install this manually via `.deb` files once if the container isn't prepared).
3. Import the data:
```bash
# Extract the data to the correct location
sudo tar -xvzf /path/to/usb/pve-cache-export.tar.gz -C /
sudo chown -R apt-cacher-ng:apt-cacher-ng /var/cache/apt-cacher-ng
sudo systemctl restart apt-cacher-ng
```

---

## Phase 5: Configuring Air-Gapped Proxmox Clients

Now, configure all your air-gapped Proxmox 9 nodes to use the internal cache server.

### 5.1 Set the Proxy
Edit `/etc/apt/apt.conf.d/00proxy` on **every** node:
````markdown
```text
Acquire::http::Proxy "http://<INTERNAL-CACHE-LXC-IP>:3142";
```
````

### 5.2 Update Repository Sources
Ensure your `/etc/apt/sources.list` and `/etc/apt/sources.list.d/pve-enterprise.list` point to standard URLs. Even though there is no internet, `apt-cacher-ng` will trick APT into thinking it's talking to the real servers, while actually serving the files from the local disk.

**Example for Proxmox 9 (No-Subscription):**
````text
deb [http://download.proxmox.com/debian/pve](http://download.proxmox.com/debian/pve) trixie pve-no-subscription
````

### 5.3 Run Update
```bash
apt update
apt dist-upgrade
```

---

## Troubleshooting & Maintenance
* **Maintenance:** To update the air-gapped system again, repeat Phase 3 (on the internet host) and Phase 4 (transfer).
* **Disk Space:** Monitor `/var/cache/apt-cacher-ng`. You can use the web interface at `http://<cache-ip>:3142/acng-report.html` to manage the expiration of old packages.

---

Soll ich dir noch spezifische Konfigurationsparameter für die Proxmox Enterprise Repositories heraussuchen, falls du diese über den Cache spiegeln möchtest?