# Scripts, Hacks & Snippets
Practical scripts, command snippets, and small technical solutions created to solve specific problems.
# Download Patreon Video (mass-download)
To mass download Patreon video you login to pattern and save the cookie first. The easiest way to do is by using Firefox Browser and the cookies.txt extension.
Once you have to cookie saved, go and grab the Markdown Content of tha page. A good plugin for this is the [MarkDownload - Markdown Web Clipper](https://github.com/deathau/markdownload?tab=readme-ov-file) extension available for Firefix, Chrome, Edge and Safari.
# Random Zeug
Zeug das ich irgendwo aufgeschnappt habe und behalten möchte.
# Bildformate und Auflösungen
Hier ist eine Liste von **Bildformaten** und deren **Auflösungen**, beginnend mit **720p** und aufsteigend bis zu **8K** und darüber hinaus:
| **Bezeichnung** | **Auflösung (Breite x Höhe)** | **Aspektverhältnis** |
|------------------|-------------------------------|------------------------|
| **SD (Standard Definition)** | 720 x 480 | 3:2 / 4:3 |
| **720p (HD)** | 1280 x 720 | 16:9 |
| **1080p (Full HD)** | 1920 x 1080 | 16:9 |
| **1440p (QHD)** | 2560 x 1440 | 16:9 |
| **2K (DCI 2K)** | 2048 x 1080 | 17:9 |
| **4K (UHD)** | 3840 x 2160 | 16:9 |
| **5K** | 5120 x 2880 | 16:9 |
| **6K** | 6144 x 3160 | 19:10 |
| **8K (UHD)** | 7680 x 4320 | 16:9 |
| **10K** | 10240 x 4320 | 21:9 |
| **12K** | 12288 x 6480 | 2:1 |
### Auflösungen im Detail:
- **SD (Standard Definition)**: Weit verbreitet in älteren Fernseher-Formaten.
- **720p**: Oft in HD-Fernsehen verwendet.
- **1080p**: Standard für viele Blu-ray-Disk-Formate und HD-Streaming-Dienste.
- **1440p (QHD)**: Beliebt in der Gaming- und Monitortechnologie.
- **2K**: Vor allem im professionellen Film- und Videobereich, verwendet für digitale Projektion.
- **4K (UHD)**: Immer mehr Standard, insbesondere bei Modernem Fernsehen, Streaming und Gaming.
- **5K und 6K**: Höhere Qualität für professionelle Videoproduktion und Fotografie.
- **8K**: Zunehmend im Fernsehen und in Monitoren, bietet extrem hohe Detailtreue.
- **10K und 12K**: Verwendet in spezialisierten Bereichen wie Kino, digitale Filmprojektion und Fotografie.
Diese Auflösungen bieten verschiedene Optionen für Qualität und Detailtreue, je nach Anwendung und Anforderungen.
# Zwei Homer-Dashboards in einem LXC betreiben
Wer im Self-Hosting tiefer einsteigt, neigt dazu, für jeden neuen Dienst einen eigenen Proxmox-LXC anzulegen.
Das ist nachvollziehbar, sauber – aber auf Dauer auch unnötig schwergewichtig.
Jeder zusätzliche Container bringt sein eigenes Dateisystem, eigene Updates, eigene Backups.
Für große oder sicherheitskritische Dienste ist das sinnvoll.
Für kleine, statische oder sehr schlanke Services oft nicht.
In diesem Beitrag zeige ich einen alternativen Weg:
eine zweite Instanz eines bestehenden Dienstes **im selben LXC**, am Beispiel des **Homer Dashboards**.
## Ausgangslage
Es existiert bereits ein laufendes Homer-Dashboard unter:
```
/opt/homer
```
Nun soll eine zweite, unabhängige Variante dazukommen – etwa eine „Lab-Version“ zum Testen neuer Links oder Konfigurationen – ohne dafür einen neuen Container aufzusetzen.
## 1. Datenbasis duplizieren
Homer ist eine statische Webanwendung, die lediglich über einen kleinen Python-Webserver ausgeliefert wird.
Entsprechend genügt es, das bestehende Verzeichnis zu kopieren und anzupassen:
```
/opt/homer-lab
```
Kein Build-Prozess, keine Abhängigkeiten, kein zusätzlicher Ballast.
## 2. Systemd-Service kopieren
Damit auch die zweite Instanz sauber startet, braucht sie einen eigenen systemd-Service.
Der bestehende Dienst wird dupliziert und klar benannt, etwa als:
```
homer-lab.service
```
Damit bleiben Zuständigkeiten nachvollziehbar und Logs sauber getrennt.
## 3. Konfiguration anpassen
In der neuen Service-Datei werden im Wesentlichen zwei Dinge geändert:
- der Pfad zum neuen Verzeichnis
- ein eigener Port, damit sich beide Instanzen nicht in die Quere kommen
Mehr ist nicht notwendig.
Kein zusätzliches Netzwerk-Setup, keine komplexe Isolation.
## 4. Service registrieren und starten
Nach dem Reload des systemd-Daemons kann der neue Dienst aktiviert und gestartet werden.
Ab diesem Punkt laufen beide Dashboards parallel – vollständig unabhängig, aber innerhalb desselben Containers.
## 5. Kurze Kontrolle
Ein Blick auf die offenen Ports oder die aktiven Services reicht aus, um zu sehen, dass beide Instanzen sauber laufen.
Kein Hexenwerk.
Aber effektiv.
## Warum dieser Ansatz sinnvoll ist
- **Minimaler Ressourcenverbrauch**
Eine zweite Homer-Instanz benötigt nur rund 30 MB zusätzlichen RAM.
- **Einfachere Backups**
Ein einziges LXC-Backup enthält nun beide Dashboards.
- **Weniger Wartungsaufwand**
Betriebssystem-Updates fallen nur einmal pro Container an.
Gerade bei kleinen, statischen oder rein internen Diensten ist das ein pragmatischer Mittelweg zwischen „alles in einen Container werfen“ und „für jeden Port einen eigenen LXC“.
## Gedanke für Fortgeschrittene
Wer mehrere solcher Dienste betreibt, sollte früher oder später einen Reverse Proxy davorschalten – etwa Caddy oder Nginx Proxy Manager.
Damit lassen sich die einzelnen Instanzen über sprechende URLs statt über Portnummern erreichen, ohne die interne Struktur weiter zu verkomplizieren.
# TSL x509 Zertifikatsfehler in WSL beheben
## Worum geht es
Wenn innerhalb eines Linux-Systems unter WSL (Windows Subsystem for Linux) Daten
heruntergeladen werden und eine Fehlermeldung ähnlich dieser erscheint:
```
tls: failed to verify certificate: x509: certificate signed by unknown authority
```
liegt die Ursache häufig darin, dass der Windows-Host in einem Firmennetzwerk
(Corporate LAN) betrieben wird. Dort kommen oft Proxy- oder
SSL-Inspection-Technologien (z. B. Zscaler, Cisco Umbrella, Palo Alto,
Cloudflare etc.) zum Einsatz, die den gesamten HTTPS-Verkehr prüfen.
Dabei ersetzt der Proxy die originalen Zertifikate durch ein
unternehmenseigenes Root-Zertifikat. Windows vertraut diesem in der Regel
automatisch – WSL bzw. das darin laufende Linux jedoch nicht.
Die Verbindung wirkt dadurch wie eine klassische Man-in-the-Middle-Situation,
ist in diesem Kontext jedoch beabsichtigt.
## Fehler beheben
Damit Befehle wie `npm install`, `go install` oder `curl` wieder funktionieren,
muss das Unternehmens-Root-Zertifikat aus Windows exportiert und in den
Linux-Trust-Store importiert werden.
### 1. Zertifikat unter Windows exportieren
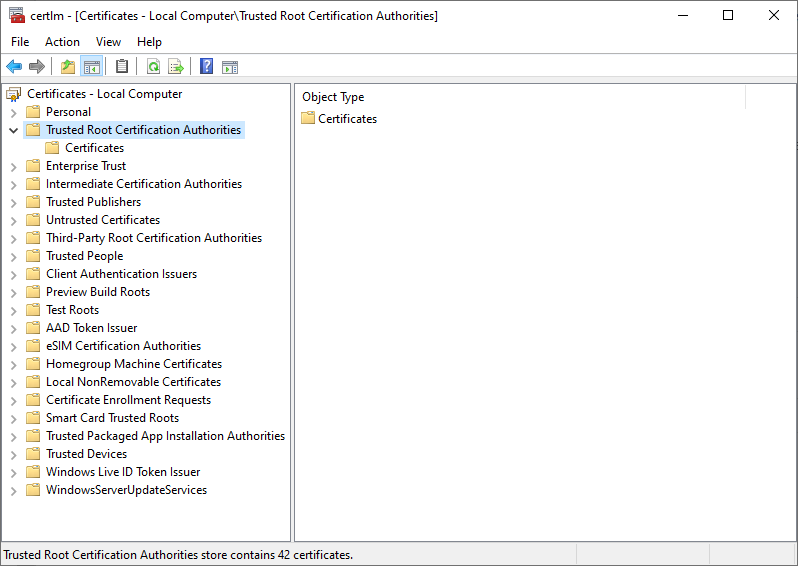
Zertifikatsmanager öffnen:
```
Win + R → certmgr.msc
```
Dann navigieren zu:
```
Trusted Root Certification Authorities → Certificates
````
[](https://wiki.zn80.net/uploads/images/gallery/2026-02/image-1771416419927.png)
Das Unternehmenszertifikat auswählen →
**Rechtsklick → All Tasks → Export → Click Next → Base-64 encoded X.509 (.CER)**
[](https://wiki.zn80.net/uploads/images/gallery/2026-02/image-1771416460242.png)
Die Datei beispielsweise unter `C:\temp\corp-root.cer` speichern.
### 2. Zertifikat in WSL installieren
In WSL ist das Windows-Laufwerk unter `/mnt/c` erreichbar:
```bash
sudo cp /mnt/c/temp/corp-root.cer \
/usr/local/share/ca-certificates/corp-root.crt
````
> Wichtig: Die Datei sollte die Endung `.crt` haben.
Anschließend den Trust-Store aktualisieren:
```bash
sudo update-ca-certificates
```
### 3. Funktion prüfen
```bash
curl https://proxy.golang.org
```
Wenn hier viel Text ausgegeben wird und keine Zertifikatsfehler mehr erscheinen, sollte auch die Installation von Paketen wieder problemlos funktionieren.
# Automated Update of a BookStack Page
To update a bookstack page from data files I created two simple scripts, a template and some data files. There a quite some solutions out there like `gomplate` and such, but I wanted something simple and more or less tool independent based on system libraries from python or go or even bash. I ended with python, because why not.
This describes the process of how I update my [Inventar](https://wiki.zn80.net/books/personal-system/page/inventar) page here in the wiki from a bunch of csv files.
First create a venv with python. You don't need it, but I like to have things separated and isolated.
```
python -m venv vene
```
How to activate it depends on your operating system.
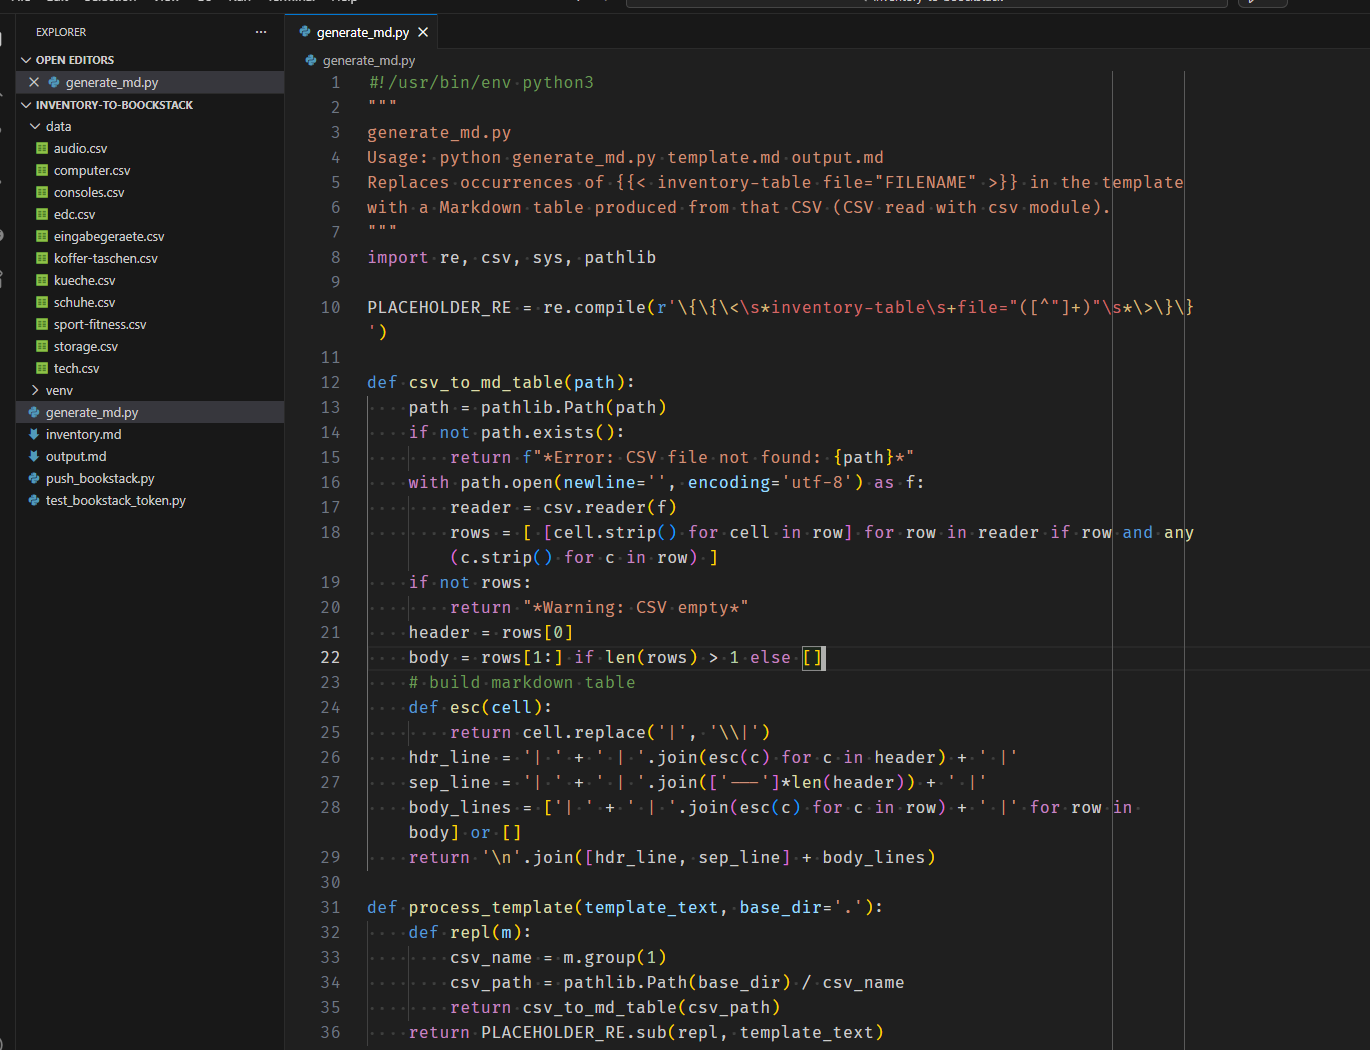
Next open VSCode and create the python scripts and the template. In the end it maybe looks like this:
[](https://wiki.zn80.net/uploads/images/gallery/2026-02/image-1772123096256.png)
## generate\_md.py
This is the python script that turns your template into a nice filled markdown file by combining the markdown template and the data from the csv files. It will scan the date folder and replace only those placeholders it can find for the file.
```python
#!/usr/bin/env python3
"""
generate_md.py
Usage: python generate_md.py template.md output.md
Replaces occurrences of {{< inventory-table file="FILENAME" >}} in the template
with a Markdown table produced from that CSV (CSV read with csv module).
"""
import re, csv, sys, pathlib
PLACEHOLDER_RE = re.compile(r'\{\{\<\s*inventory-table\s+file="([^"]+)"\s*\>\}\}')
def csv_to_md_table(path):
path = pathlib.Path(path)
if not path.exists():
return f"*Error: CSV file not found: {path}*"
with path.open(newline='', encoding='utf-8') as f:
reader = csv.reader(f)
rows = [ [cell.strip() for cell in row] for row in reader if row and any(c.strip() for c in row) ]
if not rows:
return "*Warning: CSV empty*"
header = rows[0]
body = rows[1:] if len(rows) > 1 else []
# build markdown table
def esc(cell):
return cell.replace('|', '\\|')
hdr_line = '| ' + ' | '.join(esc(c) for c in header) + ' |'
sep_line = '| ' + ' | '.join(['---']*len(header)) + ' |'
body_lines = ['| ' + ' | '.join(esc(c) for c in row) + ' |' for row in body] or []
return '\n'.join([hdr_line, sep_line] + body_lines)
def process_template(template_text, base_dir='.'):
def repl(m):
csv_name = m.group(1)
csv_path = pathlib.Path(base_dir) / csv_name
return csv_to_md_table(csv_path)
return PLACEHOLDER_RE.sub(repl, template_text)
def main():
if len(sys.argv) < 3:
print("Usage: python generate_md.py template.md output.md")
sys.exit(2)
tpl_path = pathlib.Path(sys.argv[1])
out_path = pathlib.Path(sys.argv[2])
base_dir = tpl_path.parent / "data"
tpl_text = tpl_path.read_text(encoding='utf-8')
result = process_template(tpl_text, base_dir=base_dir)
out_path.write_text(result, encoding='utf-8')
print(f"Wrote {out_path}")
if __name__ == '__main__':
main()
```
## Markdown Template inventory.md
This is the template which I use. You can of course create your own. It is based on a structure used by Hugo static site generator which I used before. I kept it this way so if I ever want to go back I can just reuse the file with Hugo again.
```
Diese Seite ist mein Werkzeug zur Achtsamkeit und Kontrolle.
Hier dokumentiere ich mein Setup, um Redundanz zu vermeiden
und den Fokus auf Qualität statt Quantität zu legen.
> "Alles, was du besitzt, besitzt irgendwann dich."
Dieser Gedanke begleitet mich seit Beginn 2025 verstärkt,
als ich mich entschied, aktiver einem minimalistischen Lebensstil
zu folgen und mich von unnötigem Ballast zu befreien.
Da wir nun schon eine ganze Weile an einem Ort wohnen,
haben sich doch sehr viele Dinge angesammelt.
Trotz schnell wechselnder politischer und wirtschaftlicher
Rahmenbedingungen lebe ich in einer privilegierten Situation,
die es mir erlaubt, die ein oder andere Anschaffung zu tätigen.
Ich versuche dabei stets bewusst zu konsumieren
und den Fokus auf Qualität und Langlebigkeit zu legen.
## EDC
Siehe auch die [EDC-Seite](/edc/) und [Telefon](/phone)-Seite
für Details zu meinen täglichen Begleitern.
{{< inventory-table file="edc.csv" >}}
## Computer
Siehe auch die [Computer-Seite](/computer/) für Details zu meinen Computern und deren Konfigurationen.
{{< inventory-table file="computer.csv" >}}
## Konsolen
{{< inventory-table file="consoles.csv" >}}
## Tech
{{< inventory-table file="tech.csv" >}}
## Eingabegeräte
{{< inventory-table file="eingabegeraete.csv" >}}
## Audio
{{< inventory-table file="audio.csv" >}}
## Storage
{{< inventory-table file="storage.csv" >}}
## Sport & Fitness
{{< inventory-table file="sport-fitness.csv" >}}
## Koffer und Taschen
{{< inventory-table file="koffer-taschen.csv" >}}
## Kleidung
### Jacken
### T-Shirts
### Hosen
### Schuhe
{{< inventory-table file="schuhe.csv" >}}
### Socken
### Diverses
## Küchen Equipment
{{< inventory-table file="kueche.csv" >}}
## Toilettenartikel
```
## Generate output.md
To gegenrate the output.md file you run the python script with the template and the desired outpu filename
```
python
```
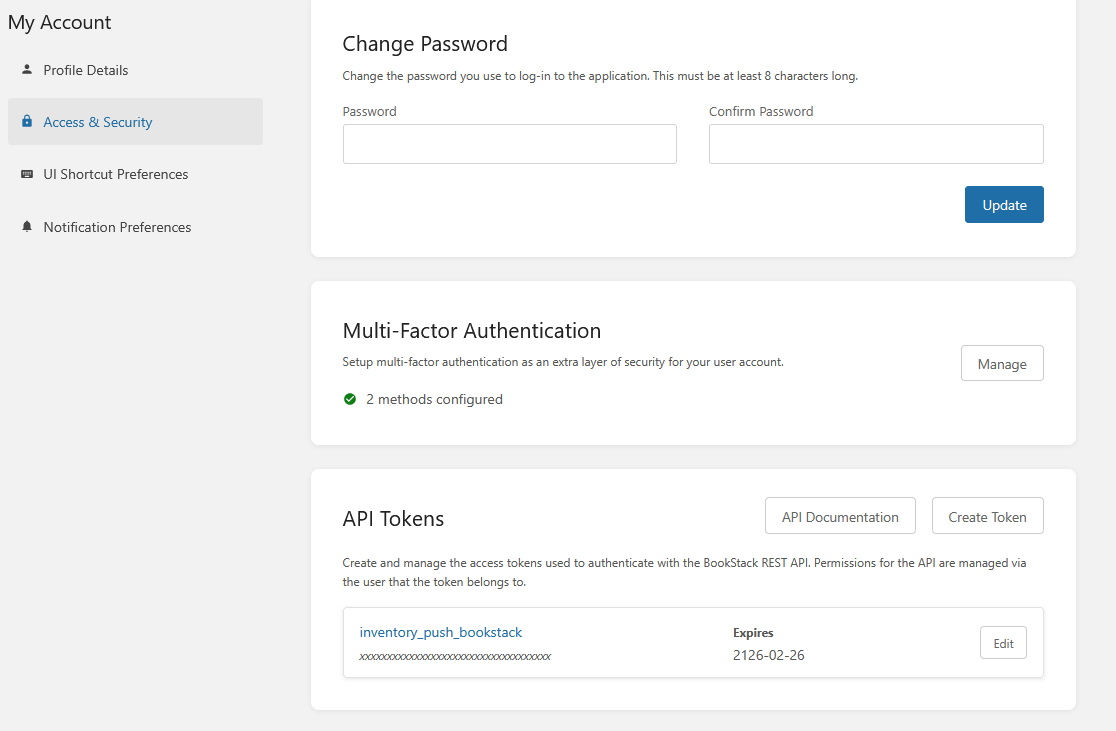
## Push to Bookstack
The interesting part is the push to Bookstack. This is done through the API. You need to create an API Token first. This can be done in your users Account Settings
[](https://wiki.zn80.net/uploads/images/gallery/2026-02/KY5image.png)
Write down the TokenID and the secret. The secret will only be shown once. So make sure to save it somewhere.
### The push\_bookstack.py Script
Next wee need the push script:
```python
#!/usr/bin/env python3
# Usage: export BOOKSTACK_BASE="https://wiki.zn80.net"
# export BOOKSTACK_TOKEN="user_token" # or user:app
# python push_bookstack.py output.md PAGE_ID
import os, sys, requests, json, pathlib
BASE = os.environ.get("BOOKSTACK_BASE")
TOKEN = os.environ.get("BOOKSTACK_TOKEN")
if not BASE or not TOKEN or len(sys.argv) < 3:
print("Usage: set BOOKSTACK_BASE and BOOKSTACK_TOKEN; python push_bookstack.py output.md PAGE_ID")
sys.exit(2)
md_path = pathlib.Path(sys.argv[1])
page_id_or_slug = sys.argv[2]
md = md_path.read_text(encoding="utf-8")
headers = {"Authorization": f"Token {TOKEN}", "Content-Type": "application/json"}
def get_page(pid):
r = requests.get(f"{BASE}/api/pages/{pid}", headers=headers, timeout=10)
r.raise_for_status()
return r.json()
# prefer sending html. convert markdown -> html if python-markdown available, else send markdown.
def md_to_html(text):
try:
import markdown
return markdown.markdown(text, extensions=['extra','sane_lists'])
except Exception:
return None
try:
page = get_page(page_id_or_slug)
except requests.HTTPError as e:
print("Failed to fetch page:", e, getattr(e.response, "text", ""))
sys.exit(1)
page_id = page.get("id")
page_name = page.get("name") or page.get("title") or "Updated Page"
html = md_to_html(md)
payload = {"name": page_name}
if html:
payload["html"] = html
else:
payload["markdown"] = md
r = requests.put(f"{BASE}/api/pages/{page_id}", headers=headers, data=json.dumps(payload), timeout=20)
if r.status_code in (200,201):
print("Updated page:", r.json().get("id"))
else:
print("Update failed:", r.status_code, r.text)
sys.exit(1)
```
To run this you export the export BOOKSTACK\_BASE and BOOKSTACK\_TOKEN first. The BOOKSTACK\_TOKEN is a combination of the ID and Secret: `:`. Similar to this
```
export BOOKSTACK_TOKEN=xxxxxxxxxxxxYBgSsVCY1tJg6OFxxxxx:xxxxxxY7op4hkBBJBZCzKCxxxxxxxxxxx
```
The BOOKSTACK\_BASE is the URL of your Bookstack installation on the internet.
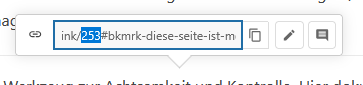
**Important**:
To run it, you also need the page id as a number. To get this number you can select some text on the page you want to update and take the ID from there.
[](https://wiki.zn80.net/uploads/images/gallery/2026-02/lcZimage.png)
It is the number before the pound sign.
### Execute the scripts
You can then execute the scripts:
```bash
$ python generate_md.py inventory.md output.md
Wrote output.md
$ python push_bookstack.py output.md 253
Updated page: 253
```
When you now refresh the page. The new content should be there.
## Test-Script
This test script is to test the API token combination before making changes. Use it the same way as the push script. Export env first and then run it. Help is provided.
```python
#!/usr/bin/env python3
"""
Test BookStack API token(s).
Usage:
export BOOKSTACK_BASE="https://wiki.zn80.net"
export BOOKSTACK_TOKEN="user_token" # or "user_token:app_token"
python test_bookstack_token.py
"""
import os, sys, requests
BASE = os.environ.get("BOOKSTACK_BASE")
TOKEN = os.environ.get("BOOKSTACK_TOKEN")
if not BASE or not TOKEN:
print("Set BOOKSTACK_BASE and BOOKSTACK_TOKEN environment variables.")
sys.exit(2)
headers = {"Authorization": f"Token {TOKEN}"}
try:
r = requests.get(f"{BASE}/api/user", headers=headers, timeout=10)
except requests.RequestException as e:
print("Request error:", e)
sys.exit(1)
if r.status_code == 200:
try:
j = r.json()
print("Token OK. Authenticated user:", j.get("name") or j.get("email") or j)
except Exception:
print("Token OK. Received 200 but could not parse JSON.")
sys.exit(0)
elif r.status_code == 401:
print("Unauthorized (401): token invalid or expired.")
else:
print(f"Unexpected status {r.status_code}: {r.text}")
sys.exit(1)
```
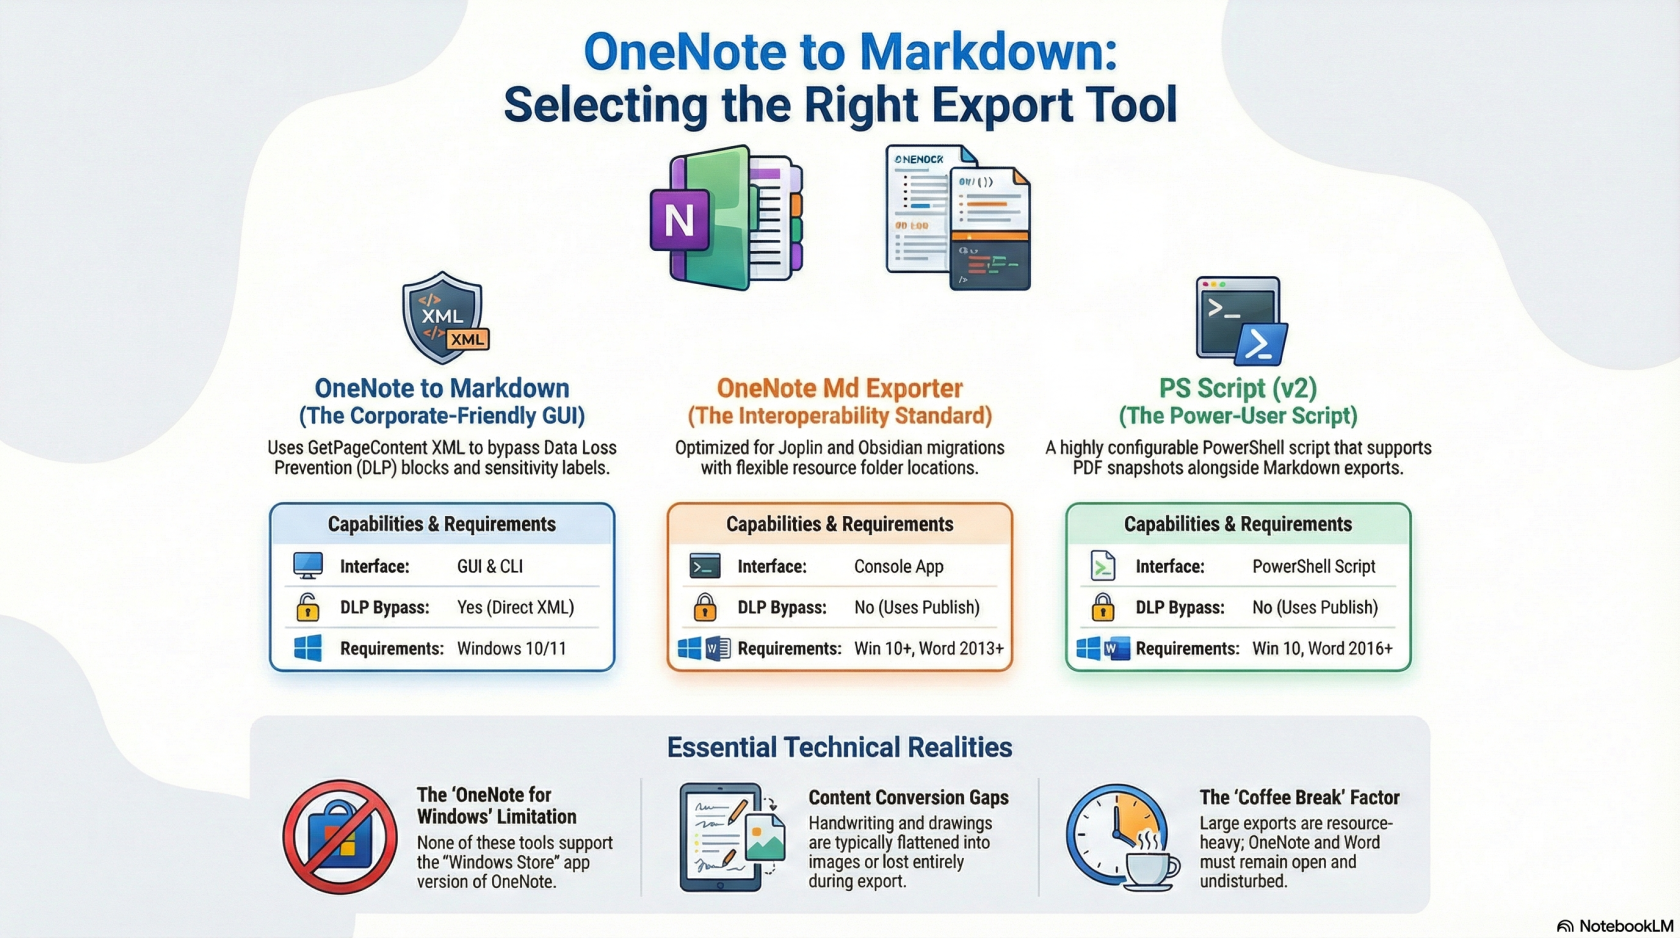
# Exporting OneNote to Markdown
If you are migrating away from Microsoft OneNote to a Markdown-based system (like Obsidian, BookStack, Joplin, or Logseq), there are three primary tools available depending on your technical needs and organizational restrictions.
---
[](https://wiki.zn80.net/uploads/images/gallery/2026-03/image-1772551193602.png)
I tested all three of them, and the easiest one was definitively the OneNote to Markdown Exporter (Tool 1) because not only is it a GUI app, but also works extremly fast and bypasses DLP blockers by pulling raw XML and base64 images directly from OneNote's `GetPageContent()` method.
Bypassing DLP does not trigger the DLP blockers because it does not write intermediate files to disk, which is a common trigger for DLP policies. Instead, it processes the content in-memory, allowing for a seamless export experience even in environments with strict data protection measures.
---
## Tool 1: OneNote to Markdown Exporter (C# Desktop App)
**Github:** [https://github.com/segunak/one-note-to-markdown](https://github.com/segunak/one-note-to-markdown)
**Best for:** Ease of use, bypassing strict Data Loss Prevention (DLP) policies, and keeping embedded images intact without writing intermediate files to your disk.
### Overview
This tool is built with C# and WPF, offering both a Graphical User Interface (GUI) and a Command Line Interface (CLI). It bypasses typical DLP restrictions by using the OneNote `GetPageContent()` method to pull raw XML and base64 images directly, rather than exporting intermediate Word documents.
### Requirements
- **OS:** Windows 10 or 11.
- **Software:** Microsoft OneNote Desktop app (installed via Microsoft 365/Office 365, *not* the retired "OneNote for Windows 10" app).
### Usage Highlights
- **GUI Mode:** Launch `OneNoteMarkdownExporter.exe` without arguments to open a visual tree-view where you can check the boxes of specific notebooks, sections, or pages you want to export.
- **CLI Mode:** Run with command-line arguments (e.g., `--all`, `--notebook "Name"`, `--overwrite`) for background syncing or scheduled tasks.
- **Linting:** Automatically runs a bundled `markdownlint-cli` to clean up OneNote's formatting inconsistencies.
---
## Tool 2: OneNote Md Exporter (.NET Console App)
**Github:** [https://github.com/alxnbl/onenote-md-exporter](https://github.com/alxnbl/onenote-md-exporter)
**Best for:** Users who want to export directly to the **Joplin Raw Directory** format, or who want basic console-based exports with YAML front-matter headers.
### Overview
This tool is a DotNet 10 self-contained console application. It exports your pages as intermediate Word (`.docx`) files and then translates them into Markdown using PanDoc. *Note: Because it writes files to disk using OneNote's `Publish()` method, this tool may fail if your organization enforces strict Data Loss Prevention (DLP) policies.*
### Requirements
- **OS:** Windows 10 or higher.
- **Software:** Microsoft OneNote (>= 2013) and Microsoft Word (>= 2013).
### Usage Highlights
- **Getting Started:** Extract the downloaded release and run `OneNoteMdExporter.exe`.
- **Process:** Select the notebook to export, choose the export format (Markdown or Joplin), edit advanced settings if desired, and run.
- **Metadata:** Can automatically inject a YAML front-matter header containing page metadata (like title, created date, updated date) into each `.md` file.
- **Automation:** Full command-line support is available by running `OneNoteMdExporter.exe --help`.
---
## Tool 3: ConvertOneNote2MarkDown (PowerShell Script)
**Github:** [https://github.com/theohbrothers/ConvertOneNote2MarkDown](https://github.com/theohbrothers/ConvertOneNote2MarkDown)
**Best for:** Extensive customization, defining specific Markdown flavors (e.g., GitHub-Flavored Markdown, MultiMarkdown), creating detailed folder hierarchies, and exporting PDFs alongside Markdown.
### Overview
This is a highly configurable PowerShell script (`ConvertOneNote2MarkDown-v2.ps1`) that utilizes the OneNote Object Model. Like Tool 2, it converts pages to Word documents first and then relies on Pandoc for the Markdown conversion, making it susceptible to enterprise DLP blockers.
### Requirements
- **OS:** Windows 10 or 11.
- **PowerShell:** Version 5.x up to 7.0.x (Versions 7.1 and above are unsupported due to deprecated Win32 GAC assemblies).
- **Software:** Microsoft OneNote (>= 2016), Microsoft Word (>= 2016), and Pandoc (>= 2.11.2).
### Usage Highlights
- **Pre-requisites:** Hidden or collapsed paragraphs will not export. It is highly recommended to install the provided Onetastic macro to expand all paragraphs prior to exporting.
- **Execution:** Open PowerShell as an **Administrator**, navigate to the script folder, and run `.\ConvertOneNote2MarkDown-v2.ps1`.
- **Interactive Prompts:** The script will interactively ask you for your preferred folder structures (e.g., subfolders vs. page prefixes), whether to keep intermediate `.docx` files, and your target Markdown flavor.
- **Automation:** To bypass the interactive prompts for automated runs, rename the included `config.example.ps1` file to `config.ps1` and configure your desired settings within the file.
# Hugo
# Externe Links in Hugo automatisch in einem neuen Tab öffnen
Nachdem ich monatelang externe Links in Hugo mühsam manuell konfiguriert habe, kam ich zu dem Entluss, dass es einen besseren Weg geben muss. Und den gibt es! Hier ist die Lösung, die für mich funktioniert hat.
Einige Themes bieten hierfür eine native Unterstützung an; in diesem Fall reicht ein Blick in die Dokumentation und das Hinzufügen einer Zeile in deiner `hugo.yaml` oder `hugo.toml`. Wenn du jedoch ein Theme verwendest, das diese Funktion nicht standardmäßig unterstützt, ist die folgende Methode ideal für dich.
---
## Schritt 1 – Konfigurationsdatei aktualisieren
Zuerst musst du einen Block zu deiner Hugo-Konfigurationsdatei hinzufügen. Je nach Setup heißt diese Datei meist `hugo.yaml` oder `hugo.toml`.
### YAML-Version:
```yaml
markup:
goldmark:
renderer:
unsafe: true
parser:
attribute:
block: true
title: true
```
Füge entweder den `markup`-Block neu hinzu oder aktualisiere deinen bestehenden Block mit diesen Einstellungen.
**Was bewirkt dieser Code?**
* Hugo nutzt standardmäßig **Goldmark** als Markdown-Parser.
* `unsafe: true` erlaubt es dem Renderer, rohes HTML einzubeziehen, das du in deinen Templates schreibst.
* Die `attribute`-Einstellungen ermöglichen es Hugo, HTML-Attribute in Links korrekt zu verarbeiten.
### TOML-Version:
```toml
[markup]
[markup.goldmark]
[markup.goldmark.renderer]
unsafe = true
[markup.goldmark.parser]
[markup.goldmark.parser.attribute]
block = true
title = true
```
> **Tipp:** Erstelle immer ein Backup deiner Konfigurationsdatei. Da diese Dateien sehr empfindlich auf Leerzeichen und Einrückungen reagieren, empfehle ich dir einen Editor wie Visual Studio Code.
---
## Schritt 2 – Ein Render-Hook-Template erstellen
Das klingt komplizierter, als es ist. Ein Render-Hook sagt Hugo vereinfacht: „Wann immer du auf einen Markdown-Link stößt, verwende dieses Template anstelle der Standard-Ausgabe.“
### Die Dateistruktur erstellen
Erstelle eine neue Datei namens `render-link.html` im Verzeichnis `layouts/_default/_markup/`. Falls die Unterordner `_default` oder `_markup` bei dir noch nicht existieren, lege sie einfach an.
Deine Struktur sollte so aussehen:
```text
deine-website/
└── layouts/
└── _default/
└── _markup/
└── render-link.html
```
### Den Code hinzufügen
Kopiere den folgenden Code in deine `render-link.html`:
```html
{{- $link := .Destination -}}
{{- $isExternal := strings.HasPrefix $link "http" -}}
{{- if not $isExternal -}}
{{- $isExternal = strings.HasPrefix $link "//" -}}
{{- end -}}
{{ .Text | safeHTML }}
```
Dieser Code extrahiert die URL (`.Destination`) aus deinem Markdown-Link. Er prüft, ob die URL mit `http` beginnt – falls ja, wird sie als externer Link eingestuft. In diesem Fall (`if $isExternal`) wird das Attribut `target="_blank"` hinzugefügt.
Zusätzlich wird `rel="noopener"` eingefügt. Dies ist eine Sicherheitsmaßnahme (Best Practice), die deine Seite schützt, wenn externe Links in neuen Tabs geöffnet werden.
---
## Fazit
Wenn du nun deine Hugo-Seite in der Vorschau betrachtest, sollten sich interne Links im selben Tab öffnen, während externe Links automatisch in einem neuen Tab erscheinen.
Es gibt zwar alternative Lösungen (z. B. via JavaScript), aber diese Methode hat den großen Vorteil, dass sie bereits zum **Build-Zeitpunkt** und nicht erst im Browser des Nutzers ausgeführt wird. Das macht deine Website schneller und sorgt für eine bessere User Experience.
# Boot-Menü aufrufen / Access Boot Menu
Der Zugriff auf das Boot-Menü oder das BIOS/UEFI ist je nach Hersteller unterschiedlich geregelt. Während einige Systeme dedizierte Tasten für das Boot-Menü bieten, wird bei anderen zunächst ein Startmenü geöffnet, über das weitere Optionen erreichbar sind.
Accessing the boot menu or BIOS/UEFI varies by manufacturer. Some systems provide dedicated keys for the boot menu, while others use an initial startup menu that leads to further options.
### Übersicht / Overview
| Hersteller / Manufacturer | Boot-Menü / Boot Menu Key | BIOS / UEFI Key | Hinweis / Notes |
|---------------------------|---------------------------|------------------|-----------------|
| Dell | F12 | F2 | Direktzugriff beim Start / Direct access at startup |
| HP | ESC, dann F9 | ESC, dann F10 | ESC öffnet Startmenü / ESC opens startup menu |
| Lenovo | F12 | F1 oder F2 | Teilweise „Novo“-Button vorhanden / Some models have “Novo” button |
| ASUS | F8 | DEL oder F2 | DEL ist häufig Standard / DEL commonly used |
| MSI | F11 | DEL | — |
| Acer | F12 | F2 | F12 ggf. im BIOS aktivieren / May need enabling in BIOS |
| Gigabyte | F12 | DEL | Häufig bei Mainboards / Common on motherboards |
| Toshiba | F12 | F2 | Ältere Geräte nutzen ggf. ESC / Older models may use ESC |
| Samsung | ESC | F2 | — |
| Microsoft Surface | Lautstärke + | Lautstärke + | Gedrückt halten beim Einschalten / Hold during power-on |
### Hinweise / Notes
- Die Taste muss direkt nach dem Einschalten mehrfach gedrückt werden.
The key must be pressed repeatedly immediately after powering on.
- Bei sehr schnellen Systemen (SSD, Fast Boot) kann das Zeitfenster extrem kurz sein.
On fast systems (SSD, Fast Boot), the timing window can be very short.
- In solchen Fällen kann ein Neustart über das Betriebssystem in die erweiterten Startoptionen helfen.
In such cases, rebooting via the OS into advanced startup options may be necessary.
```