# Service Runbooks
Practical setup and operational notes for my self-hosted services — covering installation, hardening, proxy configuration, backup integration, and issue resolution. Services with expanding documentation may eventually move into a standalone book.
# Bookstack Proxmox VE Community Script
Installing Bookstack via Proxmox community scripts is very easy. It is installed via this [Proxmox VE Community Script: Bookstack](https://community-scripts.github.io/ProxmoxVE/scripts?id=bookstack). It setups a lxc container with Debian
```
root@lxc-bookstack:~# cat /etc/os-release
PRETTY_NAME="Debian GNU/Linux 13 (trixie)"
NAME="Debian GNU/Linux"
VERSION_ID="13"
VERSION="13 (trixie)"
VERSION_CODENAME=trixie
DEBIAN_VERSION_FULL=13.2
ID=debian
HOME_URL="https://www.debian.org/"
SUPPORT_URL="https://www.debian.org/support"
BUG_REPORT_URL="https://bugs.debian.org/"
root@lxc-bookstack:~#
```
and installs and configures a MariaDB database
```
root@lxc-bookstack:~# systemctl status mariadb --no-pager
● mariadb.service - MariaDB 12.2.1 database server
Loaded: loaded (/usr/lib/systemd/system/mariadb.service; enabled; preset: enabled)
Drop-In: /etc/systemd/system/mariadb.service.d
└─migrated-from-my.cnf-settings.conf
Active: active (running) since Sun 2025-12-14 14:15:56 UTC; 19min ago
...
```
## Backup
To backup bookstack files and entries, there is a cli tool which can be used.
- Enter the LXC directly or use `pct enter ` to access the LXC container.
- change into the bookstack folder `cd /opt/bookstack`
- execute the cli cmd to backup
```bash
root@lxc-bookstack:~# cd /opt/bookstack/
root@lxc-bookstack:/opt/bookstack# ./bookstack-system-cli backup
WARNING: This CLI is in alpha testing.
There's a high chance of issues, and the CLI API is subject to change.
Checking system requirements...
Dumping the database via mysqldump...
Adding database dump to backup archive...
Adding BookStack upload folders to backup archive...
Adding BookStack theme folders to backup archive...
Saving backup archive...
Backup finished.
Output ZIP saved to: /opt/bookstack/storage/backups/bookstack-backup-2025-12-14-143913.zip
root@lxc-bookstack:/opt/bookstack#
```
## Restore
To restore a backup, log in to the BookStack LXC and change into the BookStack installation directory. From there, run the BookStack system CLI with the `restore` command and provide the path to the backup file.
```bash
root@lxc-bookstack:/opt/bookstack# ./bookstack-system-cli restore storage/backups/bookstack-backup-2025-12-12-162653.zip
```
During the restore process, the CLI will display a summary of the contents found in the backup and warn about the implications of restoring:
* Existing files and uploaded content will be overwritten
* Existing database tables will be dropped
* The target instance must be the same or a newer BookStack version
* Server-level configuration is not restored
You will be prompted to confirm before the restore is executed.
## Permissions note when restoring from outside the container
_This probably solves the issue you might encounter after a restore when you want to upload files._
If you mounted the LXC root filesystem on the Proxmox host and copied a backup into the container from outside, **do not run `bookstack-system-cli` on the host system**. Running the CLI outside the container can result in incorrect file ownership and permissions.
If this has already happened, the permissions can be corrected from the Proxmox host.
In the following example, the BookStack container ID is `120`. Adjust this value to match your environment.
```bash
# Mount the LXC root filesystem
pct mount 120
# mounted CT 120 in '/var/lib/lxc/120/rootfs'
# Change into the BookStack directory
cd /var/lib/lxc/120/rootfs/opt/bookstack
# Inspect current ownership
ls -l
```
Example output:
```bash
root@pve:/var/lib/lxc/120/rootfs/opt/bookstack# ls -l
total 755
drwxr-xr-x 23 100033 100033 23 Dec 14 12:52 app
-rwxr-xr-x 1 100033 100033 1685 Dec 14 12:52 artisan
```
To correct the ownership, apply the following command:
```bash
chown -R 100033:100033 *
```
In this setup, the UID and GID `100033` correspond to the `www-data` user and group inside the container.
**Hint**
Using `php artisan bookstack:regenerate-permissions` does not fix file ownership or filesystem permissions. As such, it cannot be used to resolve this issue.
Best practice is to mount the LXC root filesystem on the host, copy the backup file into place, immediately correct ownership and permissions, then unmount the root filesystem. After that, enter the container and execute the restore commands. This ensures that correct permissions are maintained throughout the entire process.
# Immich LXC Setup with External Storage and Backup Strategy
## Overview
Immich was installed using the **Proxmox Community Scripts**, which resulted in a fully functional LXC container without issues.
After the initial setup, the container configuration was adjusted to provide **sufficient storage capacity for photos and videos**, as the default container disk size is not suitable for long-term media storage.
The solution is based on mapping Immich’s upload directory to a **dedicated large storage volume** and handling backups **outside of Proxmox’s standard container backups**.
---
## Storage Layout and Mount Point
### Immich Upload Directory
Immich stores all uploaded media in the following directory inside the container:
```
/opt/immich/upload/
```
To avoid filling up the container’s root filesystem, this directory is mapped to a **separate mount point** backed by a larger disk (e.g. ZFS storage on the Proxmox host).
---
## Mount Point Migration Procedure
### 1. Backup Existing Upload Directory
Before changing anything, log into the Immich LXC and create a backup of the existing upload directory:
```bash
cp -a /opt/immich/upload /opt/immich/upload.backup
```
This ensures the original folder structure and any existing files are preserved.
---
### 2. Create and Map the Mount Point
On the Proxmox host:
- Create a new storage volume (e.g. ZFS dataset or subvolume) with sufficient capacity.
- Map this volume into the LXC at:
```
/opt/immich/upload/
```
This replaces the original directory with the external storage.
---
### 3. Restore Directory Contents
After the mount point is active inside the container:
```bash
cp -a /opt/immich/upload.backup/* /opt/immich/upload/
```
This guarantees that Immich finds the directory structure it expects.
---
### 4. Fix Ownership and Permissions
Immich requires the upload directory to be owned by the `immich` user:
```bash
chown -R immich:immich /opt/immich/upload
```
Failing to do this may lead to upload errors or missing media in the UI.
---
## Backup Considerations (Important)
### ⚠ Proxmox Datacenter Backups
The mapped mount point **is not included** in regular Proxmox container backups.This is expected behavior and **must be handled explicitly**.
---
## Backup Strategy
### Restic + rclone (WebDAV)
Backups are handled independently of Proxmox using the following stack:
- **restic** for versioned, encrypted backups
- **rclone** as the transport layer
- **WebDAV** as the remote storage backend as it is the easiest to be used inside LXCs (I think)
This approach provides:
- Encrypted, deduplicated backups
- Independence from container snapshots
- Fine-grained control over retention and scheduling
- Easy restores without Proxmox involvement
Only the external upload storage needs to be backed up; the container itself can be rebuilt at any time.
---
## Design Rationale
- **Large media data is decoupled from the container**
- **Container rebuilds are trivial**
- **Backups are reliable, explicit, and auditable**
- **Storage growth does not require LXC resizing**
This setup aligns well with long-term photo library management and avoids common pitfalls with container-based media applications.
# Monica CRM – Fix mixed content (HTTP assets on HTTPS)
## Installation context
Monica CRM was installed using the **official Proxmox VE Community Script**.
This means:
* Monica runs inside a **Proxmox LXC container**
* PHP, **Apache2**, and the directory structure follow the **community script defaults**
* Configuration changes (such as `.env`) are made **inside the LXC**
* HTTPS is typically terminated **outside the container** via a reverse proxy (e.g. Nginx Proxy Manager)
Because of this setup, **trusted proxy headers and HTTPS detection are mandatory**, otherwise Monica/Laravel will incorrectly assume HTTP and generate mixed-content URLs.
---
## Problem
When accessing Monica via HTTPS, the browser may show warnings like:
* CSS or images are loaded via `http://`
* Assets are blocked or only partially loaded
* DevTools shows **“mixed content”** warnings
Example:
```
The page at https://monica.example.net requested insecure content from http://monica.example.net/…
```
---
## Cause
Monica (Laravel-based) still thinks it is running on **HTTP**, even though it is accessed via **HTTPS through a reverse proxy**.
Typical reasons:
* `APP_URL` is still set to `http://`
* Reverse proxy headers are not trusted
* Laravel configuration cache was not cleared
---
## Solution (recommended order)
Follow **steps in order** and test. Best done after a fresh new install.
It could be enough to just set the `APP_URL` and the `APP_ENV`. But maybe it doesn't, then you can also try steps 2++.
---
## 1. Set correct `APP_URL`
Edit Monica’s `.env` file:
```bash
APP_URL=https://monica.example.net
```
Important notes:
* Use the **final public URL**
* **No trailing slash**
* Must match the reverse proxy domain
---
## 2. Set `APP_ENV` to `production`
Edit Monica's `.env` file and change from `local` to `production`:
```bash
# Two choices: local|production. Use local if you want to install Monica as a
# development version. Use production otherwise.
APP_ENV=production
```
## 3. Trust reverse proxy headers (very important)
If the above does not work, add this to `.env`:
```bash
TRUSTED_PROXIES=*
```
Why this matters:
* Monica is behind a reverse proxy
* HTTPS is terminated at the proxy
* Apache receives HTTP internally
* Without trusted headers, Laravel assumes HTTP
---
## 4. Clear and rebuild all caches (mandatory)
From the Monica installation directory:
```bash
php artisan optimize:clear
php artisan config:clear
php artisan cache:clear
php artisan route:clear
php artisan view:clear
php artisan config:cache
```
Do **not** skip this step.
Laravel caches URLs aggressively.
---
## 5. Restart services
### LXC / bare metal (Apache2)
```bash
systemctl restart apache2
```
### Docker / Docker Compose
```bash
docker compose restart
```
---
### Nginx Proxy Manager (common setup)
* Enabled by default
* Do **not** override `Host` headers
* Do **not** force HTTP upstream
* Remove custom proxy headers if unsure
Apache does **not** need special configuration for this as long as the headers are passed correctly.
---
## 7. Verify in the browser
* Open the site with HTTPS
* Hard refresh (`Cmd + Shift + R`)
* Open DevTools → Network
* All assets must load via `https://`
Test directly:
```
https://monica.example.net/css/app-ltr.css
```
No redirects to `http://` should occur.
---
## Summary
To fix mixed content issues in Monica behind a reverse proxy (Apache2 setup):
* Set `APP_URL` to HTTPS
* Set `APP_ENV` to `production`
* Trust proxy headers
* Clear **all** Laravel caches
* Restart Apache and or reboot.
Once done, Monica will correctly serve **all assets over HTTPS**.
# Nextcloud
## Hosting Nextcloud Yourself
Hosting a Nextcloud instance on your own can be challenging. You could rely on YunoHost or other pre-configured platforms, but here I describe how I host and maintain my installation manually.
---
## Handling a Server Error Caused by a Missing `clamav-daemon`
I uninstalled **clamav-daemon** and **Elasticsearch**, since I was not using these features and ClamAV had been causing continuous issues (including the well-known false positives when scanning PDFs for credit card numbers — something I do not need at all).
I had already disabled Full-Text Search for several days, but I *had not* disabled the Antivirus app. After removing Elasticsearch and ClamAV, everything seemed fine until I performed an upgrade of my Nextcloud instance.
Suddenly, I was greeted with:
> “An internal server error occurred.”
The Nextcloud log showed that the system was still trying to connect to the missing ClamAV daemon.
To inspect the log, change into your Nextcloud installation directory and run:
```bash
sudo -u www-data php occ log:tail
```
This will stream the most recent log entries. The shortened error message in my case was:
```
Error core RuntimeException: Cannot connect to "/var/run/clamav/clamd.ctl":
No such file or directory (code 2) at apps/files_antivirus/lib/Scanner/ExternalClam.php line 41
```
Because the web interface was no longer accessible, I had two options to restore functionality:
* Reinstall ClamAV, or
* Disable the antivirus app inside Nextcloud.
I chose the latter. Disabling the app via the command line is straightforward:
```bash
# Change into the Nextcloud installation directory
cd /var/www/nextcloud
# List installed apps (enabled and disabled)
sudo -u www-data php occ app:list
# Disable the files_antivirus scanner
sudo -u www-data php occ app:disable files_antivirus
```
After disabling the app, the Nextcloud web interface became accessible again and the system returned to normal operation.
# Practical architecture for combining AdGuard Home and Nginx Proxy Manager
Below is a **clear, actionable, scalable way** to combine **AdGuard Home** with **Nginx Proxy Manager** that mirrors the reasoning and quality of the Pi-hole + NPM setup you already reviewed — but adapted for the architectural and protocol differences that AdGuard Home introduces.([adguard.com][1])
In short:
* **AdGuard Home** becomes your DNS source of truth (and optionally encrypted DNS — DoH/DoT)
* **Nginx Proxy Manager (NPM)** handles HTTP/HTTPS for web interfaces and services
* You separate DNS from web traffic and avoid port conflicts
---
## ✅ Core Principles
### 1) Let AdGuard Home handle DNS, not HTTP
AdGuard Home’s strength is network-wide DNS + filter/parental control features. It natively supports encrypted DNS protocols **DNS-over-HTTPS (DoH)** and **DNS-over-TLS (DoT)** if you enable them.([Virtualization Howto][2])
* DNS services: port 53 (UDP/TCP), DoH, DoT
* **Do not expose AdGuard Home’s admin web UI directly on 80/443**
→ NPM should own ports 80/443 so web traffic is centralized
---
### 2) Run AdGuard Home Admin UI on a different port
By default AdGuard Home binds its web UI on ports like 80/3000/any custom — this can conflict with NPM. Run AdGuard Home’s web interface on a port **other than 80/443** (e.g., 8080, 3000, 8443).([Reddit][3])
Later NPM will proxy that internal port so external access can be via a friendly domain, with clean HTTPS.
---
### 3) Use AdGuard Home’s DNS rewrites for local hostnames
Instead of wildcard DNS (which can cause SSL and service routing ambiguity), explicitly configure local DNS entries inside AdGuard Home:
```
myservice.lab.zn80.net → 192.168.10.105
pihole.lab.zn80.net → 192.168.10.105
```
These rewrites are equivalent to Pi-hole’s A records and tell clients exactly where to send requests without relying on wildcard responses. (AdGuard Home supports rewrites but not exactly the same UI as Pi-hole — you use **DNS Rewrite Rules**.)([Chris Kirby][4])
---
### 4) Let NPM handle HTTP/HTTPS and certificates
All external web access, including admin panels and service frontends, should go through NPM:
**For each service:**
| Public URL | NPM Proxy Host config | Internal Address |
| ------------------------------ | ------------------------------------------------------ | --------------------------- |
| `https://adguard.lab.zn80.net` | Proxy to internal AdGuard Home admin port (e.g., 8080) | e.g., `192.168.10.105:8080` |
| `https://grafana.lab.zn80.net` | Proxy to Grafana | e.g., `192.168.10.110:3000` |
| etc. | … | … |
This achieves:
* Single entry point for all web UIs
* Centralized SSL certificate generation & renewal (Let’s Encrypt)
* Clean internal service structure
---
## 🔧 Step-by-Step Setup
### A) Configure AdGuard Home DNS
1. Install and run AdGuard Home on your homelab host.([adguard.com][1])
2. In AdGuard Home settings:
* Enable normal DNS on 53
* Optionally enable DoH/DoT if you want encrypted resolution
* Set trusted proxies if using a reverse proxy for DoH (advanced)([GitHub][5])
3. Create **DNS rewrites** for your internal services → local hostnames map to NPM IP.
Clients on your network should use AdGuard Home as their DNS server (via DHCP or router config). This ensures they resolve internal domains before going upstream.
---
### B) Change AdGuard Home Admin UI Port
AdGuard Home lets you configure its HTTP admin port — do **not** leave it on 80/443 if NPM is going to manage those. It’s common to use something like:
```
192.168.10.105:8080
```
(NPM will proxy this later.)
---
### C) Configure Nginx Proxy Manager (NPM)
#### C.1 – Proxy Host Rules
For each service/web UI you want externally reachable:
1. Create a **Proxy Host** in NPM
2. Domain: e.g., `adguard.lab.zn80.net`
3. Forward hostname: `192.168.10.105`
4. Forward port: your AdGuard Home admin UI port (e.g., 8080)
5. Enable SSL → request/renew certificate via Let’s Encrypt
Repeat for all other services (Home Assistant, Jellyfin, etc.).
> NPM will listen on ports **80/443** exclusively and terminate HTTPS.
---
### D) Avoid Proxying DNS Port
Do **not** proxy port 53 through NPM — DNS is not an HTTP service and must stay direct.
---
### E) SSL Certificates
* Use Let’s Encrypt through NPM for all publicly reachable subdomains.
* If you want internal-only names (e.g., `.lab.zn80.net`) with valid TLS and Let’s Encrypt fails:
* Either use a DNS challenge
* Or use a local/internal CA trusted by your clients
* Certificates must match the hostname used in the browser to avoid security warnings.
---
## 🧠 Why This Is the Best Setup
#### ✅ DNS features remain powerful and flexible
AdGuard Home can serve DNS, including local rewrites, redirection, and encrypted DNS protocols — all without conflicting with your web reverse proxy.([Virtualization Howto][2])
#### ✅ NPM becomes the single source for secure web access
All internal UIs and apps are accessible through friendly URLs with proper certificates.
#### ✅ Separation of concerns
* DNS: AdGuard Home
* HTTP/HTTPS: NPM
This simplifies maintenance and improves security and debugging.
---
## 🧩 Additional Notes
#### DNS over HTTPS (DoH) / DNS over TLS (DoT)
If you enable these in AdGuard Home and want clients to use them, they are handled independently of NPM. NPM can proxy HTTP-related admin UIs, but encrypted DNS paths are not HTTP in the same sense — you won’t reverse-proxy them unless you deliberately expose DoH endpoints.
#### Trusted reverse proxy headers
If you proxy AdGuard Home through NPM and use features tied to client IPs (e.g., logging real client IPs), consider enabling forwarding headers (`X-Real-IP`, etc.) and configuring trusted proxies.([GitHub][5])
### Local DNS resolution in NPM
Some setups report issues when NPM resolves local DNS from AdGuard Home in certain container environments — make sure containers can reach your DNS server or configure fallback resolvers.([forums.truenas.com][6])
---
## 📌 Final Architecture (Recommended)
```
[Router DHCP] → gives clients DNS of AdGuard Home
[Client]
|
+-- DNS query to AdGuard Home --> resolves local services
|
+-- HTTP(S) request to NPM (80/443) -->
|
+-- Reverse proxy to internal services (AdGuard UI, apps)
```
This pattern keeps DNS resolution stable and web/HTTPS handling secure, centralized, and scalable as your services grow.
---
If you want, I can provide a **concrete example NPM proxy configuration** for AdGuard Home (with headers and SSL settings) along with how to handle DoH/DoT clients on Android or browsers — just let me know your priorities.
[1]: https://adguard.com/en/adguard-home/overview.html?utm_source=chatgpt.com "AdGuard Home | Network-wide software for any OS"
[2]: https://www.virtualizationhowto.com/2023/03/adguard-home-vs-pihole-best-adblocker/?utm_source=chatgpt.com "AdGuard Home vs. PiHole - Best adblocker?"
[3]: https://www.reddit.com/r/Adguard/comments/mnc53k/adguardhome_docker_howtto_change_port_after/?utm_source=chatgpt.com "Adguard-Home Docker : howt-to change port after installation"
[4]: https://chriskirby.net/migrating-from-pi-hole-to-adguard-home-with-some-upgrades-along-the-way/?utm_source=chatgpt.com "Migrating from Pi-hole to AdGuard home, with some upgrades ..."
[5]: https://github.com/AdguardTeam/Adguardhome/wiki/Encryption?utm_source=chatgpt.com "Encryption · AdguardTeam/AdGuardHome Wiki"
[6]: https://forums.truenas.com/t/nginx-proxy-manager-use-local-dns-server/23843?utm_source=chatgpt.com "Nginx Proxy Manager: Use local DNS server"
# Practical architecture for combining Pi-hole and Nginx Proxy Manager
## Overview: Roles of Each Component
**Pi-hole**
* Runs local DNS (port 53)
* Serves as the DNS resolver for your network
* Provides local DNS records so devices resolve service names (e.g., `home.lab`, `jellyfin.lab`)
* Does *not* need to serve HTTP(80) or HTTPS(443)
**Nginx Proxy Manager (NPM)**
* Handles all HTTP/HTTPS traffic for services
* Manages SSL certificates (Let’s Encrypt if you choose)
* Routes incoming application requests to internal services on different ports/IPs
**Key Principle**
> Pi-hole handles *DNS resolution* only.
> NPM handles *web traffic routing and HTTPS termination*.
This clear separation avoids conflicts and makes management scalable.
---
## ✔️ Best Architecture (Most Reliable)
### 1) Move Pi-hole’s Web UI off Port 80/443
By default Pi-hole binds its web UI to port 80/443. This collides with NPM.
**Change Pi-hole Admin UI to a different port** (e.g., `8081`, `8888`):
* On Pi-hole host: change Lighttpd config so `/admin` listens on `8081`
* DNS on Pi-hole still runs on port 53 and is unaffected by this change
This allows NPM to own 80/443 exclusively. ([bolet.io][1])
---
### 2) Local DNS Records in Pi-hole for All Reverse-Proxied Hosts
Create `A` records that point friendly domains to NPM’s IP.
Example:
```
pihole.lab.zn80.net → 192.168.10.105
jellyfin.lab.zn80.net → 192.168.10.105
bookstack.lab.zn80.net → 192.168.10.105
```
Reasoning:
* Devices query Pi-hole DNS and get your internal names
* NPM then routes based on Host header
Pi-hole is the DNS source of truth for your LAN. ([ReproDev][2])
---
### 3) Configure NPM Proxy Hosts for Each Service
Inside NPM **Proxy Hosts**:
| Domain/Hostname | Forward To | Port | Notes |
| ------------------------ | -------------- | ---- | ---------------- |
| `pihole.lab.zn80.net` | 192.168.10.105 | 8081 | Pi-hole admin UI |
| `jellyfin.lab.zn80.net` | 192.168.10.xxx | 8096 | Jellyfin service |
| `bookstack.lab.zn80.net` | … | … | Other services |
**Important details**
* For Pi-hole you may need to forward `/admin` correct paths
* Enable SSL for all hosts (ideally) via Let’s Encrypt (even internal DNS)
*If Let’s Encrypt can’t validate via DNS challenge for internal domains, you can use a local CA or self-signed cert and manage trust in your clients.* ([Reddit][3])
This makes everything *clean to access via Hostnames exclusively*:
```
https://jellyfin.lab.zn80.net
https://pihole.lab.zn80.net/admin
```
---
### 4) Maintain Internal DNS Instead of Wildcard DNS (Optional but safer)
You could be tempted to use a wildcard (`*.lab.zn80.net → 192.168.10.105`), but that is **less safe and confusing** for certificate validation and service discovery.
Better pattern:
* Pi-hole local DNS → explicit A records per hostname
* Pi-hole → NPM IP
* NPM → internal service
Explicit records help:
* TTL management
* SSL certificate issuance
* Troubleshooting
---
## 🧠 Why This Is the Best Way
#### ✅ DNS + Reverse Proxy are cleanly separated
Pi-hole isn’t serving HTTP, so there’s no port conflict.
NPM can handle 80/443 without interference.
#### ✅ You achieve real HTTPS for internal domains
Every service can have a valid certificate via NPM.
#### ✅ Easy, scalable, and future-proof
Adding a new service is trivial:
1. Add A record in Pi-hole
2. Add Proxy Host in NPM
3. Done
#### ✅ Works with VPN / local DNS clients
If your devices use Pi-hole’s DNS (wired/wireless/VPN), they resolve domain names that NPM can proxy. ([Pi-hole Userspace][4])
---
## 🛠 Detailed Implementation
#### A) Change Pi-hole web interface port
Edit `/etc/lighttpd/lighttpd.conf`:
```
server.port = 8081
```
Restart:
```
sudo systemctl restart lighttpd
```
---
#### B) Add DNS entries in Pi-hole
In Pi-hole:
```
Local DNS → DNS Records
```
Examples:
```
pihole.lab.zn80.net → 192.168.10.105
jellyfin.lab.zn80.net → 192.168.10.105
```
---
#### C) In NPM, add Proxy Hosts
For each service:
* Domain names: your local domain
* Forward hostname: actual service IP/port (Pi-hole admin UI at 8081)
* SSL:
* Request new cert (if public domain or DNS challenge available)
* Or use local CA / self-signed trusted cert
Set common options:
* Block exploits: enabled
* Expires headers: optional
* Websockets: if needed
---
## 🚫 What *Not* to Do
#### ❌ Don’t proxy Pi-hole DNS-port
Do not try to proxy port 53 through NPM. DNS must be direct.
#### ❌ Don’t expose Pi-hole admin UI publicly
Pi-hole should only be accessible from your LAN or VPN.
#### ❌ Don’t use wildcards unless you know certificate chain
Wildcard DNS can break HTTPS if certificates aren’t matching.
---
## 📌 Final Result You Should See
After setup:
```
nslookup pihole.lab.zn80.net # → 192.168.10.105
nslookup jellyfin.lab.zn80.net # → 192.168.10.105
Browser:
https://pihole.lab.zn80.net/admin # SSL
https://jellyfin.lab.zn80.net # SSL
```
Pi-hole DNS works, NPM handles web access, and everything is secure, consistent, and manageable.
[1]: https://bolet.io/blog/pi-hole-nginx-setup?utm_source=chatgpt.com "How I Supercharged My Pi-hole Setup with Nginx Proxy ..."
[2]: https://reprodev.com/custom-local-hostnames-with-nginx-proxy-manager-and-pi-hole/?utm_source=chatgpt.com "Forward Custom Hostnames with Nginx Proxy Manager and ..."
[3]: https://www.reddit.com/r/homelab/comments/1c8vwhb/pihole_nginx_proxy_manager_and_homearpa/?utm_source=chatgpt.com "pihole, nginx proxy manager, and *.home.arpa? : r/homelab"
[4]: https://discourse.pi-hole.net/t/setting-up-a-reverse-proxy-with-pi-hole/77100?utm_source=chatgpt.com "Setting up a reverse proxy with pi-hole - Community Help"
# rclone Backup: Local Server → NAS (WebDAV)
The following example performs a simple backup from a local machine (`192.168.10.5`) to a NAS at `192.168.10.10` using a WebDAV share named `backup`.
### rclone Configuration
Run:
```bash
rclone config
```
Create a new remote:
* Name: `nasbackup`
* Storage: `webdav`
* URL: `http://192.168.10.10/backup`
* Vendor: `other`
* User: ``
* Pass: ``
Reference configuration block:
```bash
[nasbackup]
type = webdav
url = http://192.168.10.10/backup
vendor = other
user =
pass =
```
### Backup Command
```bash
rclone sync /opt/nginx-proxy-manager/data nasbackup:/npm-data --progress --transfers=4 --checkers=4
```
Certificates:
```bash
rclone sync /opt/nginx-proxy-manager/letsencrypt nasbackup:/npm-letsencrypt --progress
```
### Explanation of Parameters
`sync`
Makes the destination identical to the source. It copies new and changed files and removes files in the destination that no longer exist in the source. This ensures a true mirror, but it can delete data if the target is incorrect.
`--progress`
Displays live transfer information such as current file, speed and ETA. It does not influence the transfer itself.
`--transfers=4`
Defines how many files are uploaded simultaneously. Higher values can speed up transfers on a fast network but may overload the NAS. Four is a sensible local default.
`--checkers=4`
Specifies how many files rclone checks in parallel to detect changes. More checkers accelerate scanning large directories.
`--quiet`
Suppresses most output. Useful in cron jobs to avoid unnecessary logs.
### Simple Cron Job
```bash
0 3 * * * rclone sync /opt/nginx-proxy-manager/data nasbackup:/npm-data --quiet
```
This performs a daily backup at 03:00.
If you want, I can extend this with optional safety flags, versioned backups or encryption.
# Restic: High-Availability Backup Strategy for Immich and Syncthing
# High-Availability Backup Strategy for Immich and Syncthing
*(Simplified & Practical Edition – Generic Template)*
## Overview
This is a clean, generic template of a proven, simple backup strategy using a dedicated Vault LXC and Restic with REST server.
Separate repositories for different services, easy user looping, and direct pruning — minimal complexity, maximum reliability.
## Infrastructure (Example Layout)
| Host / Service | Example IP | Role | Example CTID |
|----------------------|--------------------|-------------------------------------------|--------------|
| **Proxmox VE Host** | 192.168.50.10 | Hypervisor, ZFS storage | - |
| **Immich LXC** | 192.168.50.142 | Production Immich application | 142 |
| **Syncthing LXC** | 192.168.50.135 | Multi-user Syncthing instance | 135 |
| **Vault/Restic LXC** | 192.168.50.220 | Backup controller | 220 |
| **NAS** | 192.168.50.80 | Restic REST server (listening on 10.20.20.80) | - |
## Read-Only Mount Points in Vault LXC
| Example ZFS Dataset on Host | Mount Point in Vault LXC | Purpose |
|------------------------------------|----------------------------------|-----------------------------|
| `/tank/subvol-142-disk-1` | `/source/immich` | Immich library/uploads |
| `/tank/subvol-135-disk-2` | `/source/syncthing-alice` | Syncthing user Alice |
| `/tank/subvol-135-disk-3` | `/source/syncthing-bob` | Syncthing user Bob |
| `/tank/subvol-135-disk-4` | `/source/syncthing-charlie` | Syncthing user Charlie |
Configured on Proxmox host with read-only mounts (`ro=1`).
## Restic REST Server on NAS (10.20.20.80:8000)
Two separate repositories:
- `/photos` → authenticated with user `photos-backup`
- `/sync-main` → authenticated with user `sync-backup`
`--append-only` is **not** used, allowing the backup client to handle pruning directly.
## Generic Backup Script Template
Place this in the Vault LXC as `/root/backup-mountpoints.sh`:
```bash
#!/bin/bash
# Simple backup script template for Immich + multi-user Syncthing
# --- CONFIGURATION: IMMICH ---
IMMICH_REPO="rest:http://photos-backup:StrongPhotoPass2025@10.20.20.80:8000/photos"
IMMICH_PASS="StrongPhotoPass2025"
# --- CONFIGURATION: SYNCTHING ---
SYNC_REPO="rest:http://sync-backup:StrongSyncPass2025@10.20.20.80:8000/sync-main"
SYNC_PASS="StrongSyncPass2025"
echo "--- Backup Started: $(date) ---"
# ==========================================
# 1. IMMICH BACKUP
# ==========================================
echo "Backing up Immich..."
RESTIC_PASSWORD=$IMMICH_PASS restic -r $IMMICH_REPO backup /source/immich \
--host immich-server --tag "auto" --verbose
# Prune Immich repo
RESTIC_PASSWORD=$IMMICH_PASS restic -r $IMMICH_REPO forget \
--keep-last 3 --keep-daily 7 --keep-weekly 4 --prune
# ==========================================
# 2. SYNCTHING BACKUP
# ==========================================
echo "Backing up Syncthing Users..."
USERS=("alice" "bob" "charlie")
for USER in "${USERS[@]}"; do
echo "Processing $USER..."
RESTIC_PASSWORD=$SYNC_PASS restic -r $SYNC_REPO backup "/source/syncthing-$USER" \
--host syncthing-server --tag "user:$USER" --verbose
done
# Prune Syncthing repo (once for all users)
RESTIC_PASSWORD=$SYNC_PASS restic -r $SYNC_REPO forget \
--keep-last 3 --keep-daily 7 --keep-weekly 4 --prune
echo "--- Backup Finished: $(date) ---"
```
**Security hardening:**
```bash
chmod 700 /root/backup-mountpoints.sh
chown root:root /root/backup-mountpoints.sh
```
## Automation & Scheduling
**Crontab** in Vault LXC (`crontab -e`):
```cron
0 3 * * * /root/backup-all.sh
```
**Log rotation** (`/etc/logrotate.d/restic`):
```text
/var/log/restic-backup.log {
daily
rotate 14
compress
missingok
notifempty
}
```
## Security Model
- Isolation: Production containers (Immich & Syncthing) have no network access to the NAS backup storage.
- Read-Only Access: Vault LXC cannot modify or delete live data.
- Immutability: --append-only on REST server prevents deletion of snapshots even if Vault is compromised.
- Encryption & Integrity: Restic encrypts all data and performs cryptographic checks.
## Recovery Examples
```bash
# List Immich snapshots
RESTIC_PASSWORD=StrongPhotoPass2025 restic -r rest:http://photos-backup:...@10.20.20.80:8000/photos snapshots
# Restore latest Immich
RESTIC_PASSWORD=StrongPhotoPass2025 restic -r ... restore latest --target /tmp/restore-immich
# List only Bob's snapshots
RESTIC_PASSWORD=StrongSyncPass2025 restic -r ... snapshots --tag user:bob
# Restore Bob's data
RESTIC_PASSWORD=StrongSyncPass2025 restic -r ... restore latest --tag user:bob --target /tmp/restore-bob
```
This template preserves the simplicity and effectiveness of your working setup while keeping all identifiers generic and secure. Copy, adapt, and deploy confidently!
# Restic: Multi-User Syncthing Backup Strategy
# Overview
This document covers the backup of multi-user Syncthing data from the **Syncthing-LXC** (ID: `130`) via the **Vault-LXC**(ID: `150`). We utilize a single unified Restic repository on the NAS to maximize deduplication across common files shared between users.
## Storage Configuration
Individual ZFS subvolumes for each user are passed to the Vault-LXC as **Read-Only** mount points.
User
Host Source (ZFS)
Vault-LXC Mount Point
**UserA**
`tank/subvol-130-disk-2`
`/source/sync-usera`
**UserB**
`tank/subvol-130-disk-3`
`/source/sync-userb`
**UserC**
`tank/subvol-130-disk-4`
`/source/sync-userc`
```bash
# Executed on Proxmox Host to map disks
pct set 150 -mp132 /tank/subvol-130-disk-2,mp=/source/sync-usera,ro=1
pct set 150 -mp133 /tank/subvol-130-disk-3,mp=/source/sync-userb,ro=1
pct set 150 -mp134 /tank/subvol-130-disk-4,mp=/source/sync-userc,ro=1
```
---
## The Unified Backup Script
Using tags allows us to store all users in one repository (`/syncthing`) while being able to filter snapshots by user during recovery.
**`/root/scripts/backup-syncthing.sh` (Vault-LXC):**
```bash
#!/bin/bash
# Auth & Network (Direct 2.5GbE Pipe)
export RESTIC_REPOSITORY="rest:http://vault-user:Pass123@10.1.1.2:8000/syncthing"
export RESTIC_PASSWORD="Sync_Encryption_Key_44"
# Define users and their source directories
declare -A users=(
["usera"]="/source/sync-usera"
["userb"]="/source/sync-userb"
["userc"]="/source/sync-userc"
)
# 1. Individual User Backups (Enables granular recovery)
echo "Starting Syncthing Backups..."
# Loop through users and perform backups
for user in "${!users[@]}"; do
source_dir="${users[$user]}"
restic backup "$source_dir" --tag "user:$user" --host "syncthing-srv"
done
# 2. Global Prune (Keep last 7 days for all users)
# Run locally on NAS if server is in --append-only mode
restic forget --keep-within 7d --prune
```
---
## Administration & Recovery
### How to list files for a specific user:
To see only Sarah's backups without cluttering the list with other users:
```bash
restic snapshots --tag "user:sarah"
```
### How to restore a single user's data:
If Werner accidentally deletes a folder, you can restore his latest snapshot specifically:
```bash
restic restore latest --tag "user:werner" --target /tmp/restore-werner
```
## Maintenance Notes
- **Deduplication Advantage:** If Carsten and Sarah both download the same 2GB ISO, Restic only stores the blocks **once** in the NAS repository, saving significant space.
- **Integrity Checks:** Run `restic check` once a month from the Vault-LXC to ensure the NAS data remains uncorrupted.
---
[Restic Guide: Backing Up Multiple PCs](https://www.youtube.com/watch?v=gnqmLUbT7gw)
This video explains how to manage a single repository for multiple sources using tags and hostnames, which is exactly how you are organizing your individual Syncthing users.
# Syncthing + FileBrowser Quantum
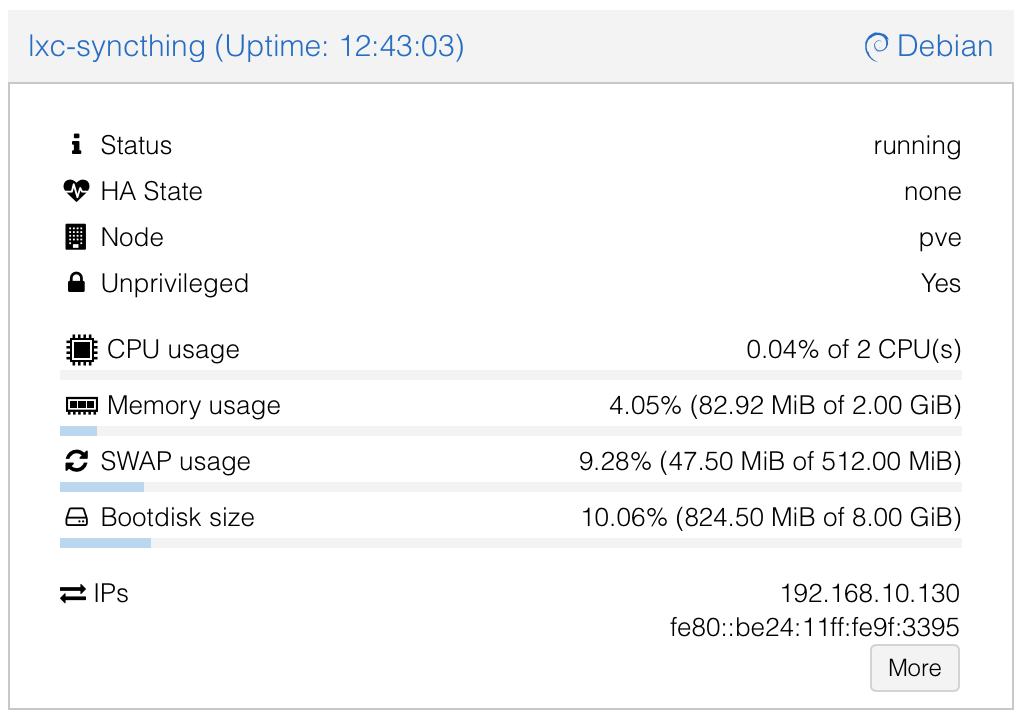
The easiest and most reliable way is to use the **Proxmox VE Community Helper-Script**, which automates everything (including installing Syncthing from the Debian repo). It creates an LXC with reasonable defaults (~2GB RAM max, 2 cores—fine for large transfers, low usage normally).
### Option 1: Recommended – Use the Community Script (Quick & Easy)
Run this single command in the Proxmox shell (node console):
```bash
bash -c "$(curl -fsSL https://raw.githubusercontent.com/community-scripts/ProxmoxVE/main/ct/syncthing.sh)"
```
- It sets up a privileged LXC by default (simpler permissions for mounted storage).
- Syncthing installs and runs initially as root (common with scripts), but we'll switch it to a dedicated user below.
- After creation, access the Syncthing web UI at `http://:8384` (set GUI auth on first access).
### Option 2: Manual Setup
[](https://wiki.zn80.net/uploads/images/gallery/2025-12/image.png)
If you prefer full control:
1. In Proxmox UI: Create a new **unprivileged** LXC (Debian/Bookworm template recommended).
- CPU: 2 cores
- RAM: 2048 MB (or adjust)
- Storage: 8-20 GB root disk
- Network: Static IP or DHCP
2. Start the LXC, open console, and install Syncthing:
```bash
apt update && apt upgrade -y
apt install syncthing -y
```
### Post-Setup: Run Syncthing as a Dedicated Non-Root User (Security Best Practice)
The community script (or manual install) often starts Syncthing as root initially. Switch it to a proper user to avoid warnings and reduce risk.
1. Stop and disable the root service:
```bash
systemctl stop syncthing@root
systemctl disable syncthing@root
systemctl list-unit-files | grep syncthing # Verify it's disabled
```
2. Create a dedicated system user:
```bash
adduser --system --group --home /var/lib/syncthing --shell /usr/sbin/nologin syncthing
```
3. Migrate existing config (if any from root run):
```bash
mkdir -p /var/lib/syncthing/.config
cp -a /root/.config/syncthing/* /var/lib/syncthing/.config/ 2>/dev/null || true
chown -R syncthing:syncthing /var/lib/syncthing
```
4. Create and secure your data directory (e.g., for your shares):
```bash
mkdir /data
chown -R syncthing:syncthing /data
chmod -R 750 /data
```
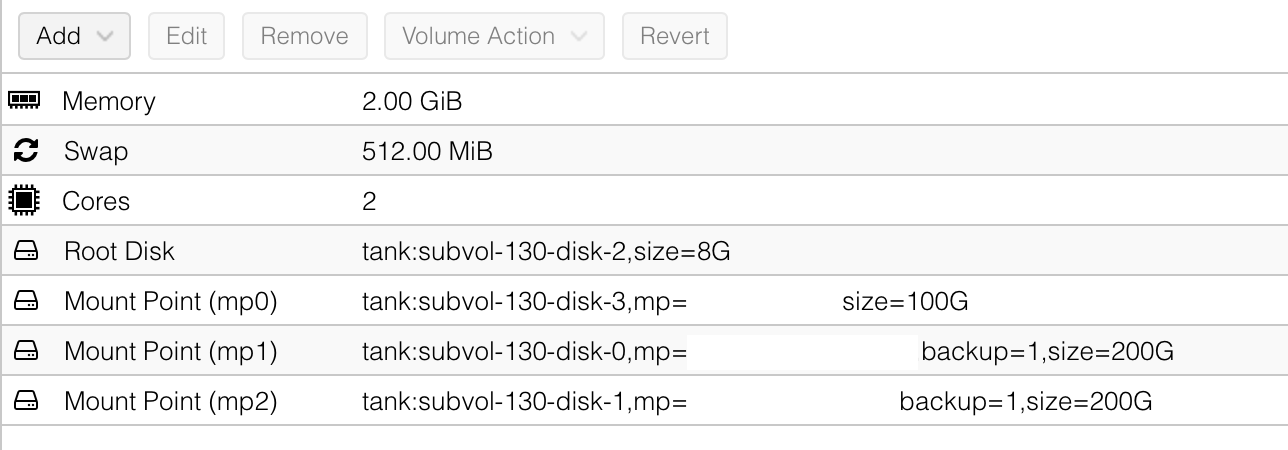
- Later, mount your Proxmox storage here (e.g., bind-mount `/data/usera`, `/data/userb`, `/data/shared` from host via Proxmox UI > LXC > Resources > Add MP).
5. Enable and start as the new user:
```bash
systemctl enable syncthing@syncthing
systemctl start syncthing@syncthing
systemctl status syncthing@syncthing # Check it's running
```
### Integrating with Your FileBrowser Shares
### [](https://wiki.zn80.net/uploads/images/gallery/2025-12/o3himage.png)
- In Proxmox: Add bind mounts for your host directories to the LXC (e.g., mount host `/path/to/data/usera` → LXC `/data/usera`). See above image.
- In Syncthing UI: Add folders pointing to `/data/usera`, `/data/userb`, `/data/shared`.
- Set "Send Only" for private user folders if laptops should receive but not push changes back.
- Full bi-directional for `/data/shared`.
###
### Config File for FileBrowser Quantum
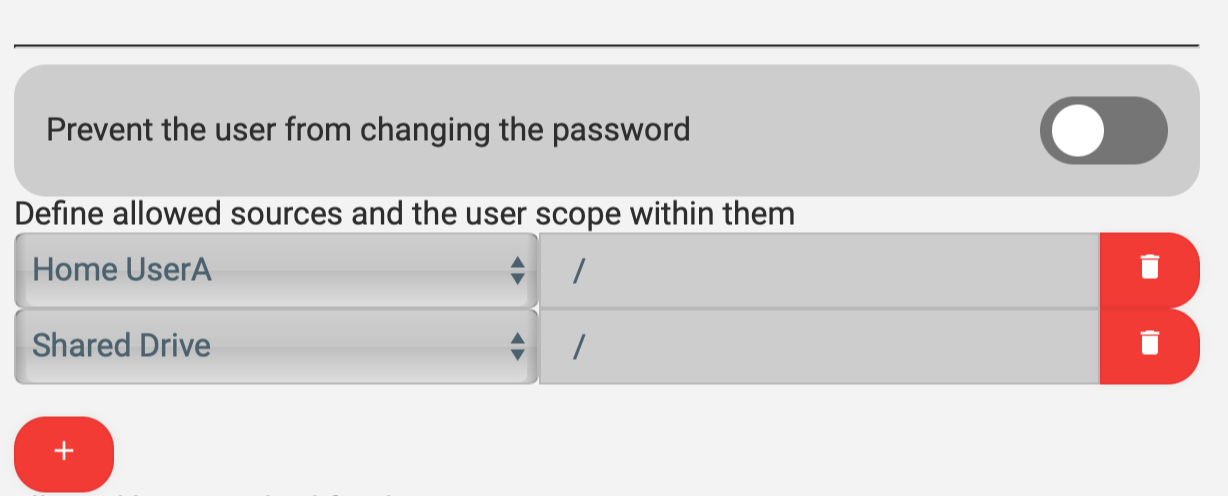
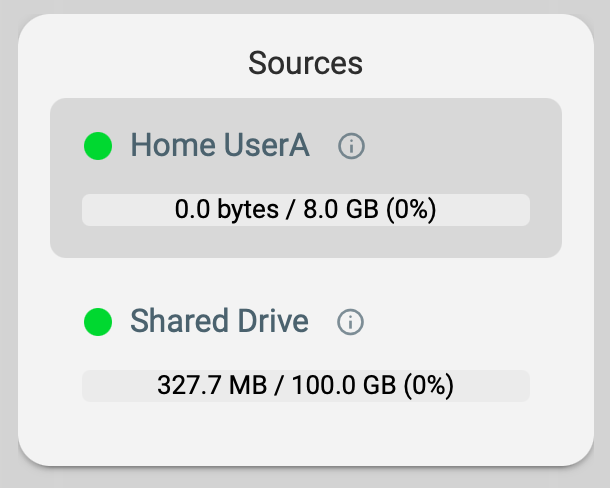
The only way to have FileBrowser Quantum show correct used and remaining size of a mount point is to map each mount point as a separate source in the config file. This is how mine looks right now which maps each mount point as a source and the users will be granted access to he shared source and their users source only. This way we keep things separate from each other but have one central share for all the users of the system.
```yaml
# FileBrowserQuantum Config File /syncthing-data/fbq-config.yaml
server:
port: 8080
externalUrl: "https://files.example.com"
database: /syncthing-data/database.db
sources:
- path: /syncthing-data/home/usera
name: Home UserA
config:
defaultEnabled: false
- path: /syncthing-data/home/userb
name: Home UserB
config:
defaultEnabled: false
- path: /syncthing-data/shared
name: Shared Drive
config:
defaultEnabled: true
logging:
- levels: info|warning|error
apiLevels: info|warning|error
output: stdout
noColors: false
utc: false
frontend:
name: FileBrowser Quantum
auth:
adminUsername: admin
userDefaults:
permissions:
api: false
admin: false
modify: false
share: false
realtime: false
delete: false
create: false
download: false
```
By setting it up this way, you can then assign the sources in Filebrowser Quantum to the user
[](https://wiki.zn80.net/uploads/images/gallery/2025-12/Lzfimage.png)
They will then appear on the Home Screen on the left side with their correct usage values.
[ ](https://wiki.zn80.net/uploads/images/gallery/2025-12/OO9image.png)
### Hub-First Setup Reminder
- Configure folders and generate device IDs on the Proxmox hub first.
- Then install Syncthing on your laptop(s), add the hub's device ID, and connect (hub as introducer for easy hub-and-spoke).