Setting up the Proxmox Nodes
On the first page of this chapter, we defined our requirements and made some key decisions. Now, let’s set up the Proxmox nodes in VirtualBox and install Proxmox VE on them.

To ensure cluster stability and prevent traffic saturation, your test environment requires a minimum of three separate network interfaces:
- Management Interface: For host access and configuration.
- Cluster Communication (Heartbeat): Isolated traffic for node health and HA voting.
- VM Migration & Storage Replication: High-bandwidth link for data synchronization.
Note: While dedicating a network segment for NAS storage is a best practice in production, it is excluded from the scope of this virtualized test exercise.
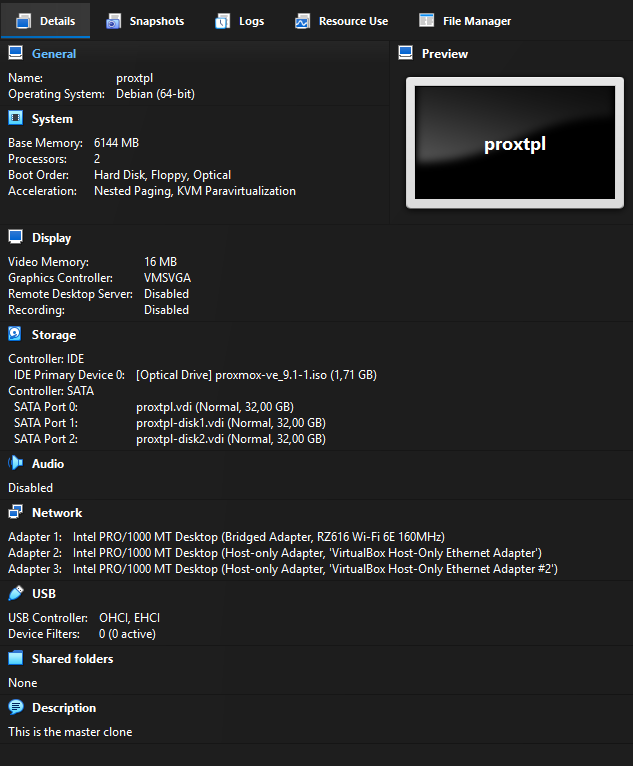
Creating the Master Virtual Machine (Hardware Mode)
To avoid missing critical settings or having to restart the process, it is recommended to build a single VirtualBox Virtual Machine (VBVM) to act as a template. You can name this master image proxtpl so that it remains at the bottom of your VM list. Ensure that you never actually start the master image; it must remain powered off.
- Name:
proxtpl - Type: Linux, Debian (64-bit)
- RAM: 2 GB minimum (4 GB or 6 GB is recommended if your host hardware allows).
- Storage (SATA0): Create a 32 GB boot drive for the Proxmox installation.
- Storage (SATA1 & SATA2): Create two 32 GB dynamically allocated disks; these will be used for the ZFS storage pool. You may use 64 GB if you have sufficient space.
- Boot Order: Adjust the order to set Hard Disk first and Optical second.
- Optical Drive: Mount the Proxmox ISO.
- Network Adapters: Attach 3 adapters:
- nic0: BRIDGED (Management interface)
- nic1: HOST-ONLY (Cluster interface / Core sync) — Disable DHCP
- nic2: HOST-ONLY (Replication / Migration interface) — Disable DHCP
Once configured, your setup should look like this:
Once the master is configured, create three clones and name them prox01, prox02, and prox03.
Installing Proxmox VE (Software Mode)
With your three clones created, start them up to begin the installation.
- Ignore KVM Virtualization errors: You will likely see an error stating that KVM Virtualization is not detected. This is expected, as VirtualBox may not pass VT-x/AMD-V instructions through to the guest. This is not an issue for this lab, as the test cluster will run Linux Containers (LXC) instead of full VMs.
- Verify hostnames: Ensure you correctly name each node (e.g.,
prox01.local,prox02.local,prox03.local) during setup. Renaming a node after a cluster is established is a complex and difficult procedure. - Select the 32GB boot drive for the installation target.
- Configure sequential IP addresses: Base these on the hostnames to simplify management (e.g.,
prox01– 192.168.10.201,prox02– 192.168.10.202,prox03– 192.168.10.203). - Network Settings: Set the Netmask to
255.255.255.0or use CIDR notation (e.g.,192.168.10.201/24). - Gateway: Set this to your network's gateway, most likely
192.168.10.1. - DNS Server: Set this to your local DNS configuration, also likely
192.168.10.1. - Finalize: After installation, shut down the hosts and reboot them in headless mode. This is where the boot order change from earlier comes in handy.

Unfold to see predefined IP Configuration
Remember the IP Configuration from the Overview-Page:
{{@387#bkmrk-node-1%3A-nic0-192.168}}
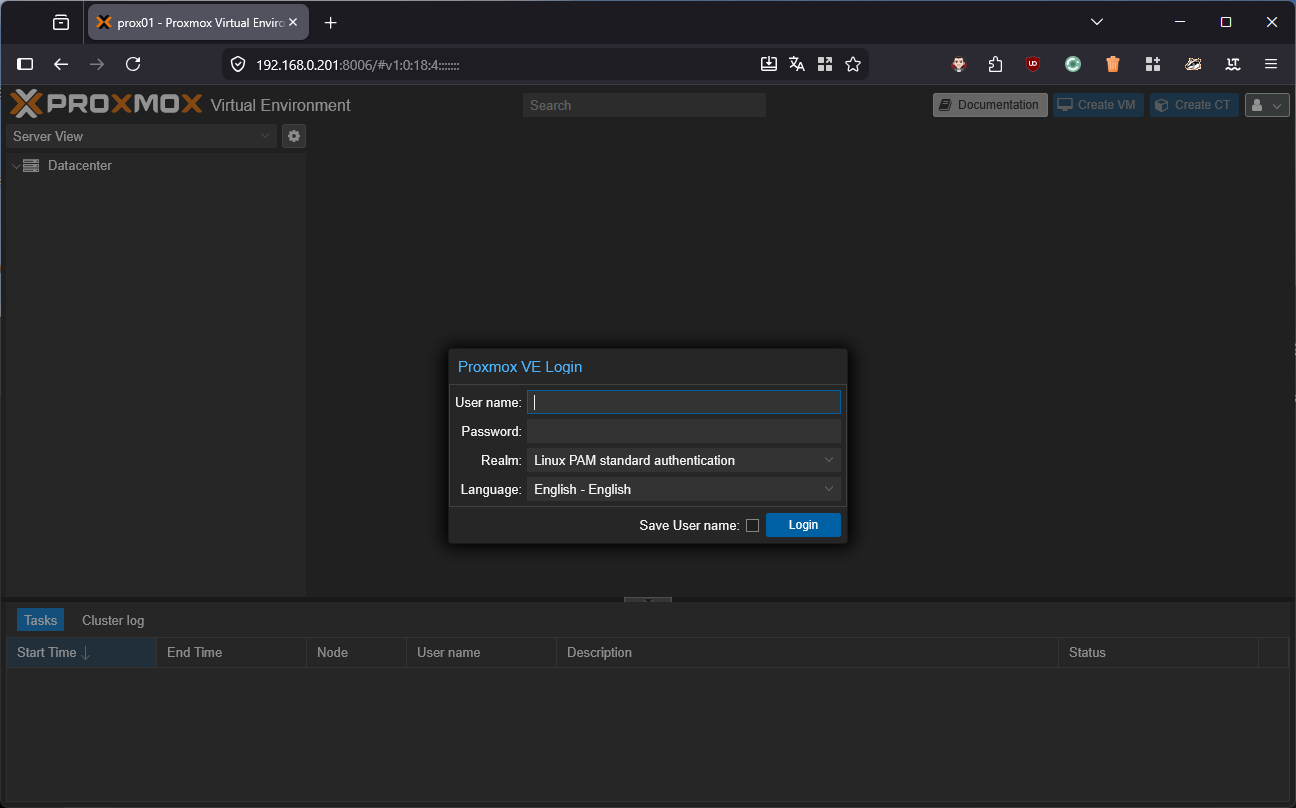
After the reboot, access the web interface on port 8006 (HTTPS). You will likely be prompted to accept a self-signed certificate. Once you accept the security risk, you should see the Proxmox dashboard.
Post-Installation & Air-Gapped Configuration
Once your Proxmox nodes have successfully booted, there are several essential post-installation tasks to complete, such as managing repositories and removing subscription warnings. The most efficient way to handle this is by using the Proxmox VE Community Post-Install Script. This interactive script automates the removal of the "No Valid Subscription" nag-screen, configures the correct non-subscription repositories, and optimizes system settings.
bash -c "$(curl -fsSL https://raw.githubusercontent.com/community-scripts/ProxmoxVE/main/tools/pve/post-pve-install.sh)"For the different
InFor an air-gapped (offline) environment, the standard script cannot reach external Proxmox servers. To resolve this, you can host a local version of the script within your network.
1. Host the Script Locally
Download the script to a machine that has network access to your Proxmox nodes. Navigate to the folder containing the script and start a temporary web server using Python:
# Start a local web server on port 8000
python3 -m http.server 8000
2. Execute on the Proxmox Node
Log into your Proxmox node's console and run the following command to pull and execute the script from your local server.
Note: Replace
192.168.0.20with the actual IP address of the machine running the Python server.
bash -c "$(curl -L http://192.168.0.10:8000/post-pve-install.sh)"This method allows you to maintain a consistent configuration across all nodes in your cluster without requiring direct internet access for each individual machine.
About the Network Interface Design
A successful Proxmox cluster requires careful network segregation to prevent traffic saturation. At a minimum, you will need three separate network interfaces for your VirtualBox test cluster:
- Management Interface: This connects to your internal network and serves as the primary way to access and manage the Proxmox hosts.
- Cluster Communication Heartbeat: This interface acts as the lifeline for the Proxmox hosts to communicate. It must be placed on its own isolated network segment (or physically isolated switch) because constant cluster "chatter" and High Availability (HA) voting can easily overwhelm a shared network link.
- VM Migration & Storage Replication: A dedicated interface is needed for migrating machines and handling Storage Replication, which copies data across nodes every 15 minutes. Combining this heavy file synchronization traffic with standard cluster communication can quickly saturate a single network connection, potentially leading to false-positive node failures.